


[Part 1] Capturing a subject standing against the sun with daytime sync
Daytime sync is a technique of firing the flash under the sun with the sunlight as the main source, and the flash as an assist light. Use it when you want to avoid the subject from appearing dark in a backlit scene, or when you want to reproduce the color of the subject in a vivid tone by illuminating light on a cloudy day. In [Part 1], I will explain the basic steps for and effects of shooting using daytime sync. (Reported by: Koji Ueda)

Brighten the subject even when the sun is in the background
In a shot with the sun included in the background, stopping down the lens aperture allows you to capture the shape of the sun in the image. This example was taken in the Aperture-priority AE mode at an aperture setting of f/22. Here, I selected E-TTL as the flash mode for the camera to determine the amount of light to emit automatically. For a composition with a huge light source such as the sun at the back of the subject, it goes without saying that the front view of the subject would be shadowed, thus turning out dark. To resolve this issue, I fired the flash from the front to brighten the subject, while capturing the silhouette of the sun at the same time.

EOS 60D/ EF-S10-22mm f/3.5-4.5 USM/ Aperture-priority AE (f/22, 1/125 sec.)/ ISO 100/ Exposure compensation: -1EV/ WB: Daylight/ Flash: SPEEDLITE 580EX II (E-TTL)
Tips
- Stop down the aperture to capture the color of the sky and the shape of the sun
- Fire flash from the front to bright the subject
Shooting Condition

Position of the subject, camera and Speedlite

A: Approx. 1.5m
On this cloudless, sunny day, I picked a composition with the sun appearing in the background of the subject. However, doing so causes the front view of the subject to be shadowed and appear pitch-dark in the resulting photo. To overcome this problem, I adjusted the angle of the emitter, and fired the flash on the upper body of the subject to brighten her. Also, I tweaked the brightness of the background by compensating the exposure to -1EV.
Steps for Daytime Sync
1: Determine the brightness of the background
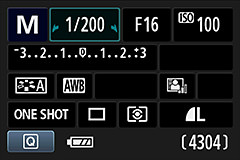
Determine the exposure according to the brightness of the background. Using the manual exposure mode allows you to set the exposure as desired.
2: Adjust the flash

Adjust the angle of the flash emitter so that light is illuminated from the front of the subject.
3: Take a test shot

Take a test shot while firing the flash. Check the balance in brightness between the background and the subject.
4: Perform flash exposure compensation

Adjust the flash output accordingly. Adjust the camera exposure again upon checking the test shot image.

Born in Hiroshima in 1982, Ueda started his career as an assistant for photographer Shinichi Hanawa. He later became a freelance photographer, and is now engaged in a wide range of work from magazines to commercials while shooting different cities and landscapes all around the world. He is also a writer and a lecturer at photography lectures and workshops.

