


New Camera? Here are 9 Useful Settings to Change Before You Shoot
Have you ever happily snapped away on your new camera only to realise you forgot to set it to record RAW files? Did you know you can adjust exposure quickly and directly with your RF/RF-S lens control ring? How about functions that will help you focus even more accurately? Here’s a list of settings that you will want to change or customise before you take your new camera on its first shoot.

1. Set the camera to record in RAW
Where: Red menu → “Image quality”

Out of camera JPEG

Edited RAW file

RAW files contain more data, making it easier to recover details from high-contrast scenes where you must choose between underexposing one element and overexposing another.
This might seem like a given to experienced photographers, but it’s easy to overlook when you’re switching cameras!
If this is your very first camera and you don’t usually post-process your files, it's okay to keep to recording in JPEG. Just know that shooting in RAW captures more data and gives you more flexibility over your final image, though you will need to post-process the file to make the most of it.
Recording options
You can choose to record only RAW, only JPEG/HEIF, or RAW + JPEG/HEIF. Even then, you have several options for recording quality, which you can choose according to your needs.
RAW or CRAW?
Your Canon camera has two RAW recording options:
- Uncompressed RAW
- CRAW (compressed RAW)
CRAW files are about 40% smaller than uncompressed RAW, but other than that, there is no visible difference. They both have the same .cr3 extension. Choose CRAW to fit more shots on your memory card.
JPEG/HEIF
Instead of recording JPEG/HEIF files in the highest resolution, you can choose a smaller resolution to save card space. For example, in the screenshot, the first “S1” option saves 2976 x 1984-pixel JPEG files as shown in the grey bar on top.
Know this: The difference between HEIF and JPEG
HEIF files hold more data than JPEG files (10-bit data versus 8-bit data) without much of a difference to the file size. They are great at capturing highlight details even in files straight out of the camera, but you might need special codecs to open them on your computer.
Also see:
HDR PQ HEIF: Breaking Through the Limits of JPEG
Will Photos Taken in RAW Retain Their Image Quality When Retouched?
2. Change the AF operation mode
Where: Pink menu → “AF operation”

- One Shot: At shutter button half-press, the camera calculates and focuses on the subject only once.
- Servo: At shutter button half-press, the camera constantly recalculates and adjusts focus.
- AI Focus: The camera uses intelligent scene detection to switch between One Shot and Servo.
The default “One Shot” setting is perfect for static subjects, but it also means that if the subject moves, the focus won’t change along with it. Switch to “Servo” mode to keep the focus on moving subjects such as the bike below. Or use “AI Focus” to let the camera decide which one to use based on scene detection.

Focus needs to be constantly recalibrated to keep up with moving subjects like this bike: a job for Servo AF mode.
Learn more about Servo AF in:
Camera FAQ: What is Servo AF?
3. Set up the control ring
Where: Orange menu → “Customize control ring”

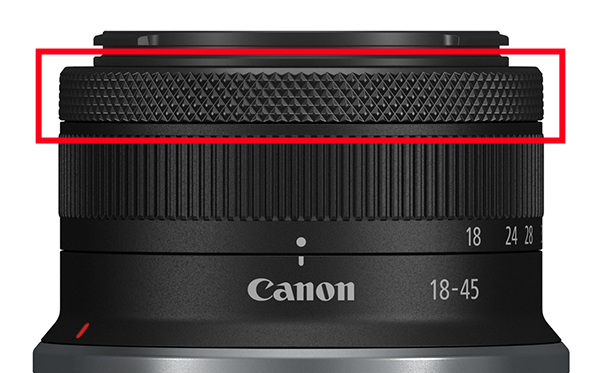
The control ring is the knurled ring on your RF/ RF-S lens. It works like an extra dial for adjusting assigned settings.
It’s something unique to RF/RF-S lenses: EF lenses don’t have this!
You can choose what you want the control ring to control in the “Customize control ring” menu. Many photographers use it as a quick way to change their most frequently accessed exposure setting.
Troubleshoot: I customised my control ring but can’t get it to work
Check: Does your lens have a combined focus/control ring?
If your lens has a combined focus/control ring, the ring function might be set to “Focus”. If there is a physical switch, make sure it’s set to “Control”. If there’s no physical switch, follow the following steps:
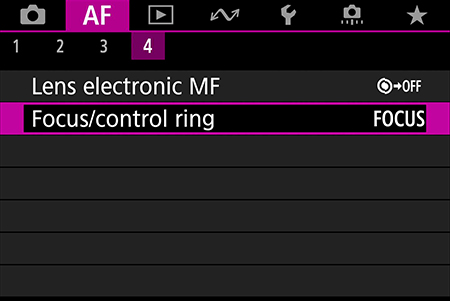
4. Pink menu → “Focus/control ring”.
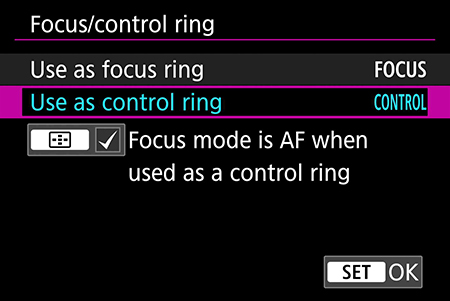
5. Select “Use as control ring”.
Remember to switch this back to “Focus” if you ever decide to use manual focus mode!
4. Viewfinder shooters: Enable Touch & Drag AF
Where: Pink menu → “Touch & drag AF settings”
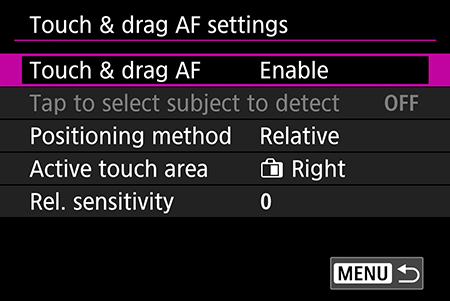
Touch & drag AF allows you to use the rear monitor like a touchpad to control the AF point/frame when shooting through the viewfinder. Like tapping to focus, it’s an intuitive way to switch or adjust the focus position!
You might also want to change the positioning method and active touch area.
Positioning method
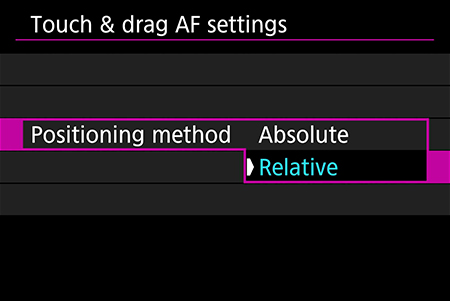
“Absolute”: Tap something on the monitor to move the AF frame to that location.
“Relative”: The rear monitor works like a laptop touchpad. This is easier to use when you’re looking the viewfinder.
Active touch area
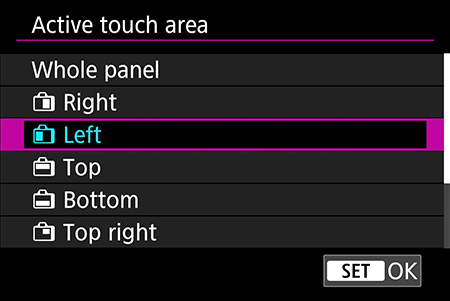
This menu sets the part of the rear monitor that is sensitive to touch & drag gestures. We recommend setting the active touch area on the same side as your dominant viewfinder eye—it keeps your nose out of the way!
Find out more about touch & drag AF, including more configuration suggestions for different shooting situations, in:
Touch & Drag AF Customisations for Better EVF Shooting
5. Video shooters: Turn on Movie Digital IS
Where: Red menu → IS (Image Stabilizer) mode → Digital IS

Movie Digital IS digitally stabilises handheld footage so that it looks smoother and less jittery. Some cameras have an “Enhanced” setting if you access the same menu in video mode.
Note: The video may be cropped slightly in the process, so frame your shots with extra allowance around the edges.
6. Disable “Release shutter without card”
Where: Red menu → “Release shutter without card”
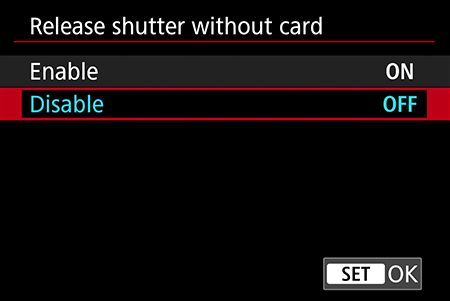
It’s every photographer’s nightmare to get to a shooting location only to realise that you forgot your memory card. It's even worse to find out only after you’ve started shooting!
Some cameras will show a “No card in camera” warning when you turn them on, but you can take it a step further by stopping your camera from shooting at all. How: Go to the red menu and disable the default “Release shutter without card” feature.
Now, if only someone could invent an alarm that stops you from leaving home without memory media…
7. Add your copyright information to the EXIF data
Where: Yellow menu → “Copyright information”

Putting your name in the “Copyright information” menu embeds the information in the EXIF data (metadata) of your pictures. This helps identify you as the creator of the photos if you share or use them elsewhere.
If you add your contact details or website information, potential clients or collaborators will know how to contact you, too:

Of course, this is not a foolproof method of safeguarding your copyrights, and there are ways to strip the information from the file. Some social media platforms may also remove EXIF data when you upload your images to them. Even so, there’s still no harm in entering your name and information. At the very least, it will be useful if you ever lose your camera!
8. Format your card
Where: Yellow menu → “Format card”
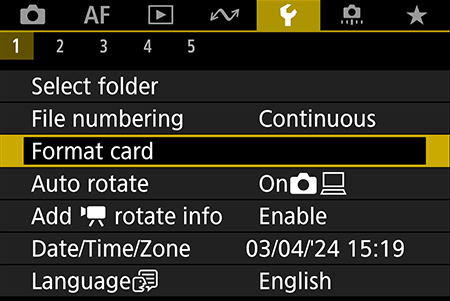
You should format your memory card:
- When using an old card on a new camera
- When using a card for the first time
This ensures that the card’s file structure is optimised for the camera, reducing the chances of errors or card issues.
Learn more about choosing an SD card in:
How to Choose an SD Card
9. Check the viewfinder view and adjust the diopter

Take off the lens cap, look through the viewfinder and check the view. If it looks blurred, adjust the diopter until it’s suitably sharp and clear. On some cameras like the EOS R50 (shown above) and EOS R10, the diopter is a sliding switch at the bottom of the viewfinder. On other camera models, the diopter is a little knob somewhere around the viewfinder.
Pro tip: Do this if you wear glasses
If the corners of the EVF image look vignetted, change the VF display format (red menu) to Display 2. This puts a border around the viewfinder display so that details at the edges of the image don’t get blurred or cut off. Find out more in: Camera FAQ: Does Viewfinder Eyepoint Height Matter?
---
What are your must-change settings on a new camera? Are there any functions or features you wish you had known about much earlier? Let us know in the comments!

