


[Flash Technique] Creating a Pop Art-inspired Night Portrait
Think your night portraits look too dull? Here’s how one photographer used street lights, an on-camera Speedlite, and the EOS R to create this candy-coloured, pop art-inspired night portrait. (Reported by: Haruka Yamamoto, Model: Haruka Shimoyama)

EOS R/ RF24-105mm f/4L IS USM/ FL: 50mm/ Manual exposure (f/4, 1/100 sec, EV±0)/ ISO 1250/ WB: Auto
1. Overexpose the background a little
When shooting with a flash at night, many photographers don’t put as much thought into the exposure as they should. One common mistake is to light up just the portrait subject—a surefire way to end up with unnatural lighting, especially if the background is disproportionately dark.
Goal: Make the background look brighter
A dark background can make the shot look plain and lifeless. To make it look as bright as possible, I set a rather high ISO speed, ISO 1250. This makes the objects in the background more visible. My trick is to expose the shot a bit more than usual so that the background looks livelier.
Tip: The EVF is (usually) great for previewing exposure
An electronic viewfinder (EVF) like the one on the EOS R is usually a great help for shooting at night as it lets you preview the effect of your exposure settings.Here, it helped me see how the background would look in the actual shot. But as I was using a flash, it couldn't really help me preview the exposure for the subject. To decide on my exposure settings, I did it the old way—by taking a few test shots and narrowing down my options.
Using E-TTL autoflash mode helped me get the most appropriate output for the subject (more about this below).
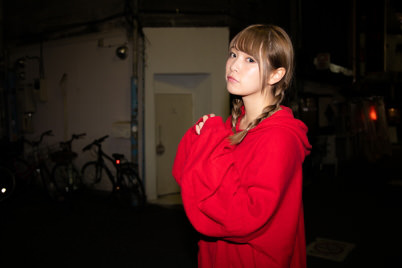
Part of the pop art-inspired aesthetic I wanted to achieve involves the model looking a little two-dimensional, almost like a cartoon character. But it needs to have a bright, interesting background to look right. Here, the background is too dark, which not only makes her stand out too starkly, but also makes the shot look ordinary and uninteresting.
2. Just for this aesthetic: Light the subject directly from the front
Use E-TTL II autoflash mode
After I got my ideal exposure for the background, I went on to work on lighting the subject with my Speedlite. For this shot, I used the E-TTL II autoflash mode, where the camera and Speedlite automatically measure and set the appropriate flash output. It's a relatively fuss-free way to get the optimum exposure with a flash. If the image still looks too harsh, you can adjust the flash compensation accordingly.
I angled the flash head so that the flash lit the subject from head on. If there are still unnatural shadows on your model’s face, adjust her the angle of her head and then try again.
Flat lighting doesn’t necessarily look bad. Find the balance
In studio shoots, you will rarely see a photographer light a portrait subject directly from the front—it makes the person look flat. But for this pop art-inspired aesthetic, a two-dimensional look is exactly what I wanted to create, so I went ahead and fired the flash from head on.
The final outcome does not look that unnatural because I made sure that there was enough light in the background.

I shot from about 2 metres away from the model. The flash was aimed directly at the model’s face.
Did you know: Signboards can make great reflectors/diffused light sources
I wanted my shot to convey the energy of the city at night, but I also wanted the model’s facial expressions to be clearly captured. For the shot below, I used the light from a signboard to illuminate her face.

EOS R/ RF24-105mm f/4L IS USM/ FL: 50mm/ Manual exposure (f/4, 1/125 sec, EV±0)/ ISO 1600/ WB: Auto
The lanterns hanging outside the shop behind were very bright, so besides using E-TTL II autoflash on my Speedlite, I also manually set my exposure settings to prevent blown highlights. It is always good to have fine control over your exposure, but I feel that this shot was successful for another reason: Being able to direct the model to stand where we could make the best of the ambient light.
Here are some tips for directing light so that your portraits flatter:
3 Flattering Techniques to Learn from Professional Models
In conclusion
Some of you may be intimidated by the thought of having to use a Speedlite. It can take a while to get the hang of it if you are a beginner, but when you do, there will be so many more different scenes that you will be able to shoot. (Not to mention other benefits.)
Try recreating the aesthetic using different types of street lights. Make it yours by putting your own spin to it. You can also try different settings, such as a lower ISO or lower shutter speed, to see what you get! I always have a lot of fun exploring ways to create portraits with unexpected elements, and I hope you’ll have fun doing the same.
More tips on shooting creative night portraits here:
How to Shoot Creative Night Portraits with the EOS R
3 Ways to Light Your Portraits When Shooting at Night with the EOS R
New to flash photography? Here are some basics to get you started:
In Focus: The Basics of External Flash Photography
Receive the latest update on photography news, tips and tricks.
Be part of the SNAPSHOT Community.
Sign Up Now!About the Author
A monthly magazine that believes that enjoyment of photography will increase the more one learns about camera functions. It delivers news on the latest cameras and features and regularly introduces various photography techniques.
Published by Impress Corporation
Born in Tokyo, Yamamoto is a freelance photographer who shoots for a variety of mediums that include magazines, CD jackets and advertisements. She also has her own blog, where she posts shots from an ongoing photography series “Otome-graphy [Maiden-graphy]”, which seeks to remove existing stereotypes of young women as well as address Yamamoto’s own issues about aging. A collection of these shots was published in book form in 2018.


