


Lens FAQ #5: What are the Pros and Cons of an ND Filter?
If you want to use a slow shutter or your maximum aperture when shooting on a sunny day, a Neutral Density (ND) filter will help to prevent your shot from becoming overexposed. Find out how. (Reported by: Kazuo Nakahara)

What is an ND filter, and when is it usually used?
An ND filter is a filter mounted in front (or at the back) of the lens to reduce the intensity of the light entering the camera. It is most often used to achieve the following outcomes:
To achieve a slower shutter speed when shooting in bright sunlight
A slower shutter speed can make waterfalls look silkier, blur clouds, or add a sense of dynamism to moving objects. However, in bright conditions such as daylight, too slow a shutter speed could result in blowout, where bright areas lose detail due to overexposure.
One possible solution is to narrow the aperture, but this increases the risk of diffraction, which causes the image to lose sharpness. For this reason, many photographers prefer to avoid doing this, and use an ND filter instead.
Tip: A slower shutter speed, paired with skillful use of lighting, can make colours appear more intense. See: 3 Tips to Elevate Your Wedding Storytelling (and Why the EOS R Helps)
To create a bokeh effect even in bright light
On a bright day, using maximum aperture to create bokeh allows a large amount of light to enter the camera. In very bright conditions, there could be so much light that even the slowest ISO speed combined with the fastest shutter speed possible on the camera can't sufficiently reduce the amount of light, resulting in the shot becoming overexposed. (Recap the basics of exposure in: Camera Basics #3: Exposure)
So what do you do if you want to take full advantage of the beautiful bokeh on your new, super-fast prime lens? You would have to cut the amount of light that enters the camera, which is what the ND filter does.
Optical viewfinder (OVF) users, note this: As the ND filter reduces the amount of light entering the camera, the image that you see through the OVF will appear darker than usual.
| Pros | Cons |
| Slows down the shutter speed | Causes the optical viewfinder to become darker |
| Maximum aperture can be used even on a bright, sunny day | Possibility of camera shake increases (can be prevented by using a tripod). |
Know this (1): An ND filter is a must-have for professional film-making
When shooting video, the shutter speed is dependant on the frame rate that the film-maker chooses to use. Since they have limited control over shutter speed, on a bright day, filmmakers will have to use a narrow aperture and low ISO speed to control exposure, which might still be insufficient. An ND filter reduces the light to a manageable intensity, and also allows the filmmaker to use a wider aperture for a shallow depth-of-field effect.
It is so important that many high-end video cameras, including those in the Cinema EOS line-up, have a built-in ND filter.
Know this (2): A graduated ND filter can help to balance out uneven contrast in your shot

A graduated ND (GND) filter (example above) is an ND filter that comes in a light-dark gradient. It comes in both oblong- and circle-shaped varieties. You place the darker part of the filter over the brighter part of the scene. This helps to even out the contrast in scenes like this.
Shooting at f/18, 0.6 sec. with the Canon ND Filter ND8X-L

As it was an extremely bright scene, I used the ND Filter ND8X-L, which is capable of 3 stops of light reduction. This allowed me to slow the shutter to 0.6 sec, which blurred the motion of the passers-by.
Shooting at f/1.8, 1/8,000 sec. with the Canon ND Filter ND8X-L

The sun was so bright that without an ND filter, shooting the maximum aperture of f/1.8 to create bokeh would cause the image to be overexposed, even if I used my camera's maximum shutter speed of 1/8,000 second. Using the ND Filter ND8X-L reduced incoming light, allowing me to use the maximum aperture without losing the details in the leaves to blowout.
Examples of Canon ND filters

ND Filter ND4X-L
Reduces the incoming light from the lens to 1/4 (2 stops). Available in 3 types — 52 mm, 58 mm and 72 mm — for use with the corresponding EF lenses.

ND Filter ND8X-L
Reduces the incoming light to 1/8 (3 stops). Available in 3 types — 52 mm, 58 mm and 72 mm — for use with the corresponding EF lenses.
Tip: If you are using the EOS R/EOS RP, consider this!
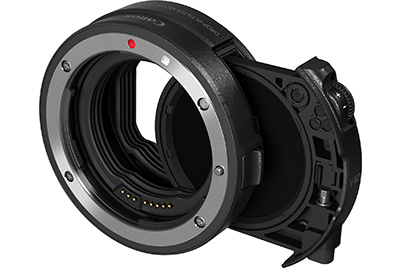
Drop-in Filter Mount Adapter EF-EOS R with Drop-in Variable ND Filter A
This mount adapter, which allows you to use EF/EF-S lenses with the EOS R or EOS RP, comes with a variable ND filter that reduces light by 1.5 to 9 aperture stops (equivalent of ND3 to ND500). It's your one-size-fits-all alternative to having multiple filters with different densities and diameters. You can even use it with lenses that are not designed to allow a front filter to be attached.
Receive the latest update on photography news, tips and tricks.
Be part of the SNAPSHOT Community.
Sign Up Now!About the Author
A monthly magazine that believes that enjoyment of photography will increase the more one learns about camera functions. It delivers news on the latest cameras and features and regularly introduces various photography techniques.
Published by Impress Corporation
Born in Hokkaido in 1982, Nakahara turned to photography after working at a chemical manufacturing company. He majored in photography at the Vantan Design Institute and is a lecturer for photography workshops and seminars, in addition to working in commercial photography. He is also a representative of the photography information website studio9.

