


7 Often Neglected Camera Settings that Ensure a Smoother Shoot
When you are shooting a wedding, sports, or simply under time constraints, check out these useful functions and settings that will increase efficiency and reduce chances of failure. (Reported by: Kazuo Nakahara, Takashi Karaki, Digital Camera Magazine)

1. Release shutter without card: Disable

After putting all your effort into a shoot, what could be worse than realising that the images were not saved because there was no memory card in the camera? It’s not just about the missed shots: if you were on assignment, it could also put your reputation in jeopardy.
To discover the missing card before you realise you have absolutely nothing to deliver, go to the SHOOT (red) menu and disable the ‘Release shutter without card’ setting, which is enabled by default. This effectively “locks” the camera from taking the shot when there is no memory card inserted.
Know this: Some camera models display a “No card in camera” alert on the EVF/rear monitor, but it never hurts to have some extra security.
2. Image review duration: Off

On most cameras, by default, after you have taken a shot, your camera will display it in the EVF/Live View for 2 seconds. This can be distracting if you need an uninterrupted view of unfolding action. Look for the ‘Image review’ option in the SHOOT menu and turn it off. Once this is done, you will have to go to playback mode to see what you shot.
Know this:
- On some cameras models such as the EOS R5 and EOS R6, you can enable/disable the viewfinder review separately from the rear monitor. Viewfinder review is disabled by default.
- Turning off the image review also consumes less battery power!
You might also be interested in:
Shutter Modes & Continuous Shooting Modes: When to Use Which?
3. Limit AF methods

Instead of scrolling through the many AF methods on your advanced EOS camera, here’s how you can access your most frequently used methods quickly: Go to ‘Limit AF Methods’ in the AF menu and select only the AF methods that you use most often.

The deselected methods will be greyed out and unselectable when you change the AF methods, allowing you to navigate to your desired AF method more easily.
Find out more about other ways you can customise your AF settings in:
Touch & Drag AF Customisations for Better EVF Shooting
Birds in Flight: Camera Settings to Increase Your Successful Shots
4. RF lens MF focus ring sensitivity: linked to rotation degree

The focus ring on RF lenses is electronic. By default, how much the focus position changes during manual focusing depends on how fast you rotate the ring. That can be challenging to get used to if you are more familiar with the old mechanical feel.
To get back the same feel, to the Custom Functions (orange) menu and change the focus ring sensitivity to ‘Linked to rotation degree’. With this, the focus position will change based on how much you move the focus ring.

5. Hybrid shooters, note this: Custom movie shooting mode C3

Shooting stills but inspired to take a quick video? Instead of using the mode dial or button, you can simply press the red Start/Stop Movie Recording button to start. And on some cameras like the EOS R, it also automatically recalls the settings saved in the C3 custom video shooting mode.
Take full advantage of this by registering your most frequently used video settings into the C3 slot:
1. Set your camera to video mode.
2. Set the camera to the settings that you want to store.
3. Go to the Set up (yellow) menu.
4. Select ‘Custom shooting mode (C1-C3).
5. Select 'Register settings'.
6. Select 'Custom shooting mode: C3'.
7. Select 'OK'.
The next time you press the red button to start recording video, you will be shooting with your go-to settings, no further adjustment needed.
New to videography? Here are some video production tips and tutorials to get you started
6. Minimum shutter speed during ISO Auto

For most situations where you prefer to let the camera decide on exposure, Aperture-priority AE (Av) mode or Program AE (P) mode with the ISO speed set to “Auto” should work fine. However, it is possible for the camera to set a shutter speed that is too slow, resulting in subject blur especially for moving subjects.
To prevent that, look for the “ISO speed settings” item in the Shoot menu, and select the ‘Min. shutter spd.’item.
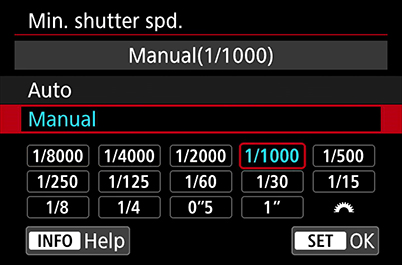
Select the minimum shutter speed necessary to prevent subject blur for your scene, and press SET. When you shoot in P or Av mode, the camera will not select a shutter speed slower than the speed that you have selected. Instead, it will increase the ISO speed to achieve the necessary exposure.

Tip: This function is especially useful for capturing candid portraits of active subjects such as children or pets.
7. Change the file name

It’s not over when you have finished the shoot—you still have to import the files to your computer for post-processing. The camera models designed for advanced and professional users provide more options for customising the file name.
Avoiding conflicting names
On advanced cameras like the EOS R and above, the default naming convention is XXXX####, where “XXXX” are four alphanumeric characters unique to the camera, and “####” are the image number. If you are not used to this, you can change the naming convention to “IMG_####”.
However, this could lead to identical file names if you use two camera bodies, or if you are a prolific shooter and easily accumulate 9999 images (which would result in the name of each 10,000th image being reset to “IMG_0001”). To avoid conflicts when you import the files into your computer, you can use 'User setting 1' to change the four characters before the image number to something else.
Keep track of different image sizes
If you tend to record JPEG (or HEIF) files with image-recording qualities (image sizes), choosing 'IMG + image size' will make it easier to identify the files with different image sizes without having to open the image. The fourth character in the image name will automatically be L, M, S, U, or T depending on the image quality. You can replace “IMG” with another three characters using 'User setting2'.
Got the EOS R5/R6? Here are some other useful functions and settings to try out:
5 Basic EOS R5/ EOS R6 Settings to Customise From the Start
HDR PQ HEIF: Breaking Through the Limits of JPEG
Portrait Relighting: Your In-Camera Lighting Crew
Receive the latest update on photography news, tips and tricks.
Be part of the SNAPSHOT Community.
Sign Up Now!About the Author
A monthly magazine that believes that enjoyment of photography will increase the more one learns about camera functions. It delivers news on the latest cameras and features and regularly introduces various photography techniques.
Published by Impress Corporation
Born in Hokkaido in 1982, Nakahara turned to photography after working at a chemical manufacturing company. He majored in photography at the Vantan Design Institute and is a lecturer for photography workshops and seminars, in addition to working in commercial photography. He is also a representative of the photography information website studio9.
After some experience as a sports instructor followed by 10 years in magazine production and editing, Karaki moved to Yonago City in Tottori Prefecture, where he became known for his landscapes of the San’in region of Japan. His works have been published in Amazing Village, a booklet of beautiful Japanese villages produced through a CANON × Discover Japan collaboration in 2017, and his shot of the sea of clouds at Akechi Pass in Tottori Prefecture was among 12 images selected by the Japan National Tourism Organization (JNTO) to represent Japan.
Instagram: @karakky0918
.jpg "trending tips")
.jpg "trending tips")

