


Cosplay Photography Techniques (5): Add “Fairies” to Your Images Using Long Exposure
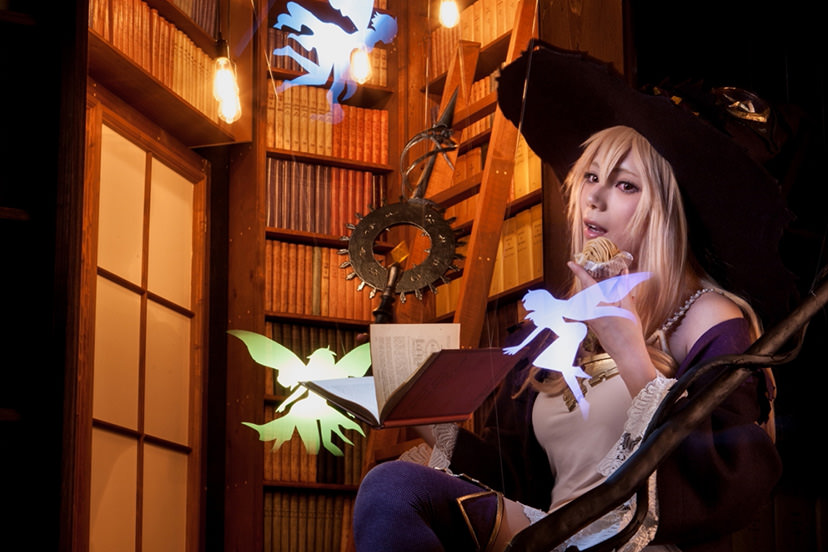
In the previous part of this series, we looked at how we can use coloured light to produce a stage lighting effect. This time, we shall be combining that together with a special photography technique called long exposure to produce images with a fantastical effect. In this article, we will look at how the below photo of a witch with fairies flying around was achieved. (Reported by: Suna, Model: Yu)
Mastering long exposure to produce fantastical cosplay shots
Long exposure is a special photography technique that makes use of the underlying mechanisms of a camera, and is a popular technique because of its ability to create intriguing effects. Not only that, long exposure also matches well with cosplay photography as it often exudes a fairy-tale like atmosphere.
In the following article, let us grasp the concept of long exposure photography and try using it to capture the “fairies of light” as illustrated in the examples below.

EOS-1Ds Mark II/ EF24-70mm f/2.8L USM/ f/16/ 5 sec/ ISO 125/ RAW
RAW image processing: Camera Raw
Light: 1 monolight (softbox + grid), 4 clip-on flash units (3 are used for the fairies)
What is long-exposure photography?
Long exposure refers to the action of leaving the camera’s shutter open for an extended period of time. During the interval while the shutter is left open, any movement in the subject will be recorded in the image. In the case of starry skies, for example, many have probably seen before photos of lights trails created by movement of the stars. These light trails are the result of a long-exposure effect. You can think of it as “a technique to depict the flow of movement or time in a photo”.

A good example of long-exposure photography is a photos of star trails, which are captured with the camera mounted to a tripod and the shutter left open for exposure for a duration lasting from several minutes to hours.
Setting up and points to note
In this example, a softbox with a grid attached to it was used as the main lighting source for illuminating the face of the subject. As the light was unable to reach the rod held in the right hand of the model, a separate clip-on flash unit was set up for the rod.
The shutter speed was set to 5 seconds (i.e., left open for 5 seconds), and the three flash units for the fairies (see illustration) that I held in my hands were to be fired successively after the shutter was released. I will explain the way to set up the flash units for the fairies later.
Also, note that the subject will be obscured by motion blur if the he or she moves during the long-exposure shot, so it is necessary for the subject to adopt a posture that allows him or her to stay still.

A: Softbox (with a grid)
B: Clip-on flash unit (for the rod)
C: Monolight
D: Flash units for the fairies
To better convey the idea that the character has magical powers, the rod and books were hung using synthetic-fibre threads.

While the shutter remains open, move the fairy cut-outs to the desired positions, and quickly fire the flashes in the direction of the camera. After that, quickly move out of the image area.
Tip: How to create the fairy
Attach a colour filter to the light-emitting side of the flash unit, and then mount a light diffuser. Next, draw the silhouette of a fairy on a piece of black paper and cut it out. Attach the black paper with the silhouette cut-out to the diffuser and you are done. When firing the flash, make sure that light does not leak from areas other than the silhouette of the fairy.

A diffuser mounted to the flash unit. Make sure to cover the entire flash unit so that light does not leak from the sides.

Use a thick piece of black paper for making the silhouette of the fairy as light from the flash unit may seep through if the paper is too thin.

Flash is fired with the black paper attached to the diffuser. You can change the colour filter on the light-emitting side of the flash unit to adjust the colour effect.
For more articles on cosplay and photography, check out the following articles:
Cosplay Photography Techniques (1): Lighting Gear
Cosplay Photography Techniques (2): Fundamentals of Lighting
Cosplay Photography Techniques (3): Examples of Different Lighting Setups
Cosplay Photography Techniques (4): How to Shoot with Coloured Light
Receive the latest update on photography news, tips and tricks.
Be part of the SNAPSHOT Community.
Sign Up Now!
About the Author
Working as a photographer mostly on weekdays, Suna always incorporates new photography techniques and provides very well-organised and easy-to-understand explanations on social media such as Twitter.
Cosplayer who is currently involved in cosplay projects such as Fate, Danganronpa and Hatsune Miku. She has won a very good reputation for her scenario-specific photos.
A publisher that specializes in books and magazines about video, photography and illustrations.


