


HDR Mode vs. Creative Filter HDR Modes: How Are They Different?
Recent EOS R cameras like the EOS R7 provide multiple ways to create HDR images, including the HDR mode and Creative filter HDR modes. Let’s see how their results differ. Read on to find out which mode helps create anime-like backgrounds! (Reported by: Kazuo Nakahara, Digital Camera Magazine)

How do they work?
HDR mode
You might have learned about auto-exposure bracketing (AEB) feature in your camera, which records three shots with different brightness when you press the shutter button just once. The HDR mode takes this one step further by blending the shots in-camera so you can see the results on the spot. The final image shows more highlight and shadow details (has a “higher dynamic range”) than possible with one normal shot, achieving an HDR image.
While the bracketed shots can be recorded in RAW, the final blended shot is recorded only in JPEG, or as a HEIF file if you have set your camera to record in HDR PQ HEIF format instead.
Creative filter
Most cameras equipped with Creative filters have four HDR Creative filter modes. The camera captures and blends three successive exposure-bracketed shots in these modes in-camera. It then applies a filter to the blended image.
The blended image is recorded in JPEG. The exposure-bracketed shots will not be recorded at all.
HDR mode
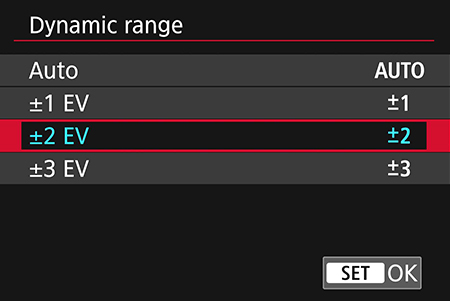
You can choose the bracketing interval in HDR mode. I felt that an interval of ±2 exposure stops gave results that most closely resembled the scene in front of my eyes.
Creative filter mode

The Creative filter HDR modes give more unique results. Try them out if your aim is artistic expression!
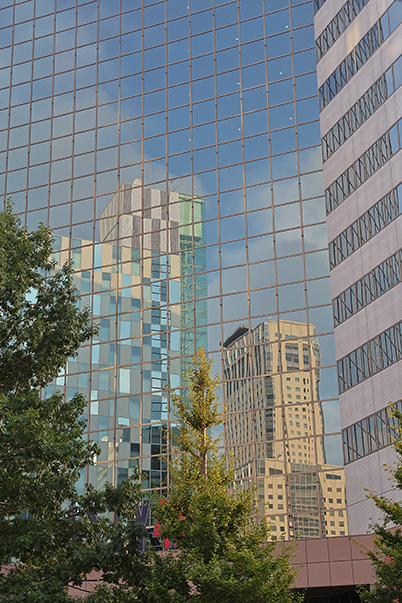
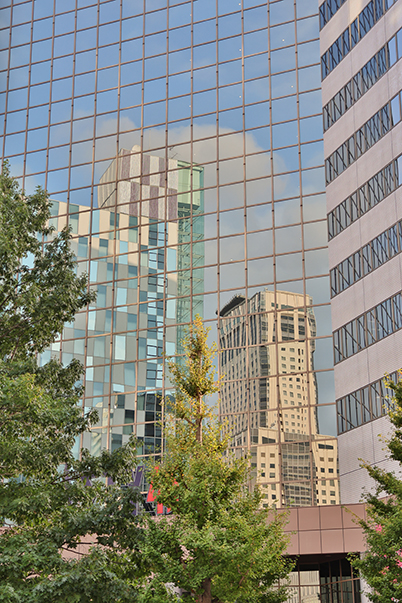
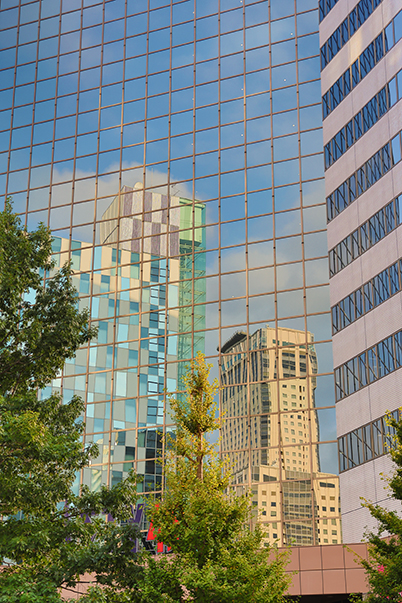
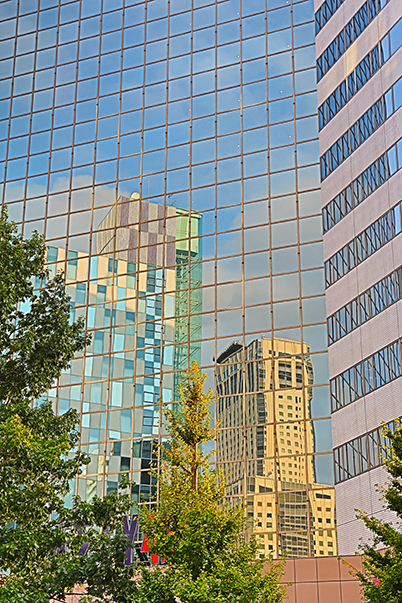
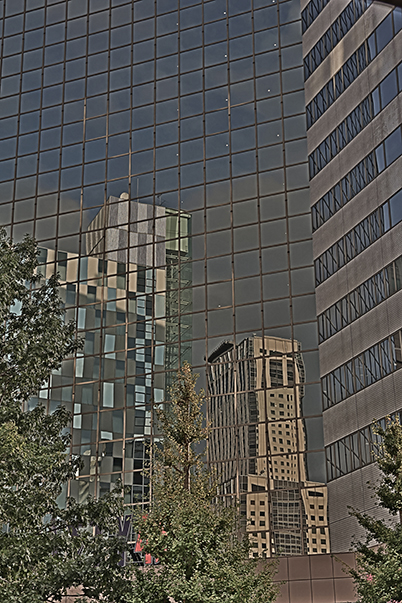
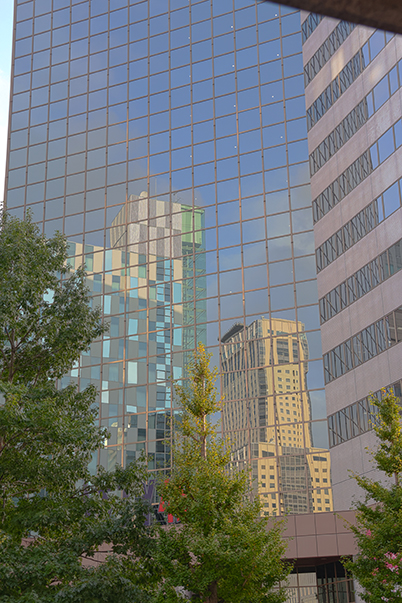
Comparing output from the different HDR modes
Examples
HDR mode
HDR art standard
HDR art vivid
HDR art bold
HDR art embossed
HDR merged in Photoshop
All images:
EOS R7/ RF-S18-150mm f/3.5-6.3 IS STM/ FL: 24mm (38mm equivalent)/ Aperture-priority AE (f/5.6, 1/1000 sec)/ ISO 500/ WB: Auto
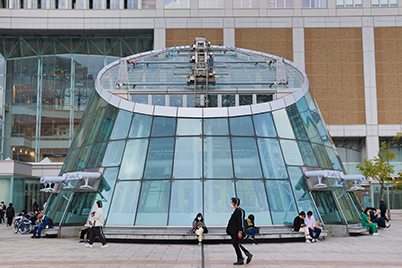
Try this: HDR Art Vivid for an anime-style finish
Try this: HDR Art Vivid makes scenery look like anime backgrounds!

EOS R7/ RF-S18-150mm f/3.5-6.3 IS STM/ FL: 24mm (38mm equivalent)/ Aperture-priority AE (f/4.5, 1/640 sec)/ ISO 200/ WB: Auto
HDR Art Vivid saturates colours while flattening details, so objects with clear outlines will look more two-dimensional—just like a line drawing or anime background! The effect becomes more obvious on shiny surfaces such as glass or metal.
Technique: Use it on a cloudy day to add some extra pop in flat lighting
The low contrast flat lighting on cloudy days makes it hard to bring out shiny glass or metallic textures. Don’t let that discourage you from shooting such subjects: try out the HDR Art Vivid Creative filter to put a different spin on things!
Normal shooting mode (default)
The same scene, shot in a normal shooting mode with no HDR. As it was an overcast day, the colours look dull. On the left side of the image, the lack of light has led to deeper shadows under the building's overhang structure, making details less visible.
Creative filter - HDR Art Vivid
The HDR Art Vivid mode lifts the shadows just enough to recover detail. The increased saturation on the glass panels makes them pop and look clearer. Tonal adjustment on the façade of the building in the background makes it look flatter, just like a drawing.
Just enough processing is applied so the results still look natural. If you want a less saturated look, try “HDR Art Standard”.
More examples (shot by the SNAPSHOT team)
Know this: Capture an HDR image in one shot with HDR PQ HEIF recording
Let's compare Images 1 and 2 against Image 3.
Image 3 shows a straight-out-of-camera image of a high-contrast situation (sunrise), where exposing for the sky has caused the structures in the foreground to be underexposed. In such situations, creating an HDR image is the best way to capture and show the detail.
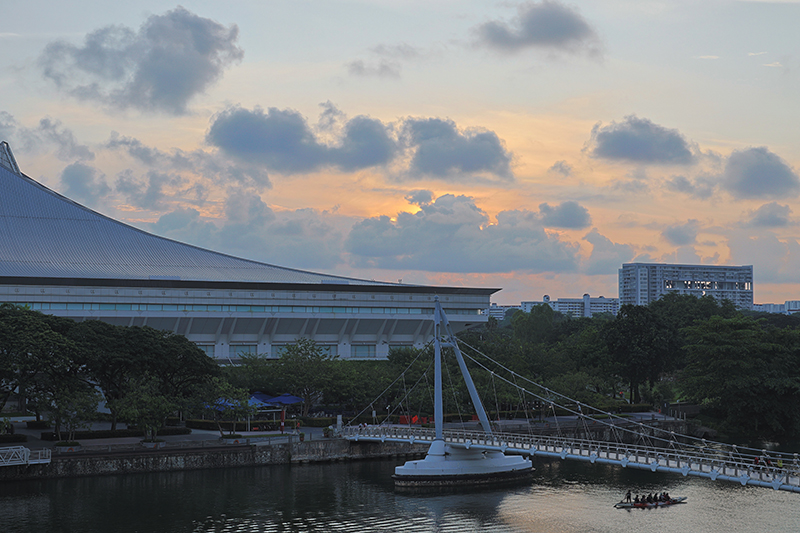
Image 1: 1 merged JPEG file from 3 exposure-bracketed shots
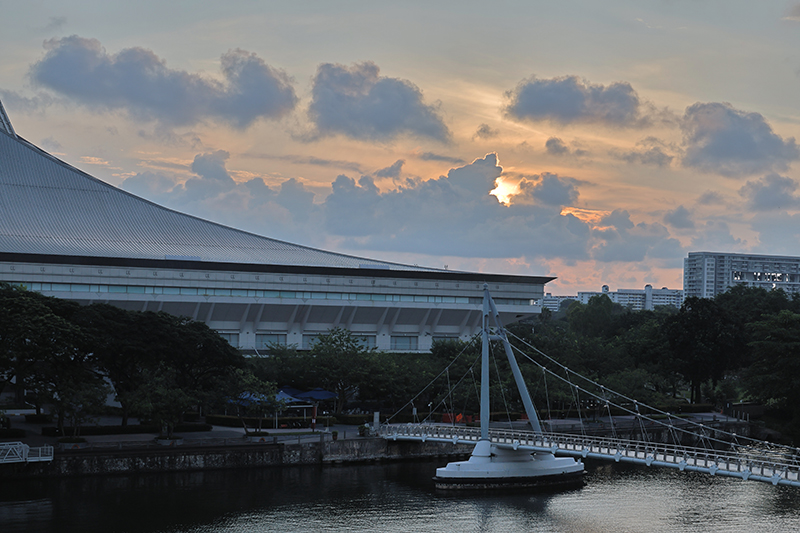
Image 2: 1 HDR PQ HEIF file achieved from 1 shot (Converted into HDR-like JPEG for viewing)
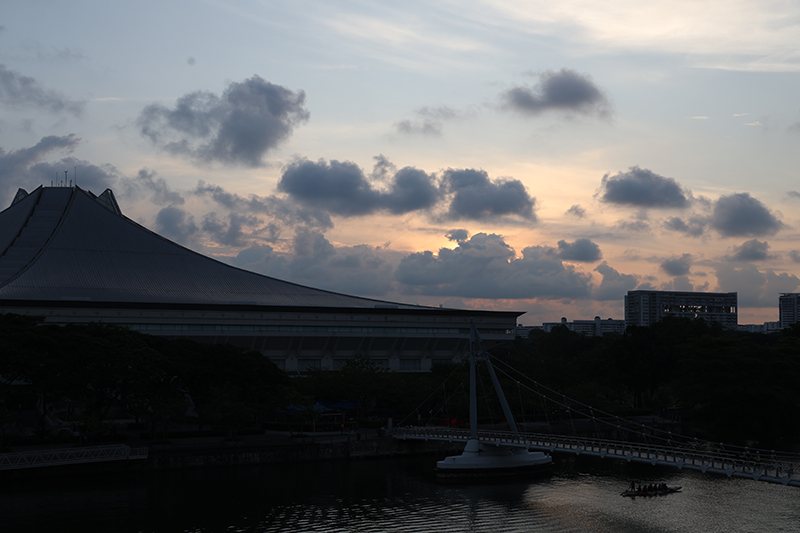
Image 3: Single-shot JPEG, exposed for the sky
How to get HDR images without merging
Images 1 and 2 may look similar. However, Image 1 was achieved by merging three exposure-bracketed shots, whereas Image 2 was achieved with just one shot in HDR PQ mode, which records 10-bit HDR PQ HEIF.
What’s HDR PQ HEIF?
HDR PQ HEIF files record 10-bit tonal detail, more than the 8-bit detail in a JPEG file. That’s less information than a RAW file (12-bit). However, unlike a RAW file, which needs to be processed to recover light and shadow details and make them visible, these tonal details are “baked into” the .hif image file so you can see them right away. It works best with highlight details.
Currently, HEIF files need to be converted to JPEG to be viewed on most devices. During conversion, the tones are remapped so that they display properly on non-HDR displays. The resulting file looks different from an image that is recorded in normal RAW or JPEG format.
Find out more about HDR PQ HEIF and how to work with it in:
HDR PQ HEIF: Breaking Through the Limits of JPEG
How much do you know your camera? Discover more fun and useful functions in:
Camera FAQ: How to Increase Depth-of-Field While Shooting Wide Open?
How to Use Creative Assist to Express Yourself with Colours
7 Often Neglected Camera Settings that Ensure a Smoother Shoot
About the Author
A monthly magazine that believes that enjoyment of photography will increase the more one learns about camera functions. It delivers news on the latest cameras and features and regularly introduces various photography techniques.
Published by Impress Corporation
Born in Hokkaido in 1982, Nakahara turned to photography after working at a chemical manufacturing company. He majored in photography at the Vantan Design Institute and is a lecturer for photography workshops and seminars, in addition to working in commercial photography. He is also a representative of the photography information website studio9.
.JPG "trending tips")

