


Did you know you can shoot black and white photos on your Canon camera? It’s something Canon Singapore’s EOS Xplorer Ryan Cheng does occasionally. He gives us some tips and insights. (Photos by Ryan Cheng; as told to SNAPSHOT)

EOS R6 + RF24-105mm f/4-7.1 IS STM @ f/8, 1/500 sec, ISO 800/ Picture Style: Monochrome with some minor post-edits
The beauty of black and white pictures
The beauty of black and white pictures
Black and white photographs are unique. It’s not just about their classic timeless quality. They often unravel aspects of a scene that you might overlook in a colour photo. That’s because when you take away the colour from a photo, you simplify. And that draws attention to tones, shapes, patterns, details, and relationships that might not be as prominent otherwise.
For example, compare the two versions of the same picture below:
In black and white

Colour version

Both images: EOS R7 + RF-S18-45mm @ 18mm, f/6.3, 1/1250 sec, ISO 2000
In the black and white picture, our attention is drawn to the lines and patterns on the façade of the building, and how they contrast with the silhouette of the flying bird. The leading lines are more prominent, giving the image more depth—the buildings even seem taller! These are less obvious in the colour version, where our eyes are distracted by the blue sky.
Why shoot in black and white (instead of leaving it to post-processing)?
Why shoot in black and white?
While you can shoot a photo in colour and convert it to black and white during post-processing, it’s a whole different experience to see a scene rendered in black and white in your electronic viewfinder or rear LCD screen. You see things that are less obvious in colour on the spot, and that allows you to respond to it by composing or exposing differently. In that way, it helps expand your artistic vision.

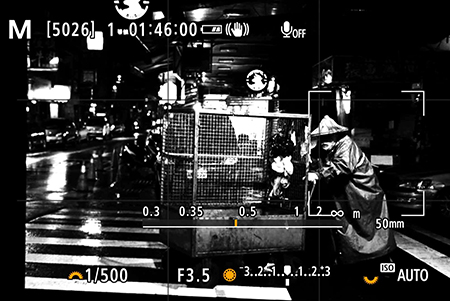
EOS R6 + RF50mm f/1.8 STM @ f/3.5, 1/500 sec, ISO 6400/ Picture Style: Monochrome
Colour version

The scene above had many yellow elements. It would have been perfect if “yellow” were the theme, but it distracts from the story! Shooting in black and white removes the clutter. It focuses on the main subject: the fish vendor in her triangle hat and raincoat pushing the trolley.
Camera settings: “Seeing” in black and white on your Canon camera
There are two ways to “see” in black and white on your camera:
- Creative filter: Grainy B/W
- Picture Style: Monochrome
‘Creative filter: Grainy B/W’ adds grain to the photo and creates a grungy effect. It’s a cool mode to experiment with! However, it records only in JPEG.
If you want more flexibility both in-camera and in post-processing, use ‘Picture Style: Monochrome’. This is the mode I used for the pictures in this article, with some minor touch-ups in post-processing.
The difference between ‘Creative filter: Grainy B/W’ and ‘Picture Style: Monochrome’

Creative filter: Grainy B/W
(Out of the camera shot)
- JPEG only
- 3 levels of contrast adjustment

Picture Style: Monochrome
(Out of the camera shot)
- Supports RAW recording
- Many fine adjustment parameters to play with.
Pro tip: Apply Creative filters using the menu option
There are two ways to enable Creative filters: via the mode dial, and from the MENU button. Always use the MENU button method (details below). The mode dial “Creative filter” is an automatic exposure mode: you will have no control over exposure settings.
How to set Creative filter: Grainy B/W and retain control over exposure settings

Step 1
Press the MENU button.
Go to ‘Shooting creative filters’ in the red menu.

Step 2
Select ‘Grainy B/W’.

Step 3
Press the INFO button to control the contrast level
Exposure settings can be controlled as desired.
How to set Picture Style: Monochrome
Step 1
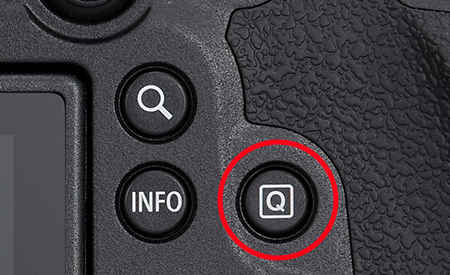
Press the ‘Q’ button on your camera to display the Quick Control menu overlay.

Step 2
Tap on/navigate to the Picture Style icon. Select the icon with the “M” in it to enable the Monochrome setting.

Step 3 (Optional)
Press the ‘INFO’ button on your camera to adjust fine settings.

Alternative: MENU button
You can also access Picture Style settings through the MENU button. It should be in the red menu.
Detailed Picture Style settings

There are many ways you can tweak the Picture Style to get results closer to what you want. Here’s what I usually shoot with:
- Sharpness (Strength): 7
This gives the image stronger definition.
- Contrast: +4
I enjoy high-contrast shots.
There are also other settings such as:
- Filter effect
Increases the luminance of specific colours so they stand out more.
- Toning effect
Gives the entire image a different colour tone, such as sepia.
Experiment with different effect levels and combinations to find your favourite style!
Know this: Both ‘Creative filter: Grainy B/W’ and ‘Picture Style: Monochrome’ can also be applied in-camera to images after you have shot them.
Tips to begin your black and white adventure
Tips to begin your black and white adventure
1. For a start, look out for these things:
- Light and shadow
- Lines and patterns
When shooting at night, look for light sources like street lamps and neon signs. Then linger around the area and wait for opportunities. They are the light sources you need for a compelling black and white photo at night!

EOS R6 + RF24-105mm f/4-7.1 IS STM@ 94mm, f/7.1, 1/1600 sec, ISO 800
Colour version

When this image is put into black and white, the shapes and patterns in the buildings and the shadows become more obvious. It’s something that we might not have noticed or thought worthy of photographing, especially if we walk past the same place every day!
2. Don’t be afraid to under or overexpose

You may need to crush some of the blacks or blow out highlights for shapes and textures to become more obvious. Here, I set the exposure about 1 stop lower than necessary to keep the buildings in the background properly exposed. This removed the distracting details of the walkway, making it easier to see the shapes and lines of the highways overhead.
FAQ: What exposure settings should I use for street and urban photography?
Ans.: Start with a narrower aperture. The rest depends.
For street and urban photography in the daytime, you usually need a larger depth of field to keep important elements in focus, so I tend to start with a narrower aperture: f/8 to f/16. I adjust this as necessary.
The shutter speed depends on the scene and your intent: Are there moving elements? If there are, do you want to freeze them or create motion blur?
We usually want to set the ISO speed as low as possible to avoid image grain. Introducing grain can add character, but it’s always easier to add grain to a clean image than remove grain from a noisy image.
Pro tip: Not familiar with M mode? Use a semi-automatic mode and exposure compensation
Don’t feel that you must use manual exposure mode to be a “legit photographer”. Catching the moment is what matters most, and you might miss it if you’re fumbling with your settings. It’s okay to leave the technical aspects to the camera, so go ahead and use Av, Tv, Fv, or even P mode. You can still deliberately under- or overexpose the shot with exposure compensation.
3. Observe how the light changes in the places you pass by daily
I often scout locations for wedding shoots, so it’s become my habit to notice details about the location that could make my pictures different. This includes light and shadows at different times of the day.
It takes a while to train the eye, but you can start by observing the light during your daily routine. Pick a place somewhere you frequent: near your home, your workplace, or perhaps your favourite jogging route. Look at how the light and shadows change at different times of the day and throughout the year. Use Picture Style: Monochrome to help you get an idea of how these changes apply in black and white!
About the Author
When he’s not photographing weddings, events, or travel documentaries, award-winning full-time photographer Ryan Cheng enjoys capturing moments and scenery all around the world, wherever he is. He was Canon Singapore’s EOS World Community Ambassador before being appointed EOS Xplorer in 2023.
Instagram: @ryancheng80

.jpg "trending tips")
.JPG "trending tips")

