


Previously, we explored the features that you would find on most lenses including kit lenses and standard prime lenses. In this article, we zoom in on the features you will find on two special types of lenses: telephoto lenses and macro lenses.

Features explored
1) Distance scale
2) Focusing distance range selector switch
3) Multiple IS modes
4) Tripod mount rings
5) Focus preset button
6) Built-in Macro Lites
7) Zoom touch adjustment ring
8) Filter adjustment window
9) SA control ring
1. Distance scale
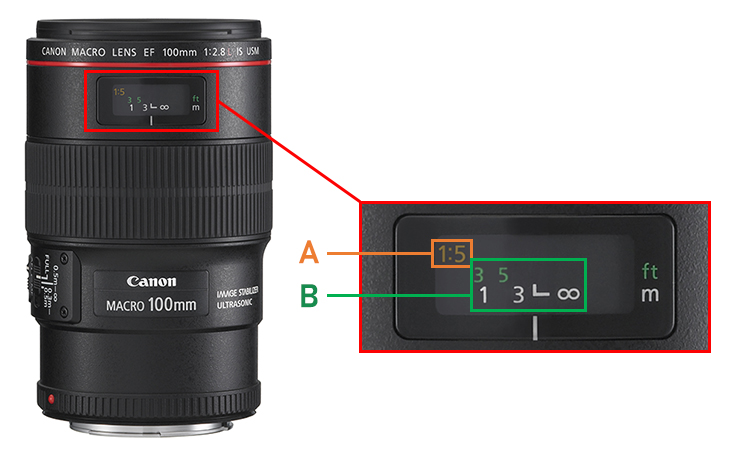
A: Magnification ratio
B: Focal distance
The distance scale shows the focal distance, i.e., the distance from the image sensor to the point of focus, in metres or feet. Depending on the lens model, it might also show the magnification ratio. You take the focal distance reading from the white index mark at the bottom of the scale. For example, when the scale is at ‘3m’, subjects three metres away from the camera focal plane mark will be in focus.
In the image above, the lens is set to focus to infinity, and the ratio in ‘A’ indicates the magnification ratio (actual size of the subject compared to its image on the image sensor). The ratio of 1:5 indicates a magnification of 0.2x.

On macro lenses, the highest magnification is often achieved at the lens’ closest focusing distance. To maintain this, use manual focus and set your focal distance accordingly. After that, you just need to move your lens back and forth until your subject is in focus.
A bit of history
The distance scale panel is a carry-over from days when manual focusing was the norm, and it usually is combined with a depth-of-field scale that allows users to estimate how much of the image would be in focus at a given aperture and focal distance.
Changing technologies such as the advent of autofocus systems, zoom lenses, and streamlined lens designs mean that today’s lenses carry only simplified distance scale panel if they have one at all. But even in its simplified form, a distance scale is still useful when shooting in scenes that are so dark that the subject is barely visible in the viewfinder, or when you want to ensure that you are focused to infinity. It is also useful gauge for scenes where you want to focus at a specific focal distance, especially when combined with the focusing distance range selector switch.
Fun fact (1): Distance scale in an LCD panel

The EF70-300mm f/4-5.6 IS II USM has an LCD panel that can display the distance scale, among other types of information.
Fun fact (2): On the EOS R system, you can display the distance scale in the EVF

RF lenses don’t feature a distance scale panel, but that doesn’t mean Canon has done away with it altogether. You still can see it in your electronic viewfinder and Live View display when an RF lens is attached—simply enable it in the Setup menu (look for “Shooting info. display”). That’s one of the perks of the EVF information display and the fast communication capability of the RF mount.
Know this: The red outlines in the screen capture above are due to focus peaking, which helps you to carry out manual focus more effectively. Find out more about it here.
2. Focusing distance range selector switch

The focusing distance range selector switches on (from left) RF100mm f/2.8L Macro IS USM, RF400mm f/2.8L IS USM, and RF70-200mm f/4L IS USM.
Also known as a focus limiting switch or focus limiter, this switch allows you to limit the AF so that it works only within a given range. This is useful for reducing focus hunting in scenes where the subject is always within a specific range either relatively near the lens, or relatively far away.
3. Multiple IS modes

Besides the image stabiliser switch that allows you to turn the in-lens image stabilisation on and off, Canon’s professional telephoto lenses also feature an image stabiliser mode selector switch, which allows you to choose between 3 different image stabilisation modes (2 modes on older lens models) during handheld shooting.
Mode 1: Still subjects
This mode corrects blurring caused by camera movement in all directions.
Mode 2: Moving subjects/panning (“Panning mode”)
In this mode, the lens detects the direction of panning when you pan the camera horizontally or vertically, and corrects only the camera movement that occurs in a perpendicular direction to the pan. This mode is also suitable for subjects moving in a predictable direction, such as vehicles.
Mode 3: Subjects with unpredictable movement (“Sports mode”)
In IS Modes 1 and 2, image stabilisation occurs the moment you half-press the shutter button, which means that as you observe the subject, your view through the viewfinder will be stabilised too. However, this could result in an unnatural view if you are tracking a subject that moves erratically. IS Mode 3 counters this by performing image stabilisation only during the exposure.

Shot on the EOS R5 and RF400mm f/2.8L IS USM. IS Mode 3 is ideal for shooting unpredictable subjects such as ball sports and wildlife.
4. Tripod mount rings

A: Tripod mount ring
B: Lock knob
The length and weight of the typical telephoto lens results in a rather front-heavy setup. Mounting such a setup to a tripod via the camera body is not only unstable, it also puts extra strain on the lens mount. To ensure the best stability, the setup should be mounted via the lens instead.
Most of the L-series telephoto zoom and super telephoto lenses are bundled with a tripod mount ring (tripod collar) for this purpose. The tripod mount collar is designed to allow you to rotate the camera and lens to shoot in any orientation.
Allows easy change of camera orientation

You just need to loosen the lock knob on the mount, adjust the camera and lens to your desired shooting position, and then tighten the lock knob again. While the image above shows the RF100mm f/2.8L Macro IS USM, the same applies for the tripod ring mount that comes bundled with most L-series telephoto lenses.
Note: On other lenses such as the RF100mm f/2.8L Macro IS USM or non-L series lenses, the tripod mount ring is sold separately. Some lenses have a built-in tripod mount instead of tripod mount ring compatibility.
5. Focus preset button

Many super telephoto lens users shoot wildlife or action, where fast reaction is necessary to capture fleeting moments. Found on EF and RF mount L series super telephoto prime lenses, this function lets you store and recall a preset focusing distance so that you can instantly focus at a specific distance.
Other unique features on specific lenses
6. Built-in Macro Lites

Found on: EF-M28mm f/3.5 Macro IS STM, EF-S35mm f/2.8 Macro IS STM
Close-up shooting with a macro lens opens your eyes to a whole new world. However, when your gear is very close to the subject, it can be tricky to get enough light on the scene.
If you are new to macro photography, the built-in Macro Lites on the EF-M28mm f/3.5 Macro IS STM and EF-S35mm f/2.8 Macro IS STM mean that you don’t have to worry about investing in additional lighting gear specifically for macro photography. This makes it easier to take full advantage of their extremely short closest focusing distances of 9.3cm and 13cm respectively.

Pressing the Macro Lite On button turns on the Macro Lites.
There are two brightness settings. Use the Macro Lite On button to toggle between the Off, Bright and Dim settings. You can also use the left and right lights independently. To switch between single and double light modes, hold down the Macro Lite On button.
See the effects of the lights and learn more about these lenses in:
EF-M28mm f/3.5 Macro IS STM Photo Review
Field Testing the EF-S35mm f/2.8 Macro IS STM
7. Zoom touch adjustment ring

Found on: EF100-400mm f/4.5-5.6L IS II USM, RF100-500mm f/4.5-7.1L IS USM
This ring lets you adjust the torque of the zoom ring to your preference. ‘SMOOTH’ makes the zoom ring turn with less effort whereas ‘TIGHT’ requires more torque to turn the ring.
8. Filter adjustment window

Found on: RF70-200mm f/2.8L IS USM, EF100-400mm f/4.5-5.6L IS II USM, RF100-500mm f/4.5-7.1L IS USM
A circular polarising filter (CPL) helps to reduce glare and reflections from sunlight, which in turn makes colours more intense. Meanwhile, a lens hood helps to prevent excess sunlight from entering the lens and causing unwanted flare. This unique lens hood design lets you kill two birds with one stone: it features a window that can be opened and closed so that you can adjust the CPL without having to take the lens hood off. Just remember to close the window before shooting!
9. SA control ring

Found on: RF100mm f/2.8L Macro IS USM
The Spherical Aberration control ring lets you adjust the degree of spherical aberration (SA), which changes the look of bokeh. Turning the ring towards ‘-’ smoothens the outlines of background bokeh and hardens the outlines of foreground bokeh, whereas turning the ring towards ‘+’ achieves the "bubble bokeh" effect similar to that found on some vintage lenses.
SA Control towards ‘-’

SA Control towards ‘+’

---
Learn more about lenses in:
In Focus: RF Lenses
In Focus: Lenses FAQs
In Focus: Lens Basics
Receive the latest update on photography news, tips and tricks.
Be part of the SNAPSHOT Community.
Sign Up Now!
