


Like composition and colour theories in photography, adding motion can help to elevate your shots with a sense of realism. You can utilise a slow shutter speed to capture motion when shooting a fast-moving object; a fast shutter speed to freeze the subject in motion; techniques like panning shots - or in this article, sequence photography.
So what is sequence photography? In layman’s terms, sequence photography means to produce an image that captures the different frames of a subject in motion and to have it all condensed into a single photograph. This photography style requires the photographer to post-edit and layer continuously-shot frames together, so we will give you a step-by-step guide on how to achieve your first sequence effect below!
Step 1: Pre-Shoot
When brainstorming your first sequence photography session, start by figuring out your moving subject. Will it be a toy car (as seen above), a bouncing ball, a human running, or an animal jumping? For your first try, we recommend going for an easier setup, such as a rolling ball or a flipping slinky.
For this article, we present the scene of a pull-back sports car ‘flying’ over a ramp. Once you’re ready to level up the difficulty level, you can experiment creatively with different high-intensity movements like a parkour stunt, a cartwheel, a diving action, and more.
Other gear you will need for this setup is a tripod to prevent any camera shake, and make sure that the series of photos taken are in the same composition and framing to reduce unnecessary extra post-processing work.
Step 2: Wider Framing

Remember to position your camera further back to give it a wider framing. This will allow you to capture all your subject’s movements and prevent the frame being cut. We shot the scene with more space on the top because we thought the car will fly slightly higher than expected.
If you’re shooting a sequence photography scene that requires a larger space (such as parasailing or cliff jumping), it would be extra helpful to have a wide-angle lens at hand too.
Step 3: Camera Modes
Use Manual Mode with a fast shutter speed of at least 1/2000s (the faster, the better), but this may vary as it is very dependant on the speed of your moving subject. The key factor here is to freeze the subject in motion clearly and to achieve enough frames of the subject in different moving parts so you can layer it and produce the sequence effect. Take advantage of your Canon camera’s Continuous Shooting mode to capture a series of photos in rapid succession.
In our example, we shot the scene with a Shutter Speed value of 1/6400s.
Step 4: Picking Out The Scenes
The above GIF example shows the 7 chosen images. You would want to condense all the movements into a single image. You can include even more frames, but as a start, between 6-10 frames will convey the effect well enough. As you have used a tripod and Manual mode, you will realise that all of the frames have consistent exposure, framing, and composition.
Tip: You can also create a gif with the shots you've taken!
Step 5: Merging Into One
Steps to merging all your sequence photography into one:
1. Start by uploading all your chosen images on post-editing software like Photoshop.

2. Select all images and use the ‘Darken’ effect to view the sequence and make sure that they are the frames you want.

3. Make your first layer (the first frame of your car) visible and edit any unnecessary elements out. This will be your base layer.

4. Make your second layer visible and use the Lasso Tool to select the car. Copy the selected area and paste as a new layer.

5. You can then delete the second layer (not the new layer with the copied car).

6. Repeat the process for the rest of your frames before flattening the layers together and saving it as one single image.

Step 6: Final Look
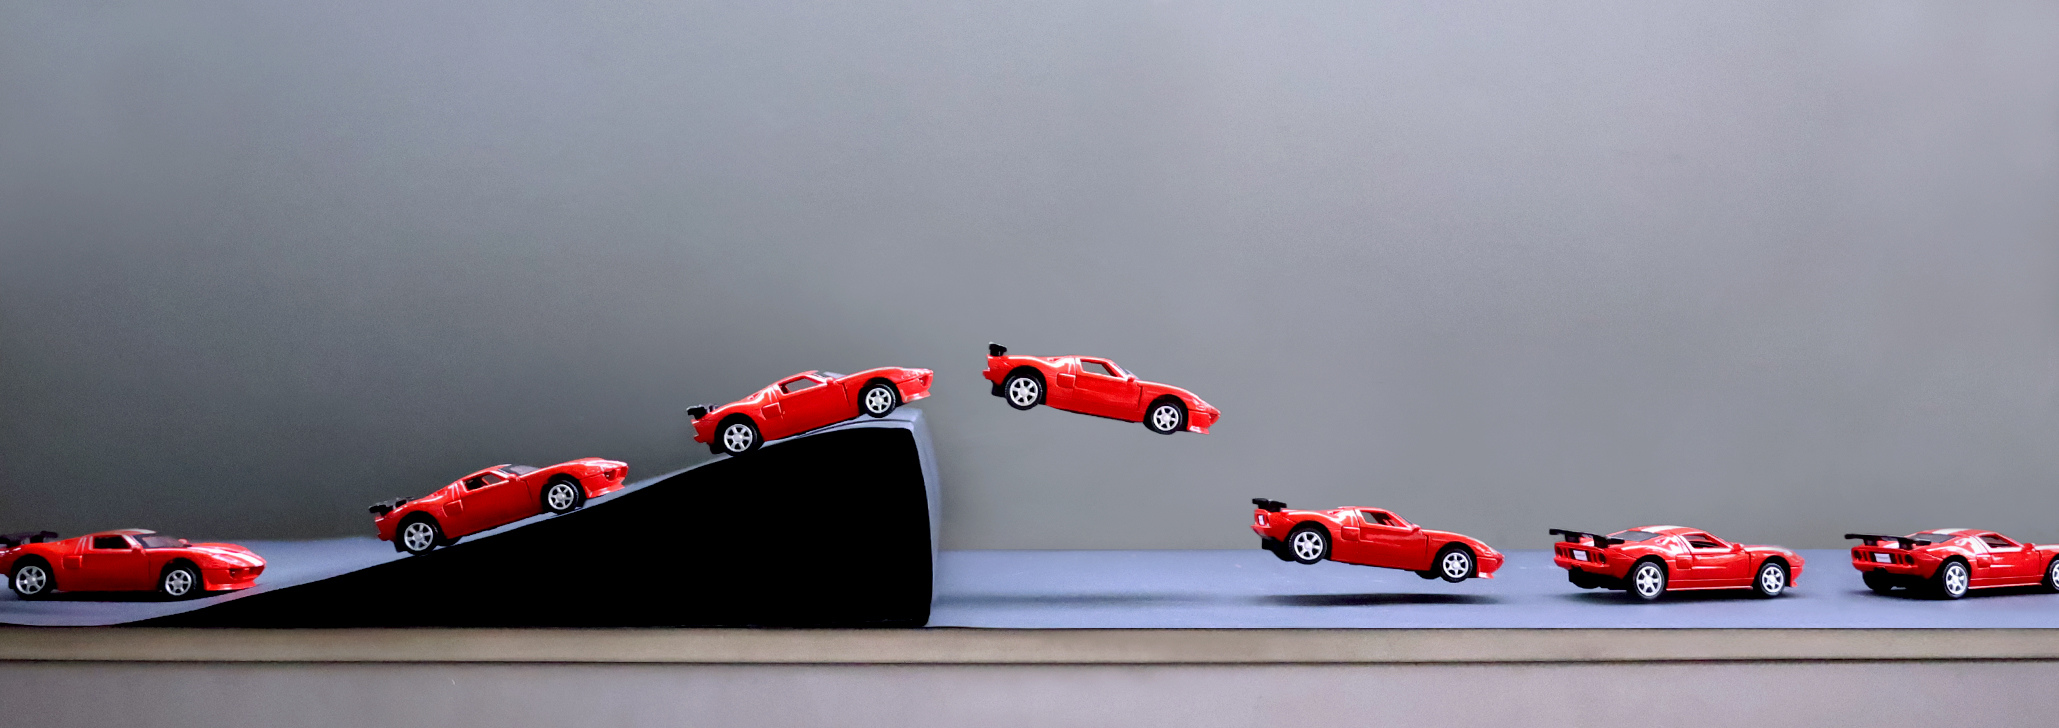
Ta-dah! If you’ve followed the previous steps correctly, the result will be similar to the one pictured above. You should have an action-packed shot that showcases all of your subject’s movements within a single image!
Sequence photography is a fun, easy, and versatile concept that pushes you to experiment, expand your creativity, and deliver impactful shots that will benefit your photography portfolio. You can also incorporate this style of presentation in other photography genres like wildlife photography (a sequence effect of a horse galloping), sports photography (a gymnastic routine), and more!
For similar articles:
Built-in Flash Techniques #5: Fast, Furious Light Trails with Second-Curtain Sync
Telephoto Landscapes: Contrasting Stillness with Movement
Camera Settings to Use for Awesome Slow Shutter Shots!
.jpg "trending tips")

