


Good photos are made up of a number of elements done right, such as subject and composition, with colour tone also being a fairly important element. The impression of a photo can be markedly changed simply by changing the colour tone. In this article I will introduce the White Balance (WB) setting, which is used to change the colour tone of an image. (Edited by studio9)

Manually change the White Balance
When you first start using a DSLR or mirrorless camera, you may find yourself overwhelmed by the number of settings and not know which to start with. While it is better to use the various automatic features when you are starting out to minimize the number of settings to be configured, you should try adjusting the White Balance (WB) yourself whenever possible. By simply changing the colour, the look and visual impact of elements such as the subject and composition changes markedly for the same photo!
3+2 White Balance settings you should first master
White Balance is a function that is normally used to correct an image’s colour tone to reflect the original colours of the subject, regardless of the ambient light. However, I will introduce White Balance as a function for setting the colour tone to suit your preferences in photos.
When you change the White Balance, a photo may appear reddish or bluish (although when set appropriately, the colours will appear as you actually see them). Keep this in mind when changing the White Balance.
First, check the White Balance modes that are available on your camera. The way of checking the modes may differ depending on the camera model, so refer to the manual of your camera. Because White Balance is a commonly used setting, it can usually be accessed with one or two button presses.
The White Balance settings menu you see will look like this or similar.

There should be a long lineup of modes, including Daylight, Shade, Cloudy, Tungsten light, and White fluorescent light. If you are just starting out in photography, it is unlikely that you will master such a large number of modes at once, so you should start by mastering three modes.
They are, namely, White fluorescent light, Daylight, and Cloudy, twilight, sunset.
These modes change the colours of photos as shown below.
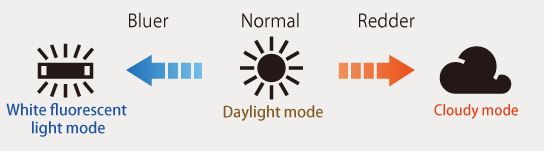
If the colour tone for the Daylight setting is considered “normal”, the colour tone of photos will appear bluish when using White fluorescent light, and reddish when using Cloudy. It’s that simple!
These 3 modes are more than enough to start with. Once you have mastered them, you just need to master two other modes, and you will have all the modes you need.
They are Tungsten light and Shade. The Tungsten light mode makes images even bluer than White fluorescent light mode, while Shade mode makes images even redder than Cloud mode. A good way to understand this is as follows:

Once you have mastered these modes, you’ll be ready for the big league.
Recommended settings by scene
While the adjustments to White Balance depend on each person’s preferences, I will share some of my recommended settings below.
*The example is of photos developed from the same RAW file, with only the White Balance setting changed. Settings other than WB, such as brightness and contrast, are kept the same.
Photos with a delicate, translucent feel
The cool White fluorescent light mode is recommended for such photos, particularly when taking shots of a flower on a sunny day.
The photo might appear bluer than it actually seems, but there is a definite translucent finish to it. When photos are made bluer, they tend to appear darker, so the key is to make your photos brighter by about +0.7 to 1.3.
Incidentally, the above photo appears as shown below when shot in Daylight mode.

Here, there is an overall warm colour tone, which results in a photo that conveys warmth.
Photos with a cool, sombre feel
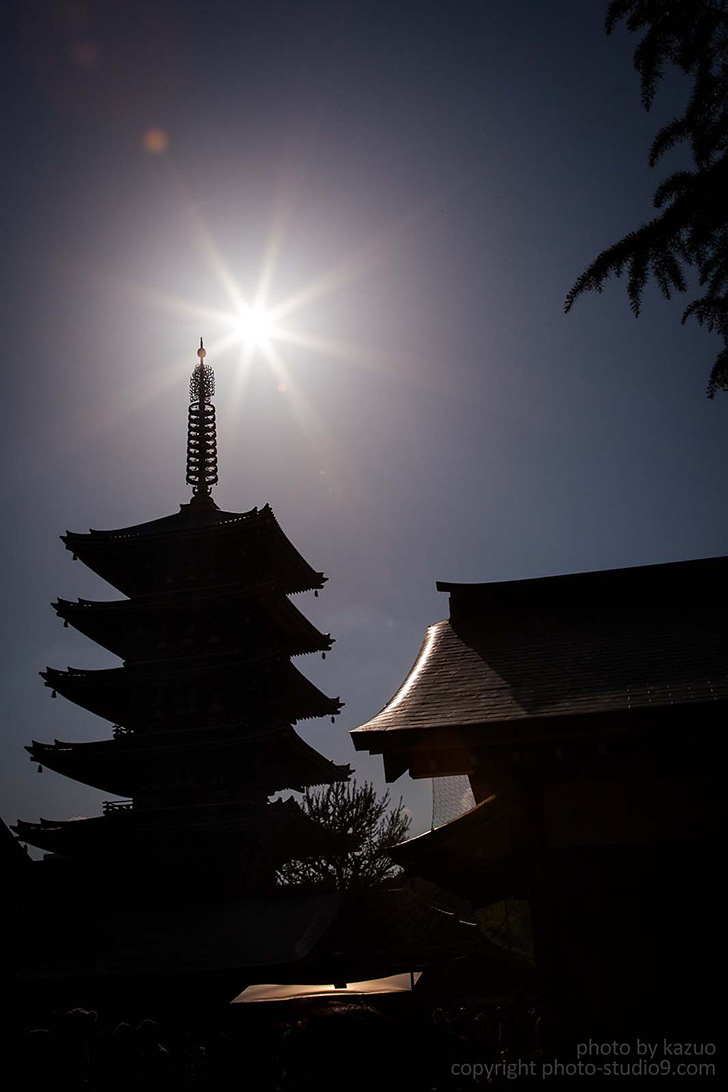
Cool colours are recommended for photos with a cool, sombre feel as well. You can use the White fluorescent light mode, or even Tungsten light mode depending on the scene. These modes are a good match for photos capturing the likes of nightscapes and silhouettes!

Here, I captured the silhouette of the five-storied pagoda at Sensoji Temple in Tokyo. I took the shot in Tungsten light mode, which created a cool and sombre impression.
Below is the same shot, taken in Daylight mode.
There is a slight warmth to the colours here, giving a twilight-like appearance. You’d be hard pressed to say that there is a cool and sombre feel. Because I took the shot in the evening, the colours in the photo appear closer to those you would see with your own eyes.
Photos that beautifully capture the sunset
When you start changing the White Balance yourself, you’ll be able to capture more impressive photos of the evening scenery. In the evening, set the White Balance to bring out the warm colours.

I took this shot in Shade mode. You can come across scenery like this when walking around town in the evening. You can shoot in Cloudy mode, or for something different, you could try Shade mode.
Below is the same shot, taken in Daylight mode.

Here, the blueness is a little more pronounced, and the atmosphere of the sunset is nowhere to be seen. While these colours might be closer to what you actually see with your own eyes, we tend to associate sunset with a stronger orange tone.
Summary: Take “Daylight” as your reference mode
I introduced just a few example in this article, but it’s easy to see that by simply changing the White Balance, the look of a photo can change markedly.
The three modes you should first master are White fluorescent light, Daylight, and Cloudy. After you have gradually become familiar with these modes, learning how to use two additional modes, Tungsten light and Shady, will expand the range of expression in your photos.
If this is too much to take in at once, just concentrate on taking a shot and thinking about whether you want to make it appear bluer or redder. To that end, remember the order of the five White Balance modes and their effects!

studio9
A photography website established in Japan in 2011. With the slogan “Bringing photography closer to you”, the site provides content that is useful for everyone who enjoys photography. Besides web content, studio9 also conducts seminars and workshops.

