


Creative Assist Lesson 3: Ways to Capture Sparkling Christmas Lights
The Creative Assist function offers an easy, fuss-free way to create images your style, even if you are new to cameras. In this lesson, we put together what we learned in Lessons 1 and 2 for a one-point bokeh circle technique that allows even beginners take beautiful images of decorative lights. Also, learn some useful techniques to deal with camera shake, your arch enemy when shooting night scenes! (Photos by: Takeshi Akaogi, Edited by: Etica)
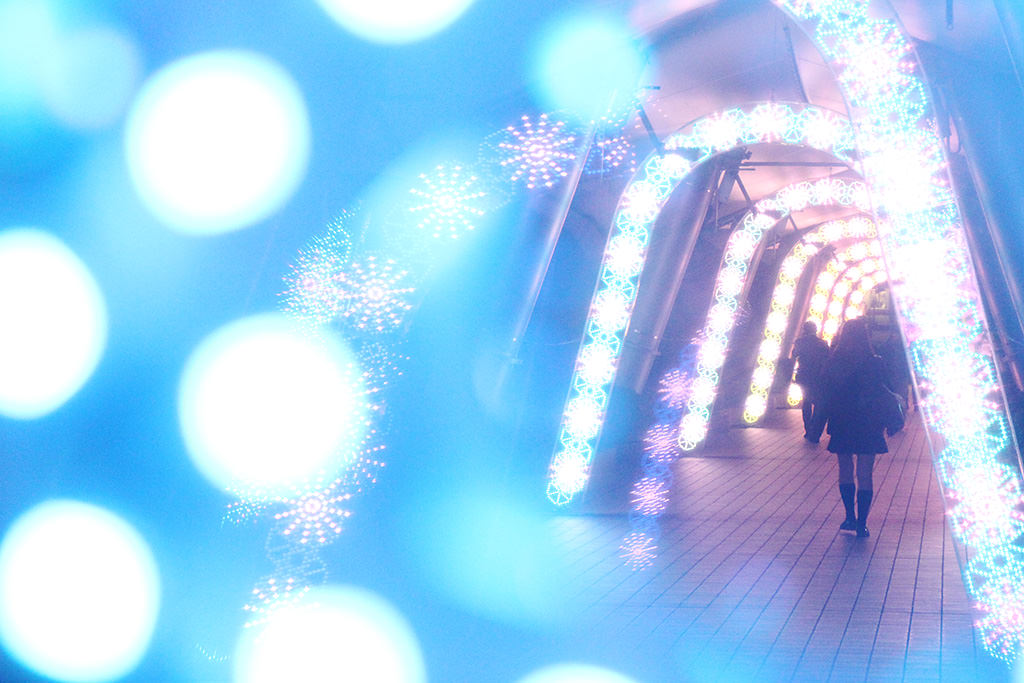
Make use of bokeh circles and the “Contrast” menu in your shots
Bokeh circles are spherical balls of blurred light that are captured by blurring the light source. (Read more about them in Lens FAQ #8.) When bokeh circles are incorporated into your nightscape shots, they will make your photos appear more magical and lovely. Moreover, using the “Saturation” menu in the Creative Assist function that you learnt about in Lesson 2, will make multi-coloured Christmas lights look even more appealing.
Point 1: How to take bokeh circles
By adjusting the level of background blur in the “Background” menu with the Creative Assist function like you learnt in Lesson 1, you will be able to control how the bokeh in the foreground and background is captured.

The more you adjust the level of background blur in the “Background blur” menu towards the "Blurred” end, the narrower the in-focus plane will become. This makes the light sources in front of and behind the subject that you focus on appear as bokeh circles.

EF-M18-55mm f/3.5-5.6 IS STM/ Creative Assist/ Background blur +3
By placing the decorative lights directly in front of the camera and focusing on the people walking in the distance, I managed to blur the lights in front to a great extent and capture them as bokeh circles.
Bonus tip: How to defocus the entire image for a dreamy effect
There's a way to make the bokeh circles stand out even more in your shot: Defocus the entire image!
Step 1: Place your hand slightly in front of the lens and half-press the shutter button to focus on it.
Step 2: Keeping the shutter button half-pressed, remove the hand that's in front of the lens. The entire image on the screen should be defocused.
Step 3: Take your shot. The resulting image will have a soft, hazy, dreamy feel.
Before

EF-M15-45mm f/3.5-6.3 IS STM/ Creative Assist
After

EF-M15-45mm f/3.5-6.3 IS STM/ Creative Assist
Point 2: Adjust the saturation towards the "Vivid" end to make coloured Christmas lights appear more striking!
If you want to highlight the beauty of multi-coloured Christmas lights, I would recommend increasing the saturation to express the vividness of the colours.
(Need a refresher on how to do so? Go back to Creative Assist Lesson 2.)

If you set Saturation towards "Vivid" with the Creative Assist function, the colour finishing will generally appear better.

Before: Brightness ±0, Contrast ±0, Saturation ±0
After: Brightness +2, Contrast +2, Saturation +2
EF-M22mm f/2.0 STM
The pink and green decorative lights are captured more vividly, and the difference in brightness is larger, achieving an overall finish that looks both sharp and vivid.
Point 3: Countermeasures against camera shake are crucial when shooting in low light conditions!
In low light conditions, the shutter speed will be slowed down in order to achieve a suitable brightness with little light. When the shutter speed slows down, camera shake and blurring of the subject occur easily. It is important to adopt a firm camera posture to prevent camera shake.
2 steps to getting a firmer hold on your camera

1. Tuck both arms securely to your sides and support the camera with your left hand from the bottom.

2. When you want to extend your arms to take a shot, pull the strap taut to support and stabilise the camera.
(Here are more tips for preventling camera shake when shooting in low light.)
Tip: Use a longer focal length for a tighter shot
Even if you take a shot from the same place, the finishing will vary greatly depending on whether the angle of view (focal length) of your lens is adjusted to the telephoto end (60mm or more*), or to the wide-angle end (35mm or less*).
(Read more about the characteristics of different lenses.)
When shooting decorative lights, especially when the scene is quite deep, I recommend using a longer focal length. This makes objects at the back appear closer, creating a density effect that adds impact.
*35mm equivalent value

Shot at 45mm (35mm equivalent value: approx. 72mm)
EF-M15-45mm f/3.5-6.3 IS STM

Shot at 15mm (35mm equivalent value: approx. 24mm)
EF-M15-45mm f/3.5-6.3 IS STM
See the amazing effects that an even longer lens can create in:
Creating a Captivating Scene with Telephoto Leading Lines
How to Photograph Dreamy Images of Decorative Lights
Like the look of bokeh circles? You can do even more when you graduate to Aperture-priority AE (Av) mode! Here's an example of what you can do in it with the help of a built-in flash:
Built-in Flash Techniques #6: Magical Bokeh Circles on a Rainy Day
Receive the latest update on photography news, tips and tricks.
Be part of the SNAPSHOT Community.
Sign Up Now!About the Author
Etica Co., Ltd. not only run photography classes under the name “Tanoshii Camera School", but also edit publications and plan media and events related to cameras and photography, with a focus on themes related to child care, animals and food. Their motto is "Photos make people happy!" and they are engaged in communicating the charm of cameras and photography.
As a photographer, Akaogi works mainly for magazines and writes books introducing photography and practical tips. He also teaches at photography workshops.

.jpg "trending tips")

