


Lighting is a crucial factor that determines the level of perfection of a cosplay photo. There is a diverse range of photography equipment available, and it is important to select them carefully and use them optimally according to the scene. In the following, I will introduce the lighting equipment used by the top photographers in cosplay shooting. (Reported by: Suna, Model: Yu, Kanata)

You will need 2 lights for cosplay photography
There are a few types of lighting gear that are used for cosplay photography. These can be distinguished according to their light intensity and how they diffuse light. If you are an independent photographer, it would be difficult to own a lot of shooting equipment. However, lighting can make a critical difference to how your final photo looks, so at the very least, it would be ideal to have two flash units, even if they are on-camera units—a two-light setup is the most basic setup for such photography. You may also want to consider renting equipment if necessary.
External flash units
A flash is a device that emits light synchronously with the shutter release operation of the camera. Flash units can be largely divided into two types: compact and battery-operated on-camera flash units that can also be attached to the hot shoe and large monolights with a high flash intensity. On-camera flash units are generally employed for cosplay photo shoots because of their portable size and ease in possessing multiple units. There is also a broad range of accessories available on the market that you can attach to your flash unit for an even broader scope of photographic expression.
On-camera flash units
On-camera flash units, such as Speedlites, are battery-operated and are usually mounted to the camera for use. However, by employing a radio slave (for wireless control), it can also be set up at a distance away from the camera, and multiple units can be fired at the same time.

Monolights
Also known as monoblock (or ‘monobloc’) strobes, monolights lack portability and need to be connected to a power source for use, but they emit a huge amount of light and have a very short flash recycle time. Monolights are mainly used for studio shoots.

Light diffusers
A light diffuser is a device that is usually attached to a flash unit to spread out light. As light travels only in a straight line, using a light diffuser helps to cast light evenly across a wider area, thus adding a soft touch to the resulting photo. Light diffusers can be further divided into several types, each of which varies in the way light is scattered. In the following, let us look at the characteristics of different types of diffusers.

Note that “diffuser” is not a product category, but a generic term that can refer to anything that fulfils the purpose of diffusing light.
How a diffuser changes your photo
No diffuser
EOS-1Ds Mark II/ EF24-70mm f/2.8L USM/ FL: 54mm/ Manual (f/2.8, 1/160 sec)/ ISO 100/ WB: Manual - 5000K
Light from the flash unit falls only on a part of the subject, resulting in a photo with a poor distribution of light.
With diffuser

EOS-1Ds Mark II/ EF24-70mm f/2.8L USM/ FL: 43mm/ Manual (f/5.6, 1/160 sec)/ ISO 400/ WB: Manual - 5000K
Light is cast evenly on the subject, producing a shot that is well-balanced with a soft touch.
Types of diffusers
Softboxes
This type of diffuser is most commonly used and softens light that is emitted from the flash.
Umbrella diffusers
Also known as shoot-through umbrellas, umbrella diffusers are used to spread the light that passes through the umbrella over a wide area.

Strip softboxes
Strip softboxes come in a long, rectangular shape. Suited for full-body portraits, they are a very popular choice for cosplay photo shoots.

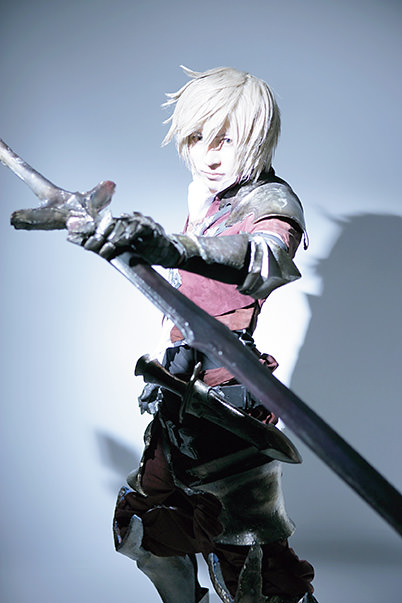
Beauty dishes
A beauty dish is able to illuminate a narrower area than a softbox, and is employed for depicting dimly-lit areas or featuring a part of the subject’s body. This characteristic makes it ideal for cosplay photography, which often involves unconventional scenarios.

Example of an image shot with lighting from a beauty dish
A beauty dish can be used to limit the amount of light, and is thus a handy tool for bringing out the atmosphere of a dimly-lit area.

EOS-1Ds Mark II/ EF24-70mm f/2.8L USM/ FL: 45mm/ Manual (f/5.6, 1/160 sec)/ ISO 400/ WB: Manual - 5000K
Diffusing fabric
Diffusing fabric can be any sheer material that allows light to pass through, such as gauze or mesh. While its uses are limited as it takes up a lot of space, diffusing fabric is capable of producing softer light that illuminates a wider area compared to box-type diffusers. It is usually installed using a boom.

There are diffusing fabrics that are commercially available, but you can also use a piece of cloth that allows light to penetrate as a substitute.
Example of an image shot with lighting from a diffusing fabric
In this example, a shoot-through umbrella is used together with a diffusing fabric, which allows the entire area to be illuminated with soft light, thus making the skin tone of the subject appear smoother.

EOS-1Ds Mark II/ EF24-70mm f/2.8L USM/ FL: 70mm/ Manual (f/7.1, 1/160 sec)/ ISO 200/ WB: Manual - 5000K
Grids
A grid, also known as a grid spot, is a mesh-patterned accessory that is attached to a flash unit or softbox. It can be used to control the area to be illuminated, and allows light to be cast on a narrower area. This accessory comes in handy when there is a need to control the shadow during your shoot.

The grid shown above is for attachment to a softbox.
No grid

EOS-1Ds Mark II/ EF24-70mm f/2.8L USM/ FL: 24mm/ Manual exposure (f/5.6, 1/160 sec)/ ISO 400/ WB: Manual - 5000K
Light from the softbox reaches a very wide area.
With grid

EOS-1Ds Mark II/ EF24-70mm f/2.8L USM/ FL: 24mm/ Manual exposure (f/5.6, 1/160 sec)/ ISO 400/ WB: Manual - 5000K
Compared to the image on the left, light falls on a narrower area in this photo.
Grids and the area of illumination
The mesh of the grid that is attached to a flash unit is also called a honeycomb grid because of its resemblance to the pattern of a beehive. A tighter mesh pattern reduces the area that is being illuminated, so by getting ready several grids with a different area of illumination, you will be able to choose the ideal one according to the scenario.

It is possible to tell the area of illumination of a grid from the “angle”, which is indicated in the product name or specifications. Note that a smaller angle represents a narrower area of illumination.
If you are a beginner to external flash photography, check out the following series:
In Focus: The Basics of External Flash Photography
Receive the latest update on photography news, tips and tricks.
Be part of the SNAPSHOT Community.
Sign Up Now!
About the Author
Working as a photographer mostly on weekdays, Suna always incorporates new photography techniques and provides very well-organised and easy-to-understand explanations on social media such as Twitter.
Cosplayer who is currently involved in cosplay projects such as Fate, Danganronpa and Hatsune Miku. She has won a very good reputation for her scenario-specific photos.
Kanata is a cosplayer as well as a modern artist who specialises in plastic arts. He is famous for the detailed texture of his weapons and protective gear. Kanata is also the official cosplayer for “Kabaneri of the Iron Fortress”.
A publisher that specializes in books and magazines about video, photography and illustrations.


