


RAW Image Processing: How to Bring Out the Blue in Blue Hour Photos
If you photograph the blue hour in RAW format, you can post-process them to make the colours even more vivid. Here’s a tutorial on how to do so using Digital Photo Professional (DPP). (Reported by Yuta Nakamura)

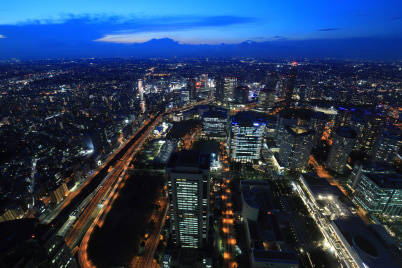
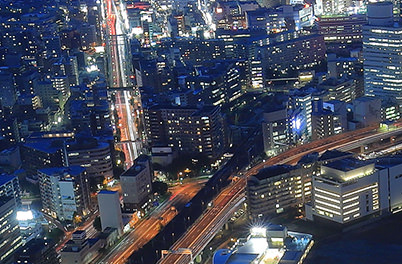
EOS 6D Mark II/ EF16-35mm f/4L IS USM/ FL: 16mm/ Aperture-priority AE (f/11, 15 sec, EV-0.7)/ ISO 100/ WB: Auto
Image before post-processing

Areas edited during RAW image processing
[1] Added a blue hue to the entire image to evoke a sense of coolness in the cityscape.
[2] Ensured that the fine details, including the dark parts of the cityscape that are obscured by black crush, were discernable.
[3] Brought out the crystal-clear feel of the blue hour in the overcast sky.
[4] Gave the buildings and roads a well-defined outline.
This bird’s-eye view of the nightscape was taken from an observation deck about 30 minutes after sunset, a time when the sky is at its bluest. The lights of the city were illuminated, but the colour of the resulting image seems somewhat dull. While the contrast of a night view shot varies depending on whether artificial light is used, the overall image appears dull because I reduced the exposure to prevent blowout.
In the following, I will apply RAW image processing using DPP to make the colours more vivid and brighten the shadowed areas so that the image will look sharper.
STEP 1: Set Picture Style to “Landscape” for more vivid colours
To add vividness to the colours of the night view, I selected the “Landscape” Picture Style. While the white balance can be left in the “Auto” setting in some cases, I set the colour temperature to 4,000K to increase the blue tone so as to create a cool urban feel. Furthermore, I fine-tuned the colour temperature toward the magenta side to bring out the evening glow in the sky. I did not make any further adjustments to the colour, as I intended to increase the colour saturation later.

After adjusting white balance to “4,000K”, I fine-tuned M-G to “-3.0” to increase the blue tone.
BEFORE

I wanted the image to have a cooler feel.
AFTER
The colour tone is now bluer and more vivid.
STEP 2: Increase the “Shadow” setting to brighten the shadow areas
When you photograph a nightscape, having a certain degree of clipping (blowout in highlighted areas or crushed black in shadow areas) is unavoidable, and you want to minimize them as much as possible. Start by taking a shot with the exposure reduced to a level where blowout is hardly noticeable. Then, raise the “Shadow” setting during image processing. Doing so brightens the shadow areas and allows the details to stand out more clearly. To reduce blowout, reduce the “Highlight” setting.

Setting “Shadow” to “4.0” and “Highlight” to “-3.0” to reduce the contrast in brightness produces a result that is reminiscent of a composite HDR image. Here, I set “Color saturation” to “2.0”.
BEFORE
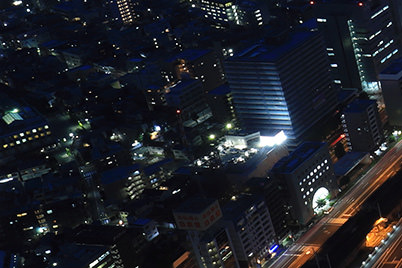
Black crush in the shadow areas.
AFTER
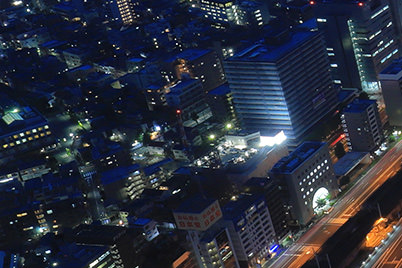
The details of the city are now clearly visible after some brightening.
STEP 3: Improve the image quality with DLO to brighten the image peripheries
To reduce deterioration in the image quality in the image peripheries, I enabled the Digital Lens Optimizer (DLO). The deteriorated areas can be rather fine, so I enlarged the image to check on the effects. I increased the DLO value from the default setting and stopped at “60.0” as no further improvement was noticeable beyond this value. I also enabled “Color blur” and set the “Peripheral illumination” value to “70.0”. Doing so enhances the image quality in the peripheral areas and adds a crystal-clear feel to the sky.

“Highlight/shadow warning” in DPP – a handy feature that provides information on clipping
I pay special attention to reduce blowout such as by turning on the highlight warning display on the camera or setting exposure compensation to the negative side. However, blowout may also occur during RAW image processing when the brightness or exposure is corrected, so you might want to check for it during post-processing.
One handy feature for doing so is the “Highlight/shadow warning” in DPP. You can display it simply by selecting “Highlight/shadow warning” from the “Preview” menu. You can also specify the threshold value and warning colour in “Highlight/shadow warning display settings” of the “Tools” menu.

STEP 4: Adjust the “Sharpness” setting for details that are crisper and better-defined
After applying DLO, I felt that the image was still not as sharp as I wanted, even after increasing the effect level. Thus, I adjusted the sharpness separately to enhance the outline of the buildings and roads below me. Just as I did when I edited on DLO, I enlarged the image and made adjustments while constantly checking on the effect. Here, I set “Sharpness” to “8.0”. This adds a sharper, well-defined feel to the night view that was captured with a narrow aperture.

I enabled “Sharpness” and raised the level from the default value of “4.0” to “8.0”. Applying highlight/shadow adjustment and DLO can affect the sharpness, so I checked the resulting effect visually while making the final adjustments.
BEFORE
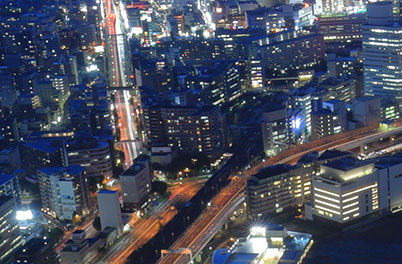
I would have preferred the outlines of the roads and buildings to be better defined.
AFTER
The outlines are now clearly defined.
The final outcome

The GIF file above shows the nightscape photo before and after post-processing. Notice how the dull, original file was transformed into one with a futuristic feel with a few tweaks to the white balance and colours. In the original image, the area on the left looked darker compared to the bustling streets at the centre, but adjusting the shadows in post-processing balanced out the contrast and brought out some details that were originally lost. The finished image looks sharper overall, crisper and hence, more dynamic.
This shot was taken through the glass window of the observation deck in a building. It would be difficult to eliminate reflection of the indoor lights from the glass during the post-processing stage, so do take the necessary measures to avoid capturing reflections during the shoot.
Keen on night photography? You might be interested in these articles:
One Location, Two Looks: Abstract Nightscapes – Tranquillity vs. Vibrancy
Night Photography Tip: How to Use a Remote Switch to Prevent Camera Shake
Useful Camera Functions for Capturing Nightscapes with a Difference
Lens Review: EF24-70mm f/4L IS USM in Night Photography
Must-try Tips for Capturing Dramatic Nightscapes
Receive the latest update on photography news, tips and tricks.
Be part of the SNAPSHOT Community.
Sign Up Now!
About the Author
A monthly magazine that believes that enjoyment of photography will increase the more one learns about camera functions. It delivers news on the latest cameras and features and regularly introduces various photography techniques.
Published by Impress Corporation
Born in Kanagawa Prefecture in 1988. Since 2010, he has been working as a nightscape photographer, not only shooting nightscape locations mainly in the Tokyo area but also throughout Japan. He runs the information site for nightscape spots “Nightscape FAN”


