


Wildlife Photography: 3 Techniques from Professional Photographers
In wildlife photography, focusing, and achieving the desired brightness in photos can be challenging depending on the time of day and location. Let’s look at some techniques professional photographers use to deal with such situations. (Reported by: Gaku Tozuka, Yukihiro Fukuda)

Technique 1: Use Single-point Spot AF to focus on wild birds in a dark forest
In low light conditions, it can get more difficult to establish focus with autofocus (AF). This is especially true in the forest, where using an AF mode that carries out operations over a wider area can result in the focus being “distracted” by branches and leaves in the foreground, or on other unexpected areas. However, although the centre AF point with Single-point AF is highly accurate, using it limits the ways in which you can compose the shot. This is when Single-point Spot AF comes in handy, offering greater freedom in your composition while ensuring the focus stays locked on your subject.
In the photo below, I positioned the bird slightly off-centre to the right in order to incorporate the interesting layout of the tree branches. The AF point was moved two points to the right to achieve this shot.

EOS 7D Mark II/ EF500mm f/4L IS II USM + Extender EF1.4×III/ FL: 700mm (1,120mm equivalent)/ Aperture-priority AE (f/5.6, 1/40 sec, EV-0.7)/ ISO 1600/ WB: Auto
Photo by Gaku Tozuka
Tip 1-1: Change the AF settings to suit the situation
In scenes where there is no margin for error or when you want to capture blink-and-you’ll-miss-it moments, the approach in theory is to focus using the highly-accurate centre AF point in Single-point AF while continuously shooting. If the movement of the wildlife is minimal, giving you more leeway, try setting Single-point Spot AF, which makes it easier to change your composition. But if you want to photograph a fast-moving subject, such as a bird flying in the sky, I would recommend a setting which covers a wider area.

EOS-1D X Mark II/ EF500mm F4L IS II USM+EXTENDER EF2×III/ FL: 1000mm/ Aperture-priority AE (f/8.0, 1/1600 sec, EV±0)/ ISO 800/ WB: Auto
Photo by Gaku Tozuka
If you use Single-point Spot AF to photograph a bird gliding in the air, the camera may end up focusing on the background if the subject moves outside the area of focus. It would probably be more ideal to use an AF mode that covers a wider area.
Check out the following articles for tips on using AF for wildlife/ wild bird photography:
Capturing Birds Gliding in the Sky
Capturing Dynamic Shots of Birds in the Sky
Capturing the Moment the Bird Takes Flight
Pro Techniques for Using the EOS 7D Mark II – Wildlife
Thinking about photography gear? Read Gaku Tozuka’s review on how the EOS-1D X Mark II fares in wild bird photography:
Stunning Focus Accuracy and AF Tracking Performance
Dual Pixel CMOS AF-Perfect Focus Even in Dark Scenes
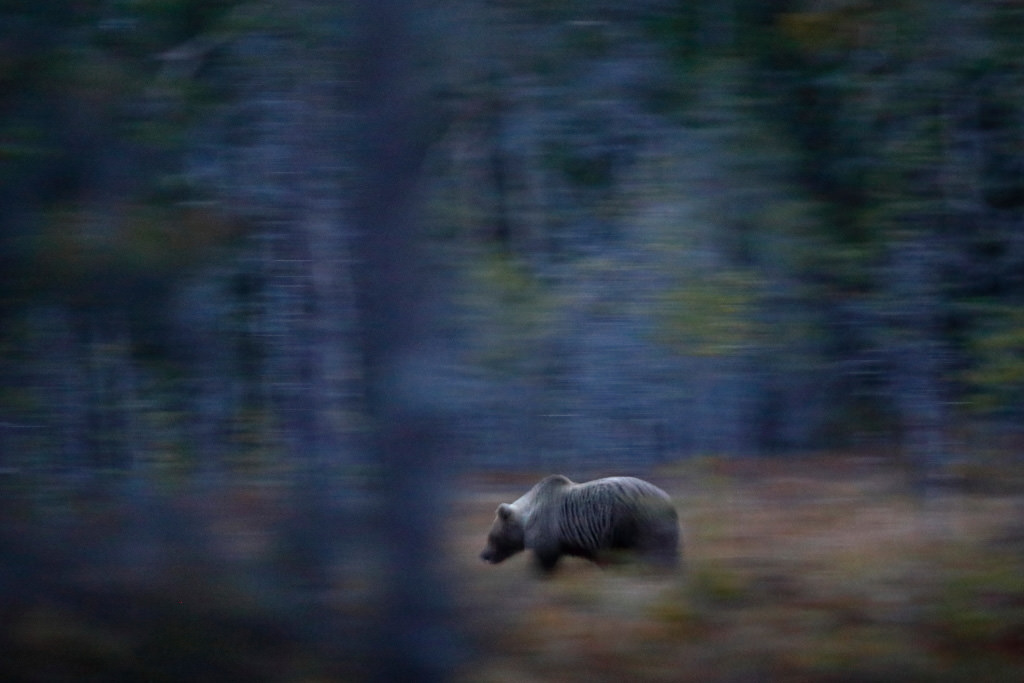
Technique 2: To retain the atmosphere of the night, shoot with negative exposure compensation in Aperture-priority AE mode
On Canon’s latest cameras, the low-light ranging limit for Live View shooting has been improved to the extent that focusing is now possible even in situations where it is hard to see with the naked eye, such as at EV-4.
While photographing wild animal species that are active after sunset, I thought about how I could showcase the world of darkness around the animals. Digital cameras have a tendency to shoot as it if it were daytime even in dark locations, so I used Aperture-priority AE with the exposure compensation set between EV-1.0 and -2.0 to suppress this effect and depict the night atmosphere in the shot. This is a shooting technique I call "Night mode", which is effective for use at times of low colour temperature after sunset and before sunrise.

EOS 5D Mark IV/ EF70-200mm f/2.8L IS II USM/ FL: 70mm/ Aperture-priority AE (f/2.8, 1/5 sec, EV-1.3)/ ISO 10000/ WB: Daylight
Photo by Yukihiro Fukuda
Tip 2-1: Shoot in Live View from behind a photographic blind
To capture this photo of a brown bear in North-eastern Finland, I shot from a blind which I had custom-made specifically for photographing brown bears. I inserted the lens through a small opening in the blind for the shoot, and was able to secure the tripod head within the blind, which made shooting easier. Be careful not to lose sight of your subject when using Live View AF while shooting. This technique is effective when visibility is minimal.

Tip 2-2: Fix the white balance at "Daylight" to capture the changes in colour temperature immediately after sunset
By fixing the white balance at "Daylight", you can take photos that retain the rapid changes in colour temperature before and after sunset. I would recommend this technique as it allows you to capture the transformations in colour that occur as the night deepens.
Redness is present 7 minutes before sunset

EOS 5D Mark IV/ EF70-200mm f/2.8L IS II USM/ FL: 200mm/ Aperture-priority AE (f/2.8, 1/60 sec, EV-1.3)/ ISO 3200/ WB: Daylight
Photo by Yukihiro Fukuda
Blueness increases 13 minutes after sunset
EOS 5D Mark IV/ EF200mm f/2L IS USM/ FL: 200mm/ Aperture-priority AE (f/2.0, 0.4 sec, EV-1)/ ISO 12800/ WB: Daylight
Photo by Yukihiro Fukuda
You can tell that darkness is rapidly falling after sunset from the exposure level indicator. By fixing the white balance, the blueness will naturally increase along with the sunset. There is no difference in the post-processing settings of the two photos above. The only parameter that was changed during post-processing was contrast, which was increased. You can see how shooting at different times of the day can result in images that give a totally different feel.
For more options on tweaking colour temperature, check out:
How to Render Colours with the White Balance Correction Function
More ideas for photographing wildlife:
Super Telephoto Lens Techniques - Wildlife Silhouettes Against the Sun
How Do I Photograph Small Animals Against a Busy but Beautiful Background?
Receive the latest updates on photography news, tips and tricks by signing up with us!
About the Author
A monthly magazine that believes that enjoyment of photography will increase the more one learns about camera functions. It delivers news on the latest cameras and features and regularly introduces various photography techniques.
Published by Impress Corporation
Born in 1965 in Tokyo. Fukuda's visit to Hokkaido in search of the Japanese cranes he loved led him to become an animal photographer. After spending 10 years on wildlife coverage in Hokkaido, Fukuda expanded his scope to other countries and underwater photography. Wildlife, underwater, and landscape photography now form the three pillars of his current activities.
Born in 1966 in Aichi, Tozuka developed an interest in photography when he was in the third year of high school, and started to capture natural landscapes as well as wildlife animals. At the age of 20, he became absorbed in photographing wild birds after accidentally capturing a woodpecker in his photo. He has released a large number of works in media such as magazines, bulletins, books, calendars and TV commercials.


