


During movie shooting, change is constant when it comes to shooting conditions—objects may enter the composition, etc. Here are 7 settings, accessories and points to note that will help you to handle just about anything that may crop up when you’re shooting movies with the EOS 5D Mark IV. (Reported by: Nobuyoshi Kodera, Model: Sayaka Aramachi (OSCAR PROMOTION CO., LTD.))

7 points to check before making your first movie with the EOS 5D Mark IV
1. Get ready a memory card that meets the requirements
Check the bit rate that the memory card can handle. Bit rate refers to the amount of data that is written to the memory card each second as you shoot the movie. Generally, the higher it is, the better the video quality, but your memory card will also need a faster write speed to ensure smooth recording of the movie; if not, you will probably end up with dropped frames.
To record 4K movies, you will need a high bit rate of approximately 500Mbps. In general, most personal camcorders that support 4K movie shooting have bit rates that range from 60Mbps to 100Mbps, so it is not difficult to tell how high the bit rate of about 500Mbps is in the case of the EOS 5D Mark IV.
However, do note that the camera is not compatible with UHS-II and CFast, which are the highest standard for SD and CF cards respectively. In other words, the types of memory cards that meet the above speed requirement are rather limited.
■SD card
4K/ UHS-I: 90MB/sec. or faster
Full HD/ UHS-I Speed Class 3 and above (60p, 50p/ALL-I), SD Speed Class 10 and above (60p, 50p/IPB)
■CF card
4K/ UDMA 7: 100MB/sec. or faster
Full HD/ UDMA 7: 60MB/sec. and above (60p, 50p/ALL-I), 30MB/sec. and above (60p, 50p/IPB)
A high-speed CF card with 128GB and above is recommended for 4K movies
A CF card of the UDMA7 standard that can write at 100MB/s or higher offers a faster transfer speed, and is thus well-suited for shooting 4K movies. It may cost more than an SD card, but considering how it can handle both movies and stills at a swift speed, it still is quite value for money.
2. Think about how to structure the movie
If you are filming a movie, even a short one, it is quite unlikely that you will complete the entire shoot within a single session. You need to join multiple scenes together in order to visually convey to audiences the world view that you are trying to show with the movie. When holding a photo exhibition for your still shots, you would think about how to arrange the layout so that the audience will see them in a particular order, wouldn’t you? The same concept applies to the structure of movies. Also, there will not be enough elements to make up a movie if you record only the scenes that you want to capture. Bear in mind to include supplementary scenes that help to connect the entire story.
5 to 6 seconds x 6 scenes = 30 seconds

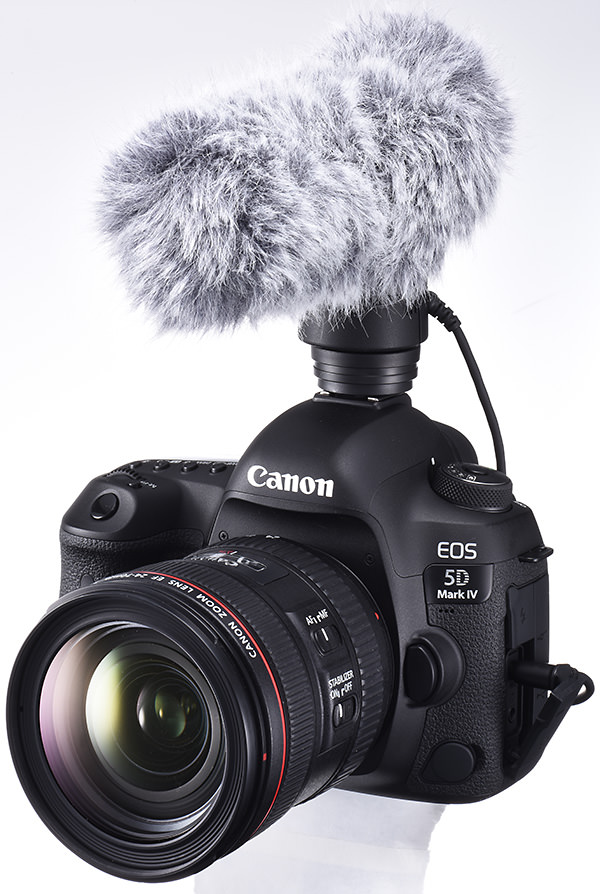
3. An external microphone is a must-have item for recording high-quality audio
The built-in microphone on the EOS 5D Mark IV is sufficient for typical situations that do not require high audio quality, such as getting a rough gauge of the sound quality at the location of the shoot. To record audio at a quality that matches that of the movie, an external microphone is a must-have. You can also monitor the sound during the shoot by making use of the headphone jack on the camera.
Canon’s external microphones come with features such as an attenuator that controls sound distortion automatically, as well as a wind filter feature for reducing noise caused by the wind. These allow you to configure the settings according to the surrounding conditions of the shoot.
An external microphone that can be mounted onto the hot shoe is recommended

Directional Stereo Microphone DM-E1
A feature of this microphone is that it offers directional control with one of the three modes. In addition to the Shotgun mode, which captures sound from a narrow zone directly in front, recording is also possible in the Stereo (90°/120°) modes.
For Outdoor Use

For Indoor Use
Comes bundled with the Directional Stereo Microphone DM-E1 is a Wind Screen which has the effect of reducing wind noise during movie shooting. Its use is recommended when you are filming outdoors. For indoor shoots, the sound may be muffled in some cases so it is best to use the microphone without the Wind Screen.
4. Avoid zooming when the movie is recording
When shooting a movie, many users may feel compelled to zoom in on the subject. However, most zoom lenses meant for use with DSLR cameras are designed for manual zooming. To ensure smooth zooming, users will need to provide constant, stable and deliberate movement, which is difficult. Therefore, if you need to zoom in or zoom out with your EF lenses, shooting separate movies and connecting them at the editing stage would probably give the best result.

When you are shooting a close-up view, capture it as an individual movie clip.
Pay attention to the composition if you intend to use 4K Frame Grab
The aspect ratio of 1.90:1 for 4K movies is rather wide. If you plan to crop the movie images into stills with an aspect ratio of 3:2 or 4:3, you will need to take this into consideration and choose an appropriate composition while shooting the movie.

Note that when the composition makes use of the entire frame in a horizontally-long aspect ratio, a part of it will be cut off when you crop it into the 3:2 or 4:3 aspect ratio.
5. Use a video tripod to enhance the movie quality
The design of tripod heads for videography is fundamentally different from that for photography. Those for video shooting come with mechanisms that allow the tripod head to move smoothly so that the camera can be tilted or panned in the vertical or horizontal direction. This is something that cannot be performed using a photo tripod. Also, unlike still shots where the horizontality of the composition is sometimes disrupted intentionally, such techniques are rarely used in movie shooting, so video tripods are designed to help achieve horizontality with ease. For 4K movies, it is definitely good to have a video tripod as an add-on.
Tilting the camera from down to up with a video tripod


There are many scenes where tilting the camera comes in handy, such as when you are filming the subject from toe to head, or when you are looking up at a high-rise building or a tall tree. These can be done smoothly with the use of a video tripod.
Sliding to the left or right


Dolly is a technique for moving the camera sideways while shooting. What is so attractive about a dolly shot is that the distance between the camera and the subject is constantly changing. Besides sideway movements, there are also other variations of dolly shots, including back-and-forth as well as up-and-down movements.
Video tripod kit with a slider is recommended for dolly shots
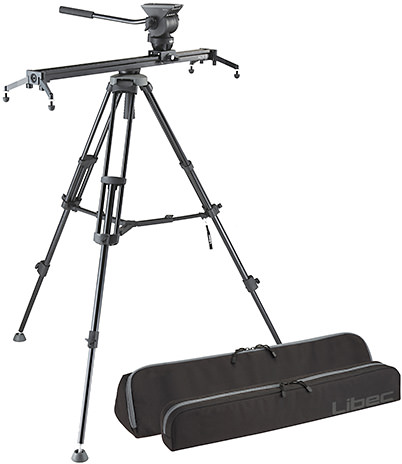
A video tripod kit that comes with a slider is most ideal when you are shooting with a dolly. Lately, the price of such a kit has become much more affordable than before.
6. Determine the aperture value and shutter speed
In many cases, the shutter speed that is employed for movie shooting is either set to a value equivalent to or approximately double that of the frame rate. In other words, for 4K movies, the shutter speed would be 1/30 or 1/60 second. Although motion within a single frame might turn out blurry because of the slow shutter, this in fact helps to make movements appear smooth in a movie. With a shutter speed setting as low as 1/30 or 1/60 second, it would be difficult to open up the aperture when you are shooting in the day or other scenes with a large amount of light. To reduce the depth of field, you can make use of a neutral density (ND) filter to control the amount of light.
* Difference in criteria between still and movie shooting for determining the aperture value and shutter speed
■ When shooting stills
- Aperture: Choose an aperture value that allows you to obtain a depth of field suitable for the photographic expression.
- Shutter speed:
1. Choose a shutter speed that does not cause camera shake or subject blur.
2. Reduce the shutter speed intentionally if you want to add a slow-shutter effect.
■ When shooting movies
- Aperture: Choose an aperture value that allows you to obtain a depth of field suitable for the photographic expression.
- Shutter speed: Select a shutter speed that is equivalent to or approximately double that of the frame rate.
An ND filter is recommended for movie shooting in a bright scene
Since the choice of shutter speed is limited in movie shooting, an ND filter can be used to control the amount of light so that you can set the aperture value more flexibly. Go for 1/16 if you are only getting one ND filter, and add on 1/4 or 1/64 according to your shooting needs.
Use a high ISO speed to obtain the necessary level of brightness when shooting in a dimly-lit scene

During movie shooting in a dimly-lit scene, the ISO speed is raised to obtain the necessary level of brightness. Also, note that flicker may occur if the light source is in synchronisation with the power supply frequency, so it is necessary to bear in mind to adjust the shutter speed according to the region you are shooting in.
Images are smoother when the shutter speed is not excessively fast
When shooting a 4K movie with the EOS 5D Mark IV, the recording frame rate cannot exceed 30 fps. Increasing the shutter speed unnecessarily produces frames without motion blur, thus resulting in a series of frames that lack continuity as a movie. In order to create smooth movie clips, care is therefore needed to avoid increasing the shutter speed excessively.

When shooting a close-up still image of a walking subject, the slight blur you get in the shot when using a shutter speed of 1/60 second is less than ideal. However, when shooting a movie, having frames with such motion blur helps to make the resulting clip appear smoother.
7. Make good use of the 3 AF modes
The EOS 5D Mark IV comes with three types of AF modes. For videoing people during occasions that do not allow for trial shots, such as a sports meet or tournament, Face Detection + Tracking AF comes in very handy. Meanwhile, for subjects or landscapes that allow for retakes, you are strongly encouraged to try out FlexiZone – Single AF, which enables adjustment of the focusing and AF response speed. Each of the three modes has their own characteristics, and it would be good to familiarise yourself with them before you start shooting.
Face Detection + Tracking AF

This mode comes in handy especially for scenes where the distance of the subject from the camera is changing constantly, such as when the subject is moving toward the camera. If there are not more than three persons in the composition, the camera is able to continue shooting while maintaining the focus on the subject.
FlexiZone – Multi AF

This mode prevents the focus from shifting to an unintended object in the composition when you are shooting subjects that take up a wide area, such as a group of people. However, it is not a suitable choice if you need to move the camera while shooting.
FlexiZone – Single AF

If AF responds unintentionally when a car or a passerby moves past the front of the camera, the resulting movie may turn out unnatural. In this case, make use of FlexiZone – Single AF to set focus while adjusting the subject tracking sensitivity of Movie Servo AF in the setting menu so as to lock focus on the subject.
Receive the latest updates on photography news, tips and tricks by signing up with us!
About the Author
A monthly magazine that believes that enjoyment of photography will increase the more one learns about camera functions. It delivers news on the latest cameras and features and regularly introduces various photography techniques.
Published by Impress Corporation
Kodera has more than 10 years of professional experience as a technical director for TV programmes, commercials and promotion videos. He is also a writer for a diverse variety of genres ranging from video and audio to contents based on the motto of making complicated content simple and simple content sophisticated.


