


In previous articles, we learned that ultra-wide-angle lenses are excellent for creating leading lines because of the way they exaggerate perspective and make the lines look longer. A telephoto lens, in comparison, compresses perspectives, but the effect of this on leading lines could actually work better depending on your artistic vision! Here’s how one photographer utilised it to bring his concept to life. (Reported by Masato Mukoyama, Digital Camera Magazine)
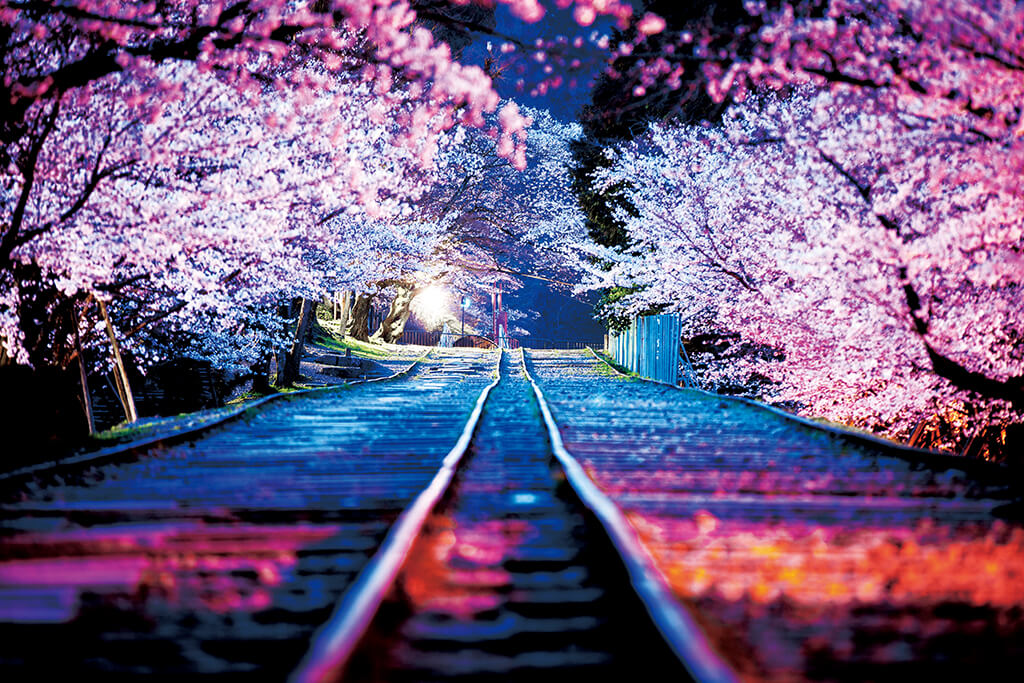
EOS 5D Mark II/ EF70-200mm f/2.8L IS II USM/ FL: 200mm/ Manual exposure (f/2.8, 30 sec, EV +0.3)/ ISO 100/ WB: 5,750K
The concept behind the shot: “A Spring Night’s Dream”
Photos reflect what the subject actually looks like, but I believe that what you envision will also reflect your own personal perspective in addition to your knowledge of your subject.
After I point my camera at the subject, before I release the shutter, I visualise what I want my final shot to look like. For this shot, I was inspired by the seductive charm of the night sakura and the dreamy feel of the scene, hence the concept “A Spring Night’s Dream”.
Two things I needed to do to achieve my envisioned shot:
i) Reduce elements that suggest reality
ii) Draw viewers deeper into the scene so that they would be "immersed" in it.
These were achieved by:
- Using a cool white balance setting
- Making use of the shallow depth-of-field and perspective compression effects of a telephoto lens
Technique 1: Use the telephoto perspective compression effect to immerse viewers in the scene
The image was shot on an upward slope that provided a clear view into the distance. This means that viewers can easily get distracted by empty spaces and elements such as the blue sky that you see in the 70mm shot below.


Using the 200mm telephoto end not only kept the sky out of the frame, but also made the sakura look closer together and hence more abundant because of the perspective compression effect. I find that this is one very effective way of removing distracting elements and making the shot more immersive.
What do we mean by “perspective”? Find out in:
Lens Basics #5: Perspective
Tip: Enhance the effect further by using a wider aperture to create bokeh. For this shot, I created bokeh in the foreground, which draws the viewer’s eyes to the in-focus areas in the middle and background of the image.
Technique 2: Shoot from a low position
The lines formed by the railway tracks are visual guides that lead the viewer’s eyes along the sakura trees. This creates the illusion of depth, and in this shot, they also contribute to the immersive, cinematic feel.
A low position results in a stronger visual guidance effect compared to eye level or a high position.
Taking care to keep the rails recognisable, I tried shooting from different low position heights. As you can see, it is not necessarily a case of "the lower the better".
75cm above the ground: Too high

As the camera is further above the ground compared to the shots below, there is less foreground bokeh. The train tracks look longer, but our eyes are drawn more to the vanishing point in the distance. It gives the scene more depth, but also adds distance: We feel less immersed compared to when the end of the tracks didn't feel so far away. This is also why a higher position would not have given me the shot that I wanted.
25cm above the ground: Too low

Too close to the ground. Our attention is drawn more to the train tracks than the sakura trees.
50cm above the ground: My ideal effect

The visual impact of the railway tracks and the sakura trees seem to be well-balanced.
From the above, we can conclude that for this scene, the leading lines were the most effective when the camera was 50cm above the ground.
Note: Don't take this as a rule of thumb: The camera position that works for you will always depend on your shooting scene and the outcome that you envision. It's good to try different positions and angles until you get what you want!
Learn more about what you can do with a telephoto lens in:
Telephoto Lens Techniques – Creating Multiple Layers of Bokeh
2 Instant Techniques to Liven Up Your Outdoor Portraits
How to Photograph Dreamy Images of Decorative Lights
Receive the latest update on photography news, tips and tricks.
Be part of the SNAPSHOT Community.
Sign Up Now!About the Author
A monthly magazine that believes that enjoyment of photography will increase the more one learns about camera functions. It delivers news on the latest cameras and features and regularly introduces various photography techniques.
Published by Impress Corporation
After finishing his graduate studies at Tokyo Institute of Technology in 2011, Mukoyama worked for a vehicle parts manufacturer, where he had the opportunity to work in the United States for 1.5 years. During that time, he visited various places in the mid-western and western United States, photographing stars and animals. When he returned to Japan, he became an active nature photographer, travelling from his home in Aichi Prefecture to other parts of the country such as Nagano, Kumamoto and Hokkaido to shoot. Since 2019, he has been shooting in mountainous areas, focusing on landscapes, plants and animals.
Website: https://mmukoyama.com/
Instagram: @mt.moco


