


Off on holiday to a snowy country? Here are some simple techniques for creating extraordinary images of snow! (Reported by: Toshiki Nakanishi, KG PHOTO CREATOR, Kunihito Ohtsubo, Digital Camera Magazine)
Technique 1: Exposure compensation magic


Images and technique by: Toshiki Nakanishi
These images were achieved with almost purely camera work! Only the image with the black background required some enhancements to black and white levels in post-processing.
It was yet another winter in Hokkaido, where a thick blanket of snow covers just about everything. It’s probably safe to say that winter is the least colourful season ever, but that also means an opportunity to challenge your photographer’s eye and creativity! For the shots above, I was trying to see how many photo variations I could create of the same monochromatic scene. Here’s one way to do so without relying on lens-related effects: simply take your exposure compensation to the extremes.
Step 1: Use a telephoto lens and decide on your framing
When faced with a grand, sprawling scene, one of the biggest decisions that a photographer has to make is almost always, “Which part of the scene should I capture?” This is especially true for somewhere scenic like Hokkaido, where possibilities are everywhere!
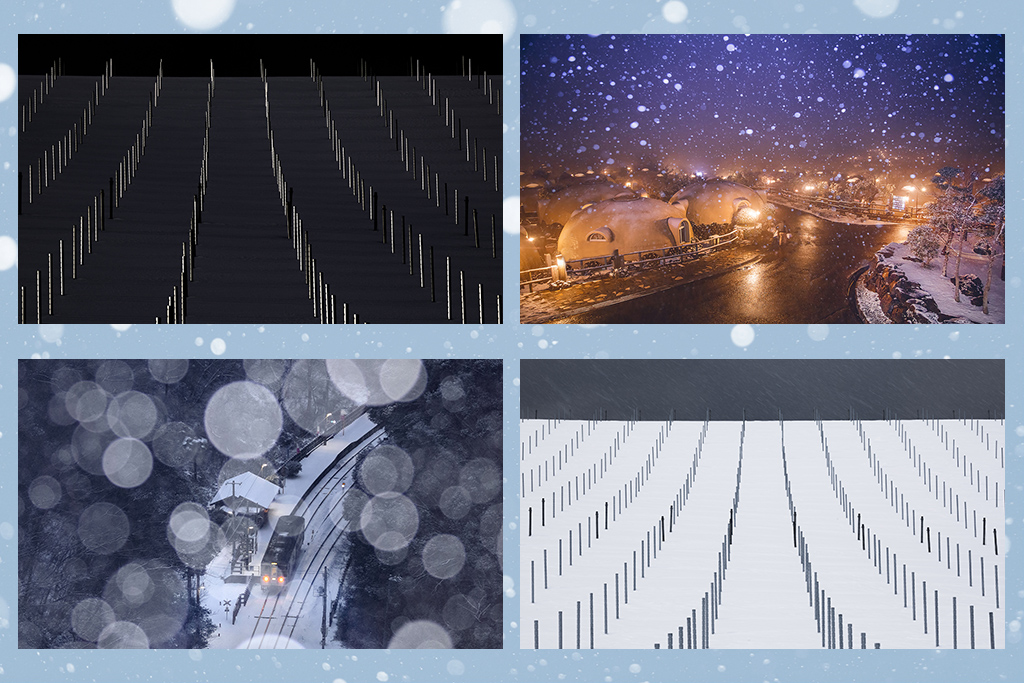
This is the actual scene I faced:

I saw the potential for a graphical image, especially with the help of telephoto compression, and decided to look for rhythm and patterns. Finding a suitable camera angle and framing that gave me what I wanted was the crucial first step to unbelievable results.
Step 2: Take your exposure compensation to the extremes
Here’s how my shot would look have looked like if I used the “correct” exposure according to the camera:
EV 0

That’s because when a large proportion of the scene is white, the camera’s exposure meter might be “fooled” into underexposing the scene. You’ll have to compensate accordingly—something best done in-camera—but why not have some fun experimenting along the way?
Variation 1: Bring out the whiteness of snow
EV +0.7

EOS 5D Mark IV/ EF100-400mm f/4.5-5.6L IS II USM/ FL: 214mm/ Aperture-priority AE (f/16, 1/13 sec, EV +0.7)/ ISO 100/ WB: Auto
Other equipment: PL filter
This is suitable for overcast and snowy days. If you are using a semi-automatic exposure mode like Av mode, increase the exposure compensation so that the snow appears as white as you want it to appear! If you are in manual exposure mode, overexpose the image to achieve the same effect. The important thing is to ensure that the snow appears brighter than grey.
Variation 2: Reverse the colours
EV -0.7

EOS 5D Mark IV/ EF100-400mm f/4.5-5.6L IS II USM/ FL: 300mm/ Aperture-priority AE (f/16, 1/400 sec, EV -0.7)/ ISO 400/ WB: Daylight
Other equipment: PL filter
For this shot, I exposed for the highlights—not the snow, but the bright parts on the poles that were catching the sunlight. To make these highlight areas stand out more, I applied negative exposure compensation until the blacks were almost completely crushed.
I further enhanced the effect when I post-processed the RAW image by:
1. Reducing shadows further
2. Adjusting the black and white levels for better separation.
There you have it: abstract art, with minimal post-processing!
Technique 2: Use a flash on falling snow

EOS 5D Mark III/ EF24-105mm f/4L IS USM/ FL: 28mm/ Manual exposure (f/4, 1/8 sec)/ ISO 1600/ WB: Daylight
Other equipment: Flash
Image by: KG PHOTO CREATOR
There’s always something magical about falling snow. But somehow, when you simply use a fast shutter speed to try to freeze the moment in a photograph, the snow might not appear the way you want.
The trick to dreamier snowy day photos that properly show the snowfall? A flash.
New to flash photography? Get to know your Speedlite in:
Start Flash Photography in 9 Steps!

Step 1: Dark background
Step 2: Set the exposure for the scenery
Step 3: Angle the flash head upwards. Start with a weaker flash output and adjust accordingly.
Step 1: Look for somewhere with a dark background
You want the snow to show up clearly. The night sky is a good choice! Avoid light-coloured or white backgrounds. For best results, the background scenery should be further away. If it’s too near, the snow will blend into it. Nearby walls and buildings will also reflect light from the flash and make the scene look unnaturally bright.
Step 2: Decide on the best exposure before you use your flash
The flash lights the falling snow and the sky, but the exposure of the scenery depends on your camera settings. If you leave it all to the camera (such as by using automatic or semi-automatic exposure settings and the flash set to E-TTL mode), these elements, especially those in the foreground, may appear unnaturally bright.
Before you fire the flash, take a test shot of the scene without a flash. At this point, it’s fine if the sky where the snow would be looks too dark! Adjust your settings (or use exposure compensation) until the scenery’s exposure looks the way you want. If you aren’t already using manual exposure mode, take note of the individual settings, switch to manual exposure mode, and dial them in.
Step 3: Angle the flash upward and fire
Tilt the flash head upwards towards the falling snow. Aim away from the scenery on the ground, or else the light from the flash illuminating just part of it could lead to unnatural outcomes! It also helps to start off with a weaker flash output and increase it when necessary.
Not sure about manual flash settings? In E-TTL auto flash mode, you can use flash exposure compensation to control the flash output. See:
When the Flash Makes Your Subject’s Face Too Bright
Got a camera with a built-in flash? Depending on conditions, you might be able to achieve similar results although there is less flexibility with the angle of the flash light. Also see:
Built-in Flash Techniques #6: Magical Bokeh Circles on a Rainy Day (yes, it works with rain too!)
In Focus: Built-in Flash Techniques
Variation: Use a wide aperture to turn the snow into dreamy bokeh

EOS 5DS/ EF70-200mm f/2.8L IS II USM/ FL: 145mm/ Aperture-priority AE (f/2.8, 1/100 sec, EV -0.7)/ ISO 640/ WB: Auto/ Cropped to 4:5
Other equipment: Flash
Image by: Kunihito Ohtsubo
With a fast telephoto lens, you can turn the falling snow into large, beautiful bokeh circles that make the scene look even more surreal. This image was created at f/2.8, the lens’ maximum aperture. I underexposed the image slightly using negative exposure compensation (EV -0.7) to prevent blown highlights.
The story behind the shot: A planned shot that called for perfect timing
The train station in this scene is Tsubojiri Station on the Dosan Line. Located in Tokushima Prefecture in Southern Japan, it is a very well-known hikyō station (remotely located station) that attracts many train enthusiasts. It looks particularly beautiful in the swirling snow, and this was the scene that I aimed to capture.
I spent a few days monitoring the snowfall in the location, using information from the local weather bureau and the live camera of the train route. There must be the right amount of snow falling. Too much snow would cover the scene with bokeh and reduce the train station’s visibility; too little would not achieve the intended effect. The wind direction affects the outcome too.
I took a few test shots before the train arrived to get my settings and angles in order. The rest was up to luck!
More simple on-camera flash photography tutorials and techniques in:
[Flash Technique] How to Achieve Dramatic Colours in Backlight
[Flash Technique] Creating a Pop Art-inspired Night Portrait
Bonus: Tips for photography in winter
- Bring along spare batteries. Cold weather reduces battery life. Keep the spare batteries in a warm place, such as in your pocket.
- Use your lens hood and/or UV filter to protect the front element of your lens from snow and other elements.
- Carry an air blower to blow off snowflakes that land on your lens or UV filter. Avoid using your hands or a cloth—these could leave smudges!
- Carry airtight plastic bags such as ziplock bags and seal your camera gear in them before you bring them indoors. This will keep the gear safe from condensation.
- If your gear is not weather-sealed, bring rain covers to protect it from getting wet in snowy or rainy conditions. A poncho or plastic bag should work, too. Weather-sealed cameras and lenses are dust- and drip-resistant and shouldn’t have any issues.
- Don’t panic if the rear LCD monitor and/or electronic viewfinder of your camera starts to lag or stop functioning. This might happen when it’s extremely cold and you’ve been outside for a while, especially if your camera is not built to operate in extreme conditions. They should return to normal when you warm the camera up.
Also see: How to Protect Your Camera for Cold Weather Photography
For more scenic winter photography spots, tips, and photo ideas, see:
3 Ways to Capture Compelling Images of Monochromatic Winter Scenes
Magical Winterscapes: When Diamond Dust Becomes Sun Pillars
Photographing Mount Fuji in Winter: Shooting Spots & Composition Tips
About the Author
A monthly magazine that believes that enjoyment of photography will increase the more one learns about camera functions. It delivers news on the latest cameras and features and regularly introduces various photography techniques.
Published by Impress Corporation
Born in 1971 in Osaka. After learning photography on his own, Nakanishi moved the base for his photography activities to the town of Biei located in Kamikawa-gun of Hokkaido. While capturing landscapes that focus on light, he also produces works that bring out the figurative beauty of nature. Head of PHOTO OFFICE atelier nipek.
Kunihito Ohtsubo is the founder and chairman of the Shikoku Camera Club, which has over 100 members. Together, they seek to create awareness of Shikoku’s rich natural beauty and charming traditional culture. His main business is in producing media that contributes to revitalising the local industry through photos and footage. This includes providing images to Shikoku’s local governmental bureaus and tourism organisations, event promotion and support, and judging photo contests.
Instagram: @kunihito_ohtsubo
A landscape photographer based in Kyushu, KG PHOTO CREATOR is a camera reviewer who also frequently writes for and provides images to camera magazines. He is also an official advisor for NiSi filters.
Instagram: @kg.photo.creator


