


Improve Your Travel Photos with the EOS M10 #2: Using Aperture Settings & Picture Style
When travelling, you will almost certainly come across landscapes that leave such an impression, you just have to take a photo for memory’s sake. In this article, we show you how you can take photos with greater impact by adjusting aperture settings and using the appropriate Picture Style preset. (Photos by: Takeshi Akaogi. Edited by: Etica)

EOS M10/ EF-M22mm f/2.0 STM/ FL: 22mm (35mm equivalent)/ Aperture-priority AE (f/8, 1/60 sec, EV+0.7)/ ISO 320/ WB: Auto
Capture stunning scenes the way you saw them, in deep focus all the way into the distance
Use a narrower aperture (large f-number) to make all the elements of the photo in focus
For landscape photos, it is very important to make sure that the photo is sharp from corner to corner and that the individual elements can be clearly seen. In Part 1, we covered incorporating bokeh into our photos to make objects stand out, but when you have a scenic landscape, you will usually want to ensure that the whole photo is in focus. Use Aperture-priority AE (Av) mode and set a narrow aperture (large f-number). An aperture value of about f/8 is recommended to give your photos a beautiful finish.
f/8
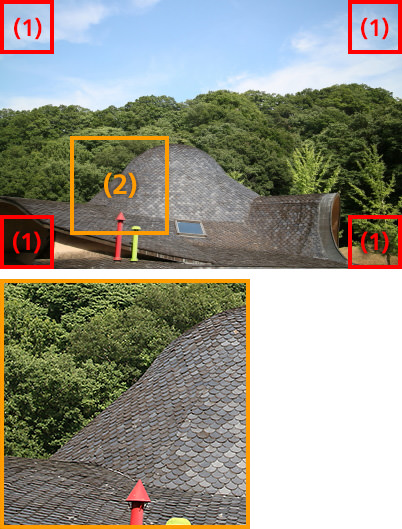
EOS M10/ EF-M22mm f/2.0 STM/ FL: 22mm(35mm equivalent)/ Aperture-priority AE (f/8, 1/320 sec, EV±0)/ ISO 200/ WB: Auto
f/2
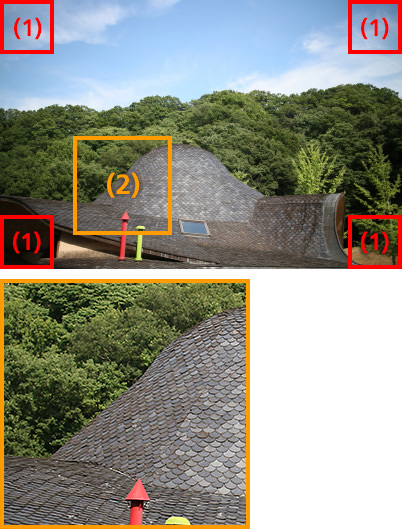
EOS M10/ EF-M22mm f/2.0 STM/ FL: 22mm(35mm equivalent)/ Aperture-priority AE (f/2, 1/4000 sec, EV±0)/ ISO 200/ WB: Auto
The above highlights two key differences in image quality between the image taken at f/2 and the one taken at f/8.
(1) Image corners are darker in the f/2 examples. This is called vignetting. It is a lens characteristic and tends to be more obvious at larger apertures. The corners of the f/8 image are clear and of a lighter.
(2) In the enlarged area, notice how the outline of the roof and the details of the tiles and leaves are crisply depicted in the f/8 example, but slightly blurred in the f/2 example.The shallower depth-of-field at f/2 means that details in the background are less in focus. This same characteristic is what creates bokeh, but for this scene, it simply makes the image look "soft" (unintentionally blurry and out of focus).

To change the aperture value, after changing the shooting mode to Aperture-priority AE (Av) mode, either turn the dial or touch and drag the slider on the touch screen to set your desired aperture value. Also, remember to turn on the ‘Grid display’ function on the LCD monitor to keep your shots level.
Don’t forget to ensure your photo is horizontally level!
By shooting at f/8, you have managed to capture everything in the scene clearly and in focus. However, at this stage, a crooked photo could potentially ruin what would have been a good photo. As a level composition is one of the key components in creating a good landscape photograph, do remember to take note of your axes whenever you get ready your camera.

EOS M10/ EF-M22mm f/2.0 STM/ FL: 22mm (35mm equivalent)/ Aperture-priority AE (f/8, 1/160 sec, EV+0.3)/ ISO 200/ WB: Auto
Take care to maintain your horizontal and vertical axes when you shoot. Display the grid on the LCD monitor for reference. To do so, press the ‘Menu’ button and go to the ‘Shooting information display’ tab. Toggle the ‘Grid display’ option to show or hide the grid.
Tip: Try out a Picture Style
Using a Picture Style can help to make your photos stand out more. You can even adjust settings such as sharpness, contrast, saturation, etc. to your own liking to decide what kind of mood you want for your photos.
Picture Style [User Def.]
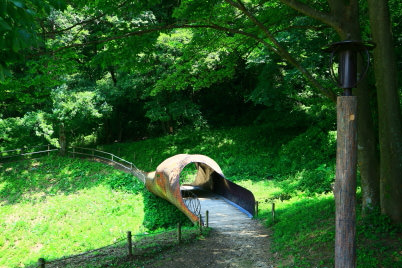
EOS M10/ EF-M15-45mm f/3.5-6.3 IS STM / FL: 21mm (33mm equivalent)/ Aperture-priority AE (f/8, 1/60 sec, EV+0.3)/ ISO 250/ WB: Auto
Picture Style (User Def.)
Sharpness (5)/ Contrast (2)/ Saturation (2)/ Color tone (0)
Picture Style [Standard]
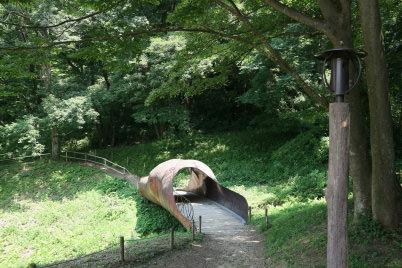
EOS M10/ EF-M15-45mm f/3.5-6.3 IS STM/ FL: 21mm(33mm equivalent)/ Aperture-priority AE (f/8, 1/60 , EV+0.3)/ ISO 320/ WB: Auto
Picture Style (Standard)
Sharpness (3)/ Contrast (0)/ Saturation (0)/ Color tone (0)
The image on the left used a user defined Picture Style. Compared to the one on the right, which was shot with Picture Style (Standard), the sharpness and contrast was increased in order to depict the thin branches of the trees more clearly. The saturation was also increased, which has given the green leaves a more vibrant finish and also made the colour of the tunnel more saturated.
Adjusting the sharpness, contrast, saturation and colour tone of a Picture Style
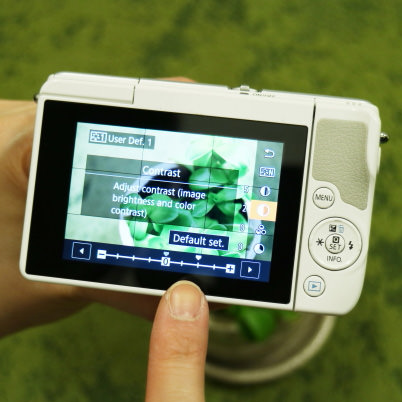
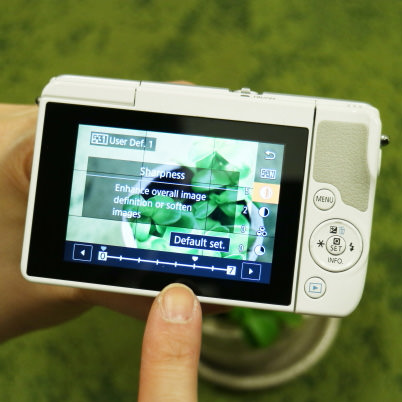
Press the ‘Quick set’ menu button (A), then select the ‘AUTO’ option in the menu (B), select your desired Picture Style and then touch the ‘Detail set’ option. Press the up or down button to choose an item to modify, and then customize the values either by pressing the left or right button or turning the dial. For ‘Color tone’, lower values will produce redder hues, and higher values will produce yellower hues.

For more information on customising Picture Style, check out:
3 Steps to Creating Custom Photos with Picture Style
Receive the latest update on photography news, tips and tricks.
Be part of the SNAPSHOT Community.
Sign Up Now!
About the Author
Etica Co., Ltd. not only run photography classes under the name “Tanoshii Camera School", but also edit publications and plan media and events related to cameras and photography, with a focus on themes related to child care, animals and food. Their motto is "Photos make people happy!" and they are engaged in communicating the charm of cameras and photography.
As a photographer, Akaogi works mainly for magazines and writes books introducing photography and practical tips. He also teaches at photography workshops.


