


Forget laser light shows: there’s nothing more spectacular than the one Mother Nature puts up during a thunderstorm. Chris Ambler’s (@chris.ambler)’s passion for photographing storms and lightning has resulted in many stunning images that capture their power and beauty in a way we can never see with our bare eyes. He shares with us how to get started.

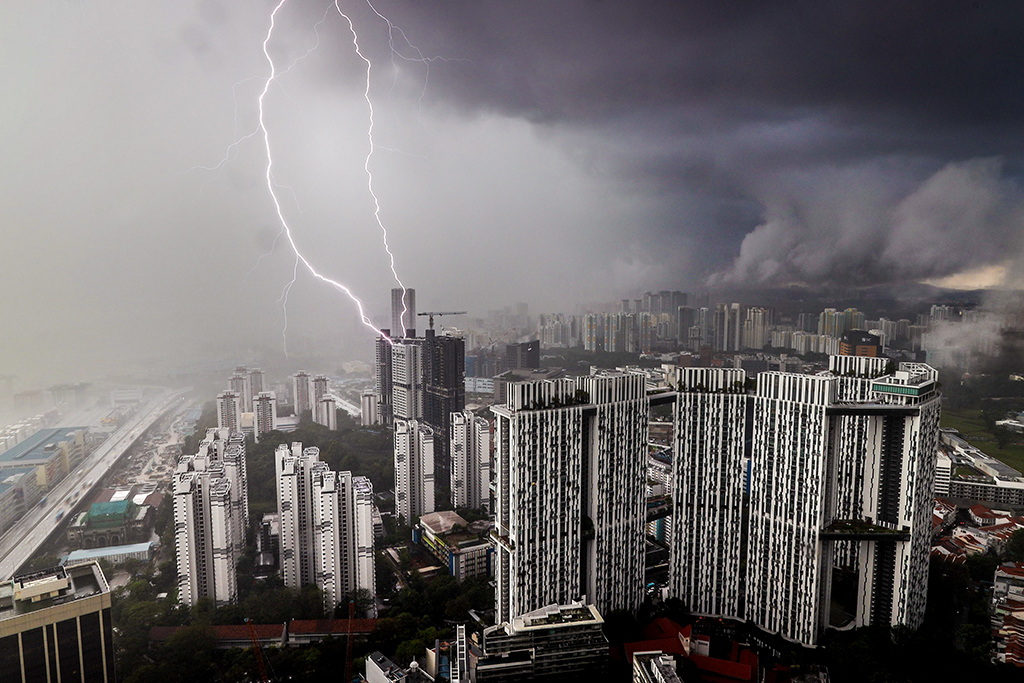
EOS R5 Mark II + RF15-35mm f/2.8L IS USM @ 18mm, f/6.3, 3.2 sec, ISO 100
Time taken: 19:30
Introduction: How I got started with storm photography
My fascination with weather started when I was a small child in Great Britain: I remember my mother waking me up so we could admire storms together. I started weather photography during the COVID-19 pandemic, when I was holed up in my apartment and decided to make the best of the amazing sea view.
I suppose I’m drawn to documenting the temporary yet dramatic changes to scenery caused by weather—and lightning is especially fascinating! Shooting the weather is also my way of relaxing, which might be why my favourite shots are often the ones taken late at night or early in the morning when the city is still asleep.
My first lightning photographs were on the EOS R and EF-S10-22mm f/3.5-4.5 USM. I now shoot mostly with the RF15-35mm f/2.8L IS USM on the EOS R5 Mark II.
What gear do you need for lightning photography?
The bare minimum equipment you need for lightning photography are:
- A camera that lets you change settings
Being able to set camera settings manually gives you more control and increases your chances of success.
- A good, sturdy tripod (or clamp, depending on where you’re shooting)
To keep your gear secure and steady. You’ll be shooting long exposures, most likely in strong wind!
- A way to release the shutter remotely
If you don’t have a remote trigger, you can use the Remote Live View Shooting or Bluetooth Remote Control functions on Canon’s Camera Connect smartphone app.
- Rain cover/plastic bags to protect your gear from wet weather
Even if your gear is weather-sealed, it never hurts to have extra protection!
- Microfibre towel for wiping water off lens
Keeps your shots clean and clear in the rain.
If you will be shooting through glass windows, it’s a good idea to get an anti-reflection lens hood.
The best lens to use depends on the scene
For beginners, I’d recommend a wider field of view so it’s easier to keep the storm in frame. Use a telephoto lens if the background scenery you want is far away. I frequently use the RF15-35mm f/2.8L IS USM because I love capturing the sprawling scenery from the high vantage points I usually shoot from.
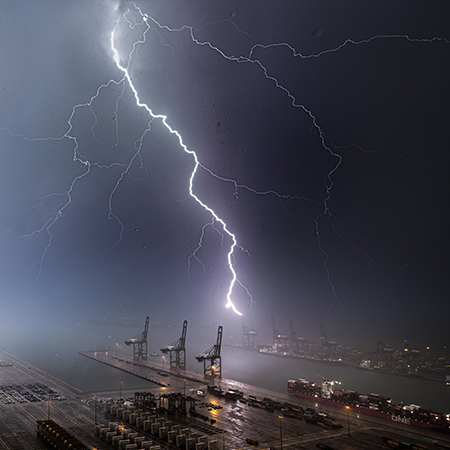
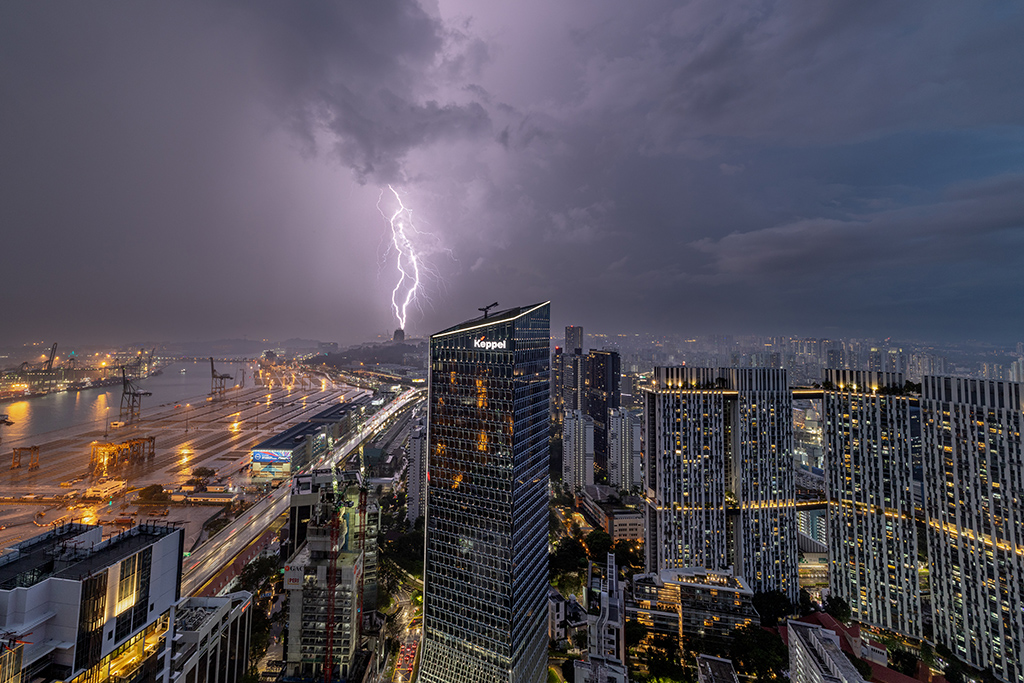
EOS R5 Mark II + RF15-35mm f/2.8L IS USM @ 15mm, f/5, 0.5 sec, ISO 100
Time taken: 02:00
A giant lightning strike hitting a ship-to-shore crane at the port. The EOS R5 Mark II’s 45 megapixels give ample room for cropping in.

I use either a tripod, clamp, or suction grip depending on where I’m shooting. When shooting from high places, safety is as much of a concern as stability: I don’t want my gear falling over and hitting someone on the ground!
My support systems, including the ballheads, have a payload far beyond the weight of my setup. I do load testing on the clamps and suction grips before I actually shoot with them.
What else is nice to have?
The following are less essential but can be nice to have when you get more invested in the hobby!
- Intervalometer (especially if your camera doesn’t have one built-in): Helps automate shutter release so you miss less.
- Lightning trigger: Releases the shutter when lightning is detected.
- Waterproof tripod: I invested in one since I’ve dedicated myself to weather photography!
Stormchaser tip: Be always ready to grab and go

When a storm alert comes in, you don’t want to waste precious time! I pack all my essential equipment, including fully charged batteries and extra memory cards, so that when a storm alert arrives, I can just grab them and head to wherever I plan to be shooting.
How do you know where and when to photograph lightning?
Monitor storm movement

Access to accurate weather information helps you get more picturesque shots. Here in Singapore, the Meteorological Service Singapore website gives detailed forecasts and real time information on thunderstorms and lightning locations.
They have an app that sends real-time storm alerts to your phone, too.
Safety first!
My ideal location is a high vantage point that has a good view of the surroundings, but also has shelter so you can stay safe. It’s possible to get a nice background on lower ground, too. Wherever you are, never compromise on safety!
Avoid:
- Being the highest point in an open area.
- Being next to the highest point in an open area, such as a tree. Lightning can travel through the ground!
- Standing in water.
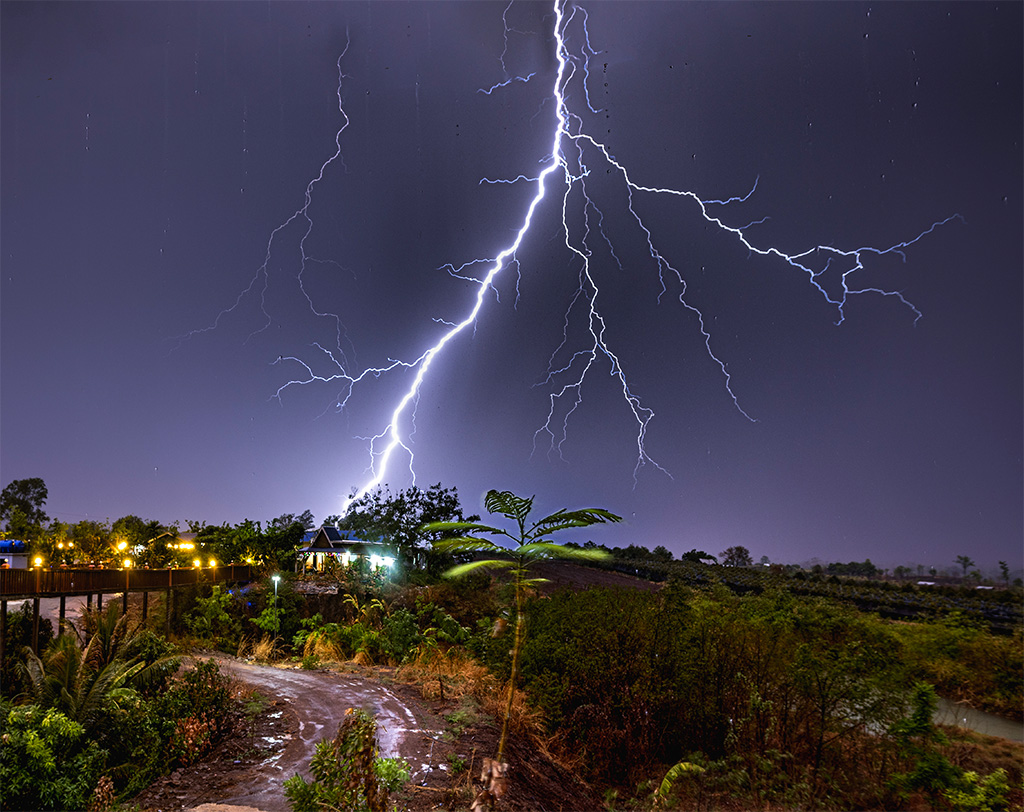
EOS R+ RF15-35mm f/2.8L IS USM @ 18mm, f/4.5, 6 sec, ISO 100
Time taken: 21:33
This storm occurred when I was doing astrophotography in Cambodia. Sometimes, you grab opportunities when they come. Luckily, there was shelter nearby!
Tip: Link up with your local storm watcher community
They can provide useful tips on where to observe/photograph storms, and other information you wouldn’t get elsewhere. For example, the local SG Storm Trackers community here in Singapore put together a detailed map of publicly accessible vantage points. It’s also always nice to meet fellow storm enthusiasts!
What camera settings do you use, and how do you decide on them?
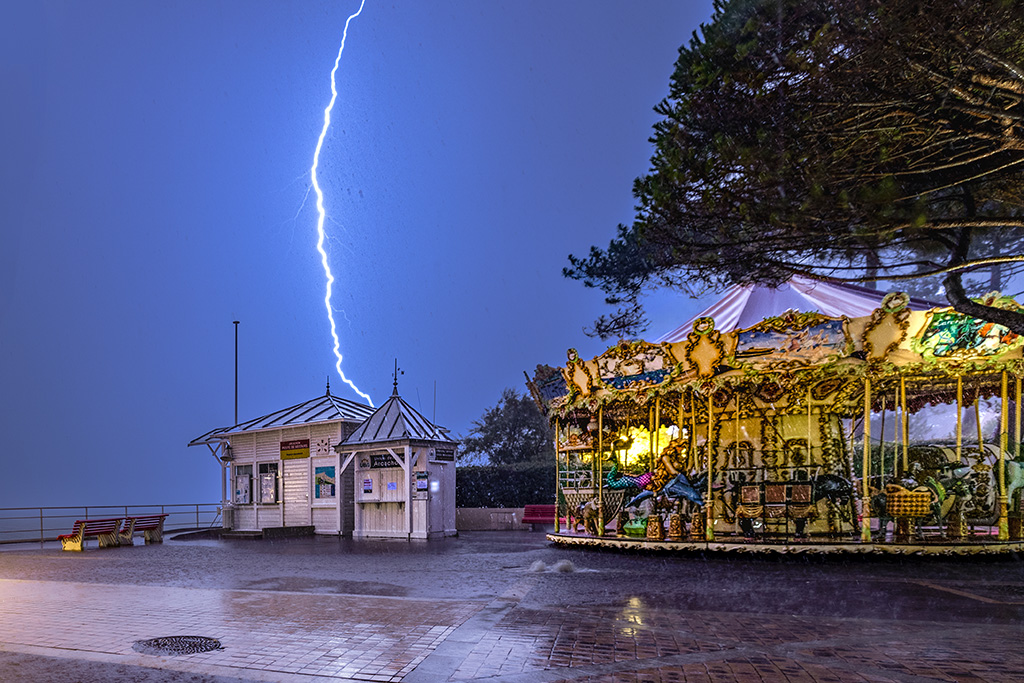
EOS R + RF15-35mm f/2.8L IS USM @ 15mm, f/5, 6 sec, ISO 100
Time taken: 00:00
Shutter speed: Slow to capture the entire lightning strike
The key to a good lightning photo is a slow shutter speed, not a fast one! If your shutter speed is too fast, you might not capture the entire strike.
I set my shutter speed first, and then adjust the aperture and ISO speed according to what I need.
My initial settings depend on the time of the day and lightning conditions, but even in daytime, I usually start with at least 1/60 seconds. At night, I go even slower: down to 3 to 6 seconds depending on the power of the storm.
I use manual exposure (M) mode for full control over my exposure settings. As the storm moves and its intensity changes, you will have to keep adjusting the exposure accordingly!
Chris’s initial shutter speed:
- Daylight: 1/60 seconds
- Sunrise or sunset: 1 to 2 seconds
- Night: 3 to 6 seconds depending on storm intensity
Overall: Shoot in RAW and underexpose
Lightning adds light to the exposure. A large strike can easily blow out the entire frame!
I usually underexpose by 1 to 2 stops. It’s easier to recover details from underexposed shots than overexposed ones. Even for night shots, I usually try not to open the aperture wider than f/4 to reduce the risk of overexposure. If I need a brighter shot, I adjust the ISO speed.
.JPG)
Notice the strange halo around the lightning strike in the "After" image. You’ll get artifacts like that when you try to recover details from an overexposed image.
Focus: Manual focus
The EOS R5 Mark II has powerful autofocus, which I love when I shoot moving things such as motorsports. It’s even locked on stars when I do astrophotography! But for lightning photography, I use the manual focus mode to lock in the focus position for every single shot.

One of my favourite EOS R system features is the Focus Guide, a visual guide that helps with manual focusing. It uses information from Canon’s Dual Pixel CMOS AF system for better accuracy.
I prefer the Focus Guide to focus peaking as it allows a cleaner preview of the scene. Like in normal landscape photography, I place my focus point 1/3 into the scene.
Pro tip: Know your camera well enough to operate it in the dark
You’ll have to keep adjusting your settings to the evolving conditions. Familiarise yourself with the physical camera controls and where they are located. That way, you don’t miss shots while fumbling with camera controls—especially if you’re shooting in the dark!
Set up shortcuts to change settings faster
I love Canon’s tab-style menus, which make features easy to find. On top of that, the EOS R system cameras can be customised for even greater convenience. You can add your most frequently accessed features to the MyMenu tab for easy access, and assign custom functions to buttons.

My MyMenu tab has pre-continuous shooting, the interval time, and the all important “Format card” on the first page!
EOS R + EF-S10-22mm f/3.5-4.5 USM @ 15mm (24mm equivalent), f/13, 0.8 sec, ISO 100
Time taken: 16:30
Useful camera features that help with timing the shot
It can be tricky to release the shutter at the right time. Here are some features that make getting the shot easier.
Intervalometer
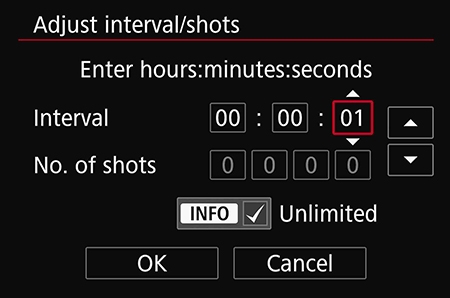
Most recent Canon EOS R series cameras have a built-in interval timer so you can shoot a predetermined number of shots at regular intervals. I’ll usually keep the intervals short: my shutter time plus 1 second, so that there is 1 second between the shots. This makes me less like to miss shots—and I can use the frames to make a timelapse video!
EOS R5 Mark II’s pre-continuous shooting mode
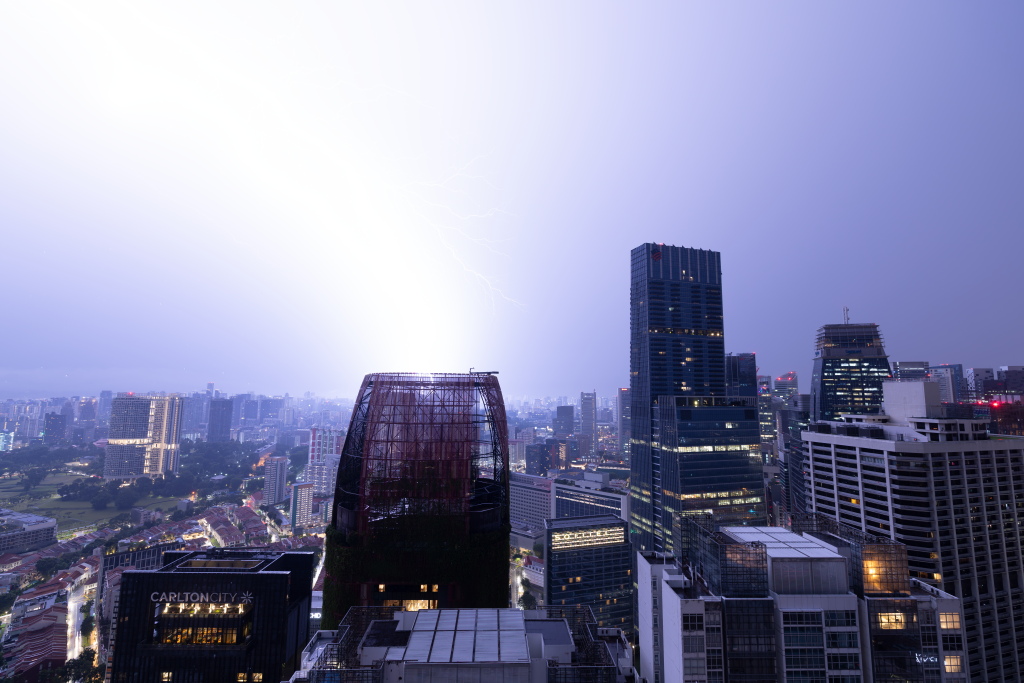
EOS R5 Mark II + RF15-35mm f/2.8L IS USM @ 15mm, f/6.3, 0.5 sec, ISO 250
Time taken: 19:30/ Shot

The pre-continuous shooting mode, available on the EOS R5 Mark II, records a pre-determined number of images from the time you start pressing the shutter button. It’s useful for if you’re struggling with timing!
Know this: The slowest shutter speed you can set will be limited to 0.5 seconds, so bump up your ISO speed if necessary.
How do you edit your images?
My style: Faithful to the scene
Composites

Composite of 6 images taken over 30 minutes through glass
EOS R + EF-S10-22mm f/3.5-4.5 USM @ 13mm (21mm equiv), aperture between f/5.6 to f/10, shutter speed between 1 to 3 secs, ISO 100
Time taken: 1830 to 1900
Timelapses
This can be easily achieved if you use the interval timer to take a series of images! (See Useful camera features).
Of course, there are other things you can do with your shots. It depends on personal preference and what you’re aiming for!
Workflow tip: Use the Rate button if your camera has it

I use the Rate button to mark the shots I want to keep. This helps to streamline the curation process.
How to improve?
Lately, I’ve been working on printing my photos, and I encourage everyone to do the same. It makes you pay greater attention to details and imperfections, which can change the way you approach the shot and improve your technique.
About the Author
Born in Great Britain, Chris has resided in Singapore for 7 years and counting. He is particularly fascinated with weather and lightning photography and has earned much recognition in the latter, with invitations to talk about his work and process by organizations such as Canon Singapore and the Photographic Society of Singapore.
Besides actively contributing to the local storm photography community, Chris is also one of the moderators of the @ig_stormclouds account. His dream is to experience chasing storms and weather phenomena in other parts of the world.


