


Touch AF complements the Dual Pixel CMOS AF system by making AF operation in Live View and EVF shooting a lot more intuitive. Here, we share how you can customise your Touch & Drag AF settings to make it work even better for your shooting style.

1) Changing the position method
i) What is the absolute method?
ii) What is the relative method?
2) Changing the active touch area
3) Examples of common setups
4) Step-by-step configuration instructions
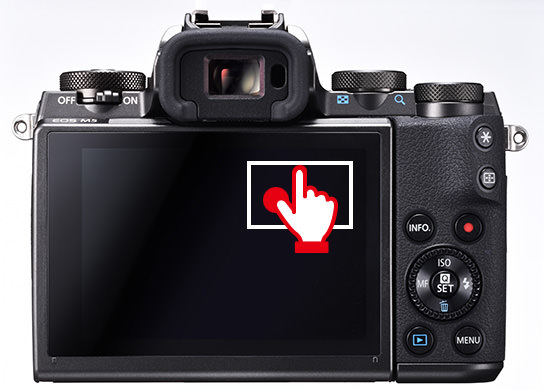
Select and move AF points with your fingertips, even during EVF shooting
The importance of critical focus cannot be emphasised enough. It doesn’t just determine what appears sharp and what doesn’t, it also directs the eye of the viewer to the subject. Yet, it is one thing that can be very difficult to “fix in post”.
Whether you are shooting in Face Detection + Tracking Priority AF or a manual selection AF area mode like 1-point AF or Zone AF/Smooth Zone AF, there will be situations where you want to adjust the AF frame position for better critical focus. Touch AF lets you do so by simply tapping or dragging your finger on the rear LCD screen, even during EVF shooting!
In this article, we will share how you can further customise Touch & Drag AF for a smoother experience when shooting through the EVF.

EOS M5/ EF-M55-200mm f/4.5-6.3 IS STM/ FL: 164mm (262mm equivalent)/ Shutter-priority AE (f/6.3, 1/1,250 sec, EV +0.3)/ ISO 6400/ WB: Auto
I tapped the point where I wanted to establish focus, and focus was established. It was quite a pleasant experience to be able to capture a shot of this swimming duck so intuitively.
Customising the position method
There are two position methods available: “Absolute”, where the AF frame moves to the position you touch or where you drag it to on the screen, and “Relative”, where the frame moves relative to the direction and distance you drag. You can also restrict the area of the screen available for touch and drag operations, with 7 different area options to choose from.

For Touch AF, there are 2 available position methods, “Absolute” and “Relative”.
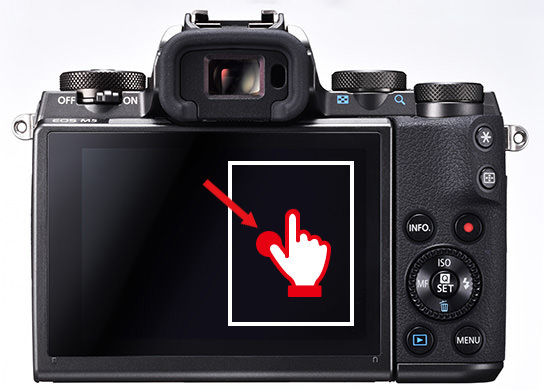
What is the “Absolute” method?

In this method, just touch the spot where you want the camera to focus. The AF frame will move there. This is most intuitive in Live View shooting.
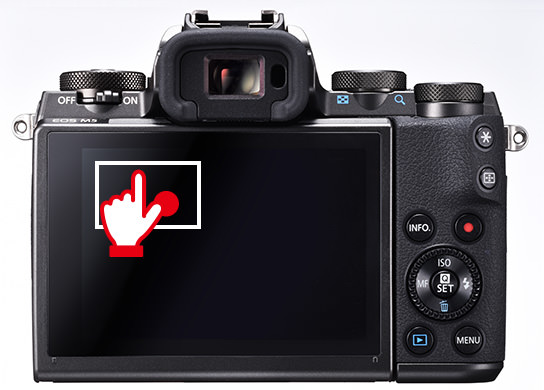
What is the “Relative” method?

In this method, no matter where you touch the screen, the AF frame will move in the direction you drag, by an amount corresponding to the amount you drag. You will probably find this more intuitive during EVF shooting.
Customising the active touch area
If your nose touches the screen when you are looking through the EVF, you can restrict the area of the screen available for touch and drag operations so that your "nose press" doesn't change the AF position.

This determines the area of the rear LCD monitor that will be used for Touch and Drag operations. The screenshot shows 6 options, but ithere are a total of 7 to choose from: “Whole panel”, “Right”, “Left”, “Top right”, “Btm. right”, “Top left” and “Btm. left”.

There are 7 “Active touch area” options:
1. Whole panel (red outline)
2. Right half (blue)
3. Left half (pink)
4. Top right quadrant
5. Bottom right quadrant
6. Top left quadrant
7. Bottom left quadrant
Common “Position method” + “Active touch area” setting combinations
1. To establish focus on a small subject: "Absolute"
If the subject is stationary, using the “Absolute” position method would be easier and give you more intuitive control. If shooting in the landscape orientation, use the top right or any other area that has a longer width than height. If you were to choose “Left” or “Right”, the active touch area would be longer in height than width, different from that of the landscape image, which may lead to less intuitive operation.

EOS M5/ EF-M18-150mm f/3.5-6.3 IS STM/ FL: 150mm (240mm equivalent)/ Aperture-priority AE (f/6.3, 1/250 sec, EV +1.3)/ ISO 1250/ WB: Auto
Position method: Absolute
Active touch area: Top right
2. When tracking a moving subject: "Relative" + "Right"
By setting the position method to “Relative, you will be able to move the AF frame where you want it to be regardless of where you started the gesture. The AF frame will move by the same distance you drag. Moving subjects are easier to handle if you set the active touch area to the right and drag with a finger on your right hand. The left of the rear monitor will not be responsive in this case, so you won’t have to worry about accidentally changing the AF position with your nose as you look through the viewfinder.

EOS M5/ EF-M15-45mm f/3.5-6.3 IS STM/ FL: 15mm (24mm equivalent)/ Aperture-priority AE (f/3.5, 1/640 sec, EV +0.3)/ ISO 100/ WB: Auto
Position method: Relative
Active touch area: Right
3. If you are a left-hander: "Absolute" + "Top left"
You will be able to operate Touch AF more smoothly if you choose an active touch area on the same side as your usual viewfinder eye. If you are left-handed and try to operate the touchscreen with your right hand while looking through the viewfinder, your face and fingers might get in the way. In that case, set the active touch area to “Top left” and drag with the thumb of your left hand. Using the “Absolute” position method is also recommended.

EOS M5/ EF-M15-45mm f/3.5-6.3 IS STM/ FL: 45mm (72mm equivalent)/ Program AE (f/11, 1/160 sec, EV ±0)/ ISO 100/ WB: Auto
Position method: Absolute
Active touch area: Top left
Configuring Touch & Drag AF settings
*Actual procedure may differ depending on camera model. When in doubt, check the user manual.
1. In the SHOOT menu, select “Touch & drag AF settings” to access the setting screen.

2. Choose “Touch & drag AF”, select “Enable”, and then press the Set button.

3. From the “Pos’n method” menu, choose either “Absolute” or “Relative” and then press the Set button.
4. To choose the active touch area, select “Active touch area” on the Touch & drag AF settings menu, choose the area that you want touch & drag functions to be active, and then press the Set button.

Learn about the new AF features and functions introduced on the EOS R system, such as new AF area modes and Focus Guide in:
8 EOS R Focusing Features We Can't Wait to Try
For more tips on achieving focus, check out:
It's All in the Eyes: A Quick Way to Create Mesmerizing Portraits
6 Useful EOS R Features for Photographing Mountains with Clouds
Did you know that Canon just released two new cameras with the upgraded Dual Pixel CMOS AF II system, which comes with Animal Detection AF? Read more about them here:
EOS R5: 7 Fantastic Features You Need to Know
7 Important Facts about the EOS R6
Receive the latest update on photography news, tips and tricks.
Be part of the SNAPSHOT Community.
Sign Up Now!About the Author
A monthly magazine that believes that enjoyment of photography will increase the more one learns about camera functions. It delivers news on the latest cameras and features and regularly introduces various photography techniques.
Published by Impress Corporation
Born in Hokkaido in 1982, Nakahara turned to photography after working at a chemical manufacturing company. He majored in photography at the Vantan Design Institute and is a lecturer for photography workshops and seminars, in addition to working in commercial photography. He is also a representative of the photography information website studio9.

