


A popular style of photography on food blogs, Instagram and even recipe books, chiaroscuro photography (also commonly known as “dark photography”) often features strong shadows and dramatic, moody feel. However, what truly characterises this style is the skillful interplay between deep shadows and highlight areas, which serve to make a subject stand out. Here, we learn the tricks of creating appetising images with it. (Reported by: Reiko Nanto)
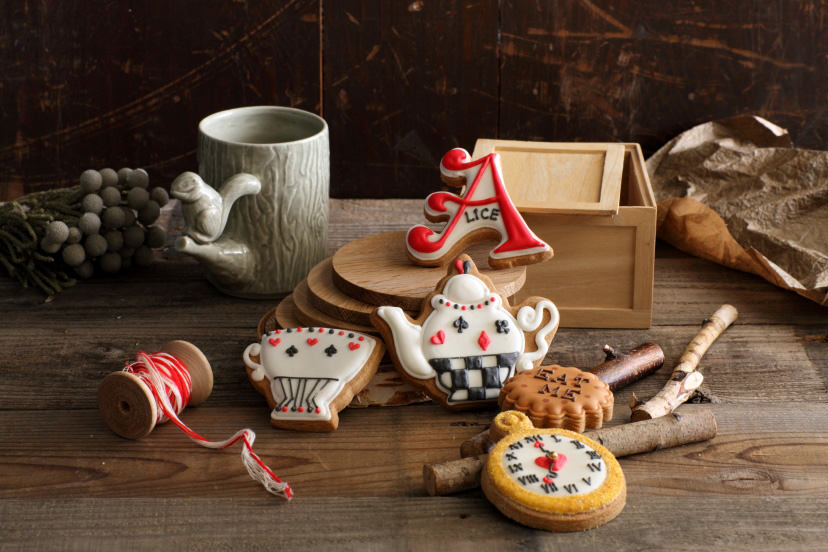
EOS 5D Mark II/ EF85mm f/1.2L II USM/ FL: 85mm/ Manual exposure (f/13, 0.3 sec, EV±0)/ ISO 320/ WB: Manual
The cookies had an Alice in Wonderland theme, which inspired me to style the shoot after the tea party in the woods. I used a black reflector (also known as a black flag) to play up the shadows and the dark background. Make sure the areas with white icing are sufficiently lit—if not, the image could look dull. To prevent the cookies from looking too flat, I propped them up using some of the styling props and shot them with side lighting.
Tip 1: Control both light and shadow
Don’t forget that chiaroscuro means “light-dark”, not just “dark”
Although it is commonly known as “dark photography”, you don’t get a successful chiaroscuro shot by simply underexposing your shot. The beauty of a chiaroscuro image lies in the skillful use of the contrast between highlights and deep shadows.
Subtle details in the lighting are important
For a good chiaroscuro shot, you want to ensure that:
- The lighting is soft enough to bring out the three-dimensionality of the subject, and
- The transitions between the light and shadow areas are smooth and gradual.
To achieve these goals, you need to manipulate light and shadow. I do so by creating pathways that determine how light enters the image, and using a black reflector board (or even a few boards) in a way that creates enough shadow in the image for there to be a sense of tension.
Recommendations
Side lighting: This lighting angle makes it easier to create stronger highlight-shadow contrasts.
Dark coloured background/background items: Dark colours absorb light and add shadows, perfect for achieving the chiaroscuro look.
A successful shot

EOS-1D X/ EF28-70mm f/2.8L IS USM/ FL: 70mm/ Manual exposure (f/6.3, 1/50 sec, EV±0)/ ISO 500/ WB: 4700K
This monochromatic image was achieved by styling white snowball cookies, a black tray and cutlery, and a grey base. Side lighting from the right created just the right amount of dimensionality and smooth transitions between the light and shadow areas, guiding the viewer’s attention to the snowball cookies and the textured base.
The lighting setup

A: Create an opening for the light to enter
B: Create shadows and tonal transitions between light and shadow in the base
C: Use a black reflector to absorb light and add shadows.
I used black reflectors to block off the area around the subject. These also serve to enhance the shadows on the subject. Light was directed into the setting through the opening at A.
Bonus tip: Here, you want to create a muted atmosphere. Lighting that is too strong will result in harsh contrasts between the light and shadow areas. Use a lace curtain or a diffuser to soften the light.
Styling the shot: The key is in the background
Dark-coloured background

Light-coloured background

When shooting a chiaroscuro photograph, choose something dark in colour for your background/base. Dark coloured backgrounds absorb light and emphasise shadow—just like a black reflector. On the other hand, light-coloured backgrounds reflect light and soften shadows, which is the opposite effect of what you want to achieve in chiaroscuro photography.
The difference between a chiaroscuro photograph and an underexposed photograph
Chiaroscuro photograph

Underexposed photograph

Chiaroscuro shot: Shadows have been intentionally created so that the food appears brighter in contrast. You can almost imagine the food sizzling due to the way it gleams, but notice how these bright areas are still kept under control so that there is no blowout.
Underexposed shot: Simply dark overall. There are no contrasts at all between the light and shadow areas.
Tip 2: Don't make your food wait as you set up! Do all your preparation work beforehand
Two important principles for food photography
1. Shoot when the food is fresh from the kitchen. The longer you leave it out, the less delicious it looks.
2. Work fast. Capture hot foods when they are still steaming hot, and cold foods before they melt. If you want your images to look appetising, the most important key is to take your shot when the food is fresh from the kitchen.
Prep as much as you can before the food is ready
With all the fine adjustments in lighting angle that are necessary, you might take a while before the entire setup is in place. Do as much preparation work as you can before the food is ready, or even before you start preparing the food. The key is to make sure that once the food is out of the kitchen and on the table, the shoot goes as seamlessly as possible.
---
Procedure
1. As you prepare your setup, finalise your background, plates and cutlery, styling, and lighting.
2. Take some test shots of the plates in position (without the food).
3. Decide on the shooting distance and angle, the lens focal length, your camera settings, and the composition technique (such as if you are going to use the Rule of Thirds).
---
Ideally, all you need to do after that is to put the food in and then release the shutter.
Bonus tip: It helps to mount your camera onto a tripod. This keeps the camera in place should you need to change your exposure, aperture, or focal point settings during your shoot.

EOS 5D Mark II/ EF24-105mm f/4L IS USM/ FL: 88mm/ Manual exposure (f/5.0, 1/60 sec, EV±0)/ ISO 400/ WB: Daylight
Anything matcha-flavoured is often styled with traditional Japanese elements, but here, I decided to use a relatively “Western-style” styling. The blend of East and West creates an elegant, sophisticated look. For this shot, besides ensuring the rhythm and visual appeal of the layout, I also wanted bring out the details in the texture of the ice cream cones and ensure smooth, gradual transitions between the light and shadow areas. This required many fine adjustments during my test shoots.

During my test shoots, I not only made many fine adjustments to the lighting angle and positioning of the black reflectors, but also to the placement and layout of the ice cream cones. Using a tripod helped to keep the camera in place during the long process. I scooped on the ice-cream only after all that preparation work was complete.
Tip 3: Food looks even more appetising if you capture the sheen and gloss just right
The key is in how you capture the highlights
If done just right, you can make soups and foods with sauce and gravy look “juicier” and more appetising.
1. The lighting angle is important. Choose side lighting or semi-backlighting, and then shoot from diagonally above the subject.
2. Keep the sheen to no more than twenty or thirty percent of the food. If there are too many shiny areas, the food will look overexposed; if there is not enough of it, the food will not look visually stimulating.

EOS 5D Mark II/ EF100mm f/2.8L Macro IS USM/ FL: 100mm/ Manual exposure (f/6.3, 1/40 sec, EV±0)/ ISO 400/ WB: Daylight
For this shot, I was careful not to open up to aperture too much, as too strong a defocus effect could obscure the details in the highlights and on the crockery.
Bonus tip: I recommend a focal length of at least 70mm (35mm film equivalent). The wide angle lens characteristics in a shorter focal length might distort the shape of the plate and cause the image look unnatural. (For illustrations of this, see Technique 3 in Lens Techniques: 4 Secrets to Mastering Your EF-S18-55mm f/4-5.6 IS STM).
Check out the following articles for more food photography tips and tutorials:
3 Composition & Styling Techniques for Food Photography
Food Photography with EOS M10: 2 Ideas for Photographing Jelly Desserts
Take Mouth-watering, Juicy-looking Pastry Pictures With These Light Control Techniques
Food Photography and Styling Hacks
Coffeetography – Photographing Coffee for Instagram
Strobist Technique in Food Photography
Receive the latest update on photography news, tips and tricks.
Be part of the SNAPSHOT Community.
Sign Up Now!About the Author
A professional food photography, Reiko Nanto discovered her love for art while studying abroad at the University of Angers in France. After returning to Japan, she enrolled in Kuwasawa Design School to study design, graduating with a specialization in photography. She then became an apprentice of Yoshikatsu Saeki, the pioneer of food photography in Japan, for five years, before breaking out on her own to become a freelance photographer, she started her own company, Nanto International, Ltd. Nanto aims to create delicious-looking designer photographs that blend art, design and food, and has shot many food and pastry photographs for many publications and advertisements.
Profile photo courtesy of: JAPAN PHOTOSTYLING ASSOCIATION
https://photostyling.jp/


