


Easy Pretty Portraits: 3 Quick & Convenient Camera Techniques
Portraits are a collaboration between the photographer and the subject, but a bit of help from your camera can make the shoot smoother—and make your model look better even before you edit the photos! Here are three techniques to try. (Reported by Haruka Yamamoto, Digital Camera Magazine/ Model: Ami Naruse)

Technique #1: Blur a foreground element to add visual interest

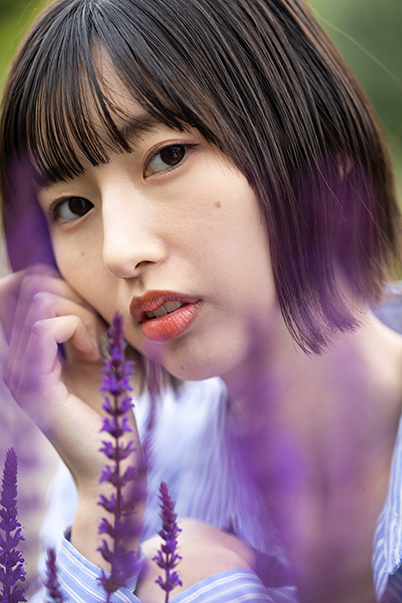
EOS R8/ RF85mm f/2 Macro IS STM/ Aperture-priority AE (f/2, 1/250 sec, EV +0.7)/ ISO 400
If you think your portrait of a person against a background looks too plain, place something in the foreground and shoot so that it’s blurred out. This “sandwich” technique also adds depth to your shot. Depending on your composition, you can also use the blurred foreground object (“foreground bokeh”) to create a frame within a frame effect that guides the viewer’s vision towards your subject’s face.
The foreground object can be anything: a wall, a window, or flowers as I have done here. Just make sure the bokeh doesn’t block too much of the model.
Tip 1: Make good use of Eye Detection autofocus (AF) and the AF area settings

Eye detection settings: Depends on your intent
By default, Eye Detection AF is set to “Auto”, which means it prioritises the eye that is nearest to the camera. This works well if you and your model are trying out different poses to see what works! However, if you have a specific image in mind that involves the model in a static, specific pose, you might want to set Eye Detection AF to prioritise either the left or right eye.
AF Area: Flexible Zone AF

I use Flexible Zone AF as it’s responsive to changes in the model’s pose and position, and at the same time limited enough to ensure that the focus doesn’t lock on passers-by instead.

Set the AF area just large enough to cover the model’s range of movement. For close-up portraits, you might find a square AF area easiest to work with. You can also adjust the size of the AF area in the Quick Setting menu during your shoot.
As the model was in a static pose, I used One Shot AF.
Tip 2: How to get better foreground bokeh

The factors that affect bokeh come into play:
- Use a lens with a wide maximum aperture (fast lens).
- Shoot as close to the foreground subject as possible.
A wider aperture will create more intense blurring. Place the lens as close as possible to the object you are blurring out (flowers in my case) so that it goes firmly out of focus. Here, I used the RF85mm f/2 Macro IS STM, which is easy to handle and provides a comfortable working distance for half-body portraits and chest-up shots.
Bonus tip: Consider the colour of the foreground blur, too
The colour of the foreground object can elevate your shot—as long as you choose wisely. Think of:
- The aesthetic you want to create.
- How the object’s colour balances with your model’s skin tone and outfit.
For example, if you want an image that looks bright and happy, a foreground object that creates a brownish bokeh would dampen the final effect. If your model is wearing green, green foreground bokeh created from green leaves could blend into the outfit.
EOS R8/ RF85mm f/2 Macro IS STM/ Aperture-priority AE (f/2, 1/500 sec, EV +1.0)/ ISO 320
The purple foreground bokeh here was created from amethyst sage. It’s easy to position the model’s face between long, thin flowers like this.
EOS R8/ RF85mm f/2 Macro IS STM/ Aperture-priority AE (f/2, 1/640 sec, EV +1.0)/ ISO 320
Round, spherical flowers like the buttercups I used here create round, fluffy foreground bokeh.
Technique #2: Soft, velvety skin with the ‘Soft Focus’ Creative filter

EOS R8/ RF50mm f/1.8 STM/ Creative filter (f/2, 1/100 sec, EV +1.0)/ ISO 500
Creative Filter: Soft focus (Strong)
Without the ‘Soft Focus’ Creative filter

In this normal shot, the details and textures are stronger and crisper.
No Vaseline needed
Have you ever heard of photographers putting Vaseline (petroleum jelly) on their UV filters to create a soft, hazy effect? You can get the same effect in a quicker, safer way by turning your mode dial to Creative filter mode and selecting the Soft Focus effect.

You can adjust the filter effect level to taste. For the first image, I set the filter effect level to maximum to make the image look even dreamier.
Tip: Straight from camera to phone
Share your lovely soft focus image on the spot: simply use the Camera Connect smartphone app to send it to your smartphone!
Technique #3: Beautiful skin tones with ‘Portrait’ SCN mode

EOS R8/ RF24-105mm f/4-7.1 IS STM/ FL: 105mm/ Special Scene mode: Portrait (f/7.1, 1/250 sec, EV +0.7)/ ISO 5000/ Brightness: +3
The most classic way to create an appealing portrait of a female subject is to ensure that her hair and skin look soft. You could play around with the aperture and exposure settings on your own (see: 3 Aperture Settings Favoured by Professional Photographers), but if you’re not familiar with such settings or pressed for time, turn your mode dial to “SCN” (Special Scene) and select the Portrait mode.

The ‘Portrait’ SCN mode chooses the widest aperture setting possible to create background blur so that the subject stands out. It also makes hair and skin appear soft and smooth. Tapping the button indicated by the red frame lets you control the brightness so you can make the skin look even better.

Brightness: 0

Brightness: +3
Tips:
- Avoid strong direct lighting: it’s unflattering to the skin. I shot these images somewhere with a roof.
- Increasing the image brightness can make skin look brighter, but make sure the image doesn’t end up overexposed!
For more easy-to-apply portrait photography tips for any level of experience, check out:
5 Portrait Photography Techniques to Take You from Day to Night
Techniques for Posing and Directing Portrait Subjects
3 Flattering Techniques to Learn from Professional Models
About the Author
A monthly magazine that believes that enjoyment of photography will increase the more one learns about camera functions. It delivers news on the latest cameras and features and regularly introduces various photography techniques.
Published by Impress Corporation
Born in Tokyo, Yamamoto is a freelance photographer who shoots for a variety of mediums that include magazines, CD jackets and advertisements. She also has her own blog, where she posts shots from an ongoing photography series “Otome-graphy [Maiden-graphy]”, which seeks to remove existing stereotypes of young women as well as address Yamamoto’s own issues about aging. A collection of these shots was published in book form in 2018.


