


Just got your new EOS R5/EOS R6? With their multitude of dials and functions, these two cameras are very user friendly even by default, and with a few customisations in the menus, you could shoot even more efficiently and effectively! To start off with, here are five default settings to configure the first time you set up the camera—you might also want to check them before every shoot! (Reported by: Takashi Karaki, Digital Camera Magazine)

1. Shoot Menu 1: Recording image quality
Record in a RAW format for more post-processing flexibility
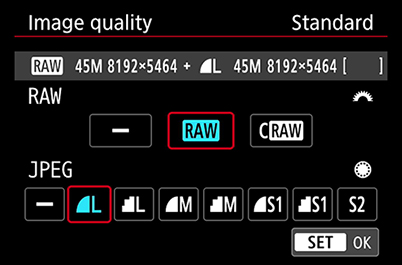
RAW files contain all the information captured by the image sensor. Recording in RAW format not only allows you to make the most of the information captured by the EOS R5’s 45-megapixel image sensor, it can also be a form of insurance in case you need to fix certain issues in post-processing.
For additional safety, record in RAW + JPEG. Some photographers may prefer recording in RAW only and then exporting to JPEG after post-processing. However, as JPEG files are recorded using the settings you used at the time of the shoot, they can be a reference to compare, reproduce and correct the image when you post-process the RAW file.
Know this: What is C-RAW?
C-RAW (Compact RAW) files are compressed RAW files. Their smaller file size makes them faster to process and allows more files to be stored on the memory card, but some functions such as Digital Lens Optimizer might not be available during post-processing.
Note: You can’t convert RAW to C-RAW or vice versa.
Learn about the difference between RAW, JPEG and HEIF formats here
2. AF Menu 4: Orientation linked AF point
Smoother switching between horizontal and vertical shooting
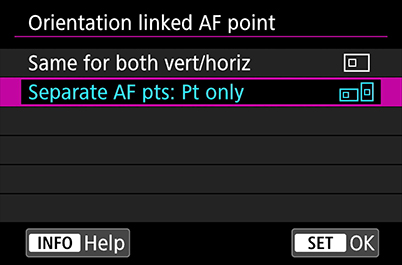
Do you frequently switch between taking horizontal and vertical shots? Under the default ‘Same for vert/horiz’ setting, the AF frame stays in exactly the same position when you change the camera orientation, which could cost you precious moments when you adjust the AF frame. Changing this setting will make your shoot smoother.
How to change the orientation linked AF point setting
1. Go to AF Menu 4
2. Choose ‘Orientation linked AF point’
3. Select ‘Separate AF pts: Pt only’
The camera will remember the focus point assigned to each orientation and automatically keep the focus on the same subject when you change orientations.

Setting the camera to remember separate AF points for different orientations lets you change the composition quickly when you want to shoot vertical and horizontal versions of the same scene.
3. Playback Menu 4: Magnification (apx)
For detailed checking of images

It is a good practice to check your shots in playback mode when still onsite, so that you can reshoot/make corrections on the spot. Magnify the image review to ensure that they are as sharp and in-focus as you want them to be. Instead of toggling through different magnification ratios to get to 100% (actual size), here’s how you can do it with just one touch of the ‘Magnify’ button.
How to change the playback magnification
1. Go to Playback Menu 4
2. Select ‘Magnification (apx)’
3. Select ‘Actual size (from selected pt)
With this setting, during playback, one push of the Magnify button will bring up an actual-size display centered around the area where focus was acquired when you took the shot.

The function automatically magnifies the part of the image that the AF frame established focus on, so that you don't have to manually shift the magnified area.
4. Set up Menu 1: Record func + card/folder sel
For more efficient recording of crucial image data

The dual card slots on the EOS R5 and EOS R6 provide additional insurance against data or image loss so that you can shoot with peace of mind. You can set them up in ‘Record func + card/folder sel.’ Screen under Set up menu 1.
You will see four recording options:
i) Standard (default): The camera records images to the card selected in ’Record/play’, and recording will stop once the card is full.
ii) Auto switch card: Like in i), shooting ends when the card is full, but when you start shooting again, the camera automatically starts recording to the other card.
The next two functions will let you use the dual card slots for backup:
iii) Rec. separately: If you chose to record in two formats in Shoot Menu 1, RAW files are recorded onto one card and JPEG files onto the other.
iv) Rec. to multiple: Each shot is recorded to both cards in the same image quality (i.e.,each card holds one copy of the same image file).

When you set the camera to record to the cards separately, you will be able to choose which format gets recorded to which card in the ‘Image quality’ Shoot menu. To make your shoots more efficient, record larger file formats to the card that has a faster writing speed and/or higher capacity.
5. [New on the EOS R5/R6] Set up Menu 5: Shutter at shutdown
Prevents dust and dirt from entering the camera when changing lenses

Dust on your image sensor—one of those things that are hard to “unsee” once you notice them! Most of such dust enters the camera when you are changing lenses. On mirrorless cameras, since the image sensor is exposed once you detach your lens, this can be a huge source of concern.
On the EOS R, the shutter curtain automatically closes when the camera is powered off, which proved to be a popular feature. On the EOS R5 and EOS R6, users can choose whether the shutter closes or stays open, so if you are worried about dust getting into your sensor, set it to close at shutdown.

The shutter blades are delicate and need to be handled with utmost care. Try to avoid touching them where possible.
Find out how to check for sensor dust and clean the image sensor here:
How to Clean the Image Sensor
For more tips on EOS R5 and EOS R6 customisations, settings, and useful features, check out these articles:
Birds in Flight: Camera Settings to Increase Your Successful Shots
3 Types of Dog Portraits to Capture with Animal Detection AF
Portrait Relighting: Your In-Camera Lighting Crew
Shutter Modes & Continuous Shooting Modes: When to Use Which?
3 Types of Scenes That Take Full Advantage of In-Body IS
Receive the latest update on photography news, tips and tricks.
Be part of the SNAPSHOT Community.
Sign Up Now!About the Author
A monthly magazine that believes that enjoyment of photography will increase the more one learns about camera functions. It delivers news on the latest cameras and features and regularly introduces various photography techniques.
Published by Impress Corporation
After some experience as a sports instructor followed by 10 years in magazine production and editing, Karaki moved to Yonago City in Tottori Prefecture, where he became known for his landscapes of the San’in region of Japan. His works have been published in Amazing Village, a booklet of beautiful Japanese villages produced through a CANON × Discover Japan collaboration in 2017, and his shot of the sea of clouds at Akechi Pass in Tottori Prefecture was among 12 images selected by the Japan National Tourism Organization (JNTO) to represent Japan.
Instagram: @karakky0918
.jpg "trending tips")
.jpg "trending tips")

