


The Matrix Method: A Systematic Way to Add Variety to Your Shots
Have you been shooting with the same lens, same angles and same point of view, resulting in images that look all the same? Here’s one way to practise adding more variety to your shots: the Matrix Method. Try this out, and you might just be surprised by what you can achieve. (Reported by: GOTO AKI, Digital Camera Magazine)

Step 1: Start off with the composition matrix
You may have found an interesting photographic subject, but don’t be tempted to just shoot from where you are and go! That spot where you were standing might not be the best angle.
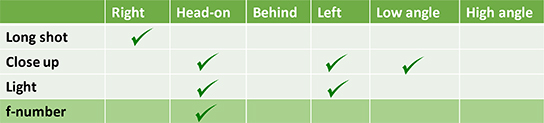
To find the best composition, you will want to try different combinations of focal lengths and shooting angles. Create a matrix to help you keep track of which combinations you have tried. The goal is not to shoot attractive images from all the combinations (although you can challenge yourself to do that if you want to). Instead, use the matrix to help you create more expressive shots of the same subject.
Here’s my matrix. The shots that I took are below.

1. My first shot: Head-on long (=”wide”) shot

The lighting and the ivy wrapped around the trees caught my attention. This head-on angle captured them the way they were when I first saw them.
2. The opposite side of the trees: Long shot from “behind”

This helped me to see what the shot would look like in backlight.
3. Close up from behind

I moved closer and shot the ivy up close. The yellow-green ivy leaves stood out more in the backlight, catching my attention. I moved in to shoot them up close.
4. Even closer

A super close-up of the ivy leaves shows more detail. If you have a macro lens, you can go even closer than this!
5. Low angle, long shot

Shot looking up from the roots of the tree.
6. Low angle, close up

For the previous shots, I had been shooting with the same focal length. I finally changed my focal length for this, and captured the colours and details of ivy leaves in the beautiful light.
Tip 1: Make a conscious effort to try the matrix
A place or subject might not look good from a certain angle but stunning from others. Yet, especially when we shoot landscapes, we tend to leave the spot to shoot something else after we have achieved our picture from one angle. Make a conscious effort to try out different combinations with the matrix. In fact, you might want to print your matrix out and check off the combinations that you have tried.
Tip 2: Change your lens where necessary
Change your lens every now and then if you think it helps improve the shot. Find out how to make the most of different types of lenses here.
Step 2: Add lighting angles to your matrix
When you are ready to level up from the composition matrix, you can add one new item to the mix: ‘light’.

Changing your camera position, angle and orientation can change the lighting in your shot. Here are three of my own examples.
1. A lower position changed the effect of reflected light

Shadows of trees in the snow. The bright patches were created by light shining through the trees.
Super low position

Shot with my camera just above the ground to draw more attention to the light. The low position gave the image a greater sense of depth.
Behind the scenes

To get the second shot, I laid down in the snow so that the camera was just above the ground.
2. Shooting in vertical orientation made reflected light look more impressive
Mention “light” and many people will think of sunlight, but don’t forget that there is light in anything, anywhere—in clouds, in rain, as reflected light, direct light, backlight, etc. Pay attention to the things outside your viewfinder or Live View image.
In the example below, I noticed light reflecting off the water surface and changed my image orientation to make it my subject.
Before

While I was observing the waves and how they changed, the clouds in the sky became brighter.
After

The light that shone from between the clouds reflected off the water surface, creating an interesting texture. I changed the camera orientation to capture this and framed it so that it became the main interest in the shot.
3. A change in shooting angle uncovered new lighting possibilities
The following shots were taken from spots that were barely 10 seconds’ walk away from each other. It’s not that difficult as long as you set your heart on exploring the possibilities!
Shot from the north, facing south

I shot from this angle to capture the shape and form of the ice sheets. But as I shot, I noticed the light originating from the right side of the frame (the west), and decided to move to see what I could get.
Shot from the east, facing west

This is the shot I captured from another spot 90 degrees away from the first, opposite the light source. The reflected light creates a golden path on the water surface.
Step 3: Add lens settings to the matrix
You can also add lens settings to your matrix. The easiest to start with is the aperture setting (f-number). Vary the f-number and see how changing the depth of field and degree of bokeh changes the look of your shot.
In both the shots below, the focus point was placed in the same position: on the water surface at the top of the frame. Notice how the degree of bokeh changes, and how this, in turn, changes the feel of the image. It goes to show how the f-number is yet another variable you can use to expand your range of creative expression.
Shot at f/2.8

The shallow depth of field at maximum aperture f/2.8 gently blurred the trees in the reflection. The resulting shot draws our attention to the space and ambience.
Shot at f/8

Using a narrower aperture captures and draws our attention to the textures of the trees and the water surface.
Find out more about the impact of different aperture settings in:
In Focus: Aperture Settings for Various Scenes
---
Summing up
The examples here are from landscape photography, but this method can be used to practise other genres of photography, regardless of whether you are indoors or outdoors. You can add other variables that you want to explore. As you get more familiar with how each variable impacts your shot, you will see more possibilities in each scene and subject you encounter. Plus, the images that you accumulate along the way will give you more variety in your portfolio.
So what are you waiting for? Go ahead, create your own matrix and start shooting now.
Need more ideas on how to practise photography? Check out these articles:
Achieve Better Photos with These 3 Simple Tips!
3 Deceptively Simple Challenges to Level Up Your Photography Skills
Receive the latest update on photography news, tips and tricks.
Be part of the SNAPSHOT Community.
Sign Up Now!About the Author
Born in 1972 in Kanagawa Prefecture and graduated from Sophia University and Tokyo College of Photography. Goto published a photo collection work titled "LAND ESCAPES" and is also actively engaged in works such as “water silence” an installation that merges photographs with videos.
A monthly magazine that believes that enjoyment of photography will increase the more one learns about camera functions. It delivers news on the latest cameras and features and regularly introduces various photography techniques.
Published by Impress Corporation

