


Camera FAQ: What Does In-Camera Lens Aberration Correction Do?
No lens is 100% perfect. Even the most well-made lenses will have some form of optical aberration, which affects the image quality in various ways. Traditionally, these aberrations are corrected through lens design via the use of special lens elements and coatings, but even these have their limits. Fortunately, with recent technological advancements, it is now possible to further reduce or even eliminate these distortions digitally in-camera, and in real-time. Here, we look at some of these aberrations and how in-camera lens aberration correction can help you to achieve pristine, high-quality images. (Reported by: Kazuo Nakahara, Digital Camera Magazine)

1. Peripheral illumination correction
Reduces darkening in the corners of your image
When you shoot at maximum aperture or close to it, you may notice some darkening in the image towards the corners. Also known as vignetting or peripheral light fall-off, this happens on all lenses—the only difference is the degree of darkening!

Both images: EOS R/ RF24-105mm f/4L IS USM/ FL: 43mm/ Flexible-priority AE (f/5.6, 1/400 sec, EV +0.3)/ ISO 100
Notice the difference when the function is turned off? Such vignetting is more obvious in areas with plain colours or regular, repeated patterns, such as the clear blue sky in the example above. Enabling ‘Peripheral illumination correction’ brightens up the corners so that the sky looks more even.
Situations where peripheral illumination correction is useful:
- When your composition involves capturing a huge expanse of sky.
- When you are shooting a portrait shot, and want to use maximum aperture to create bokeh.
- During wide-angle macro photography, when you want to use the maximum aperture.
Know this:
- On the EOS R system, ‘Peripheral illumination correction’ is set to ‘On’ by default. It’s good to leave it on most of the time, except when you want the vignetting effect for artistic reasons or are using third party lenses.
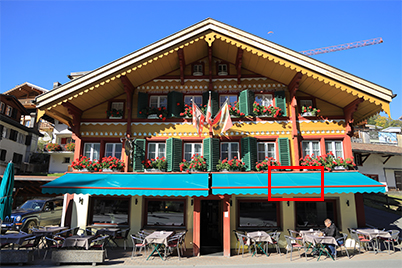
2. Distortion correction
Reduces optical distortions
Distortion occurs at extreme focal lengths, and are especially visible on subjects with straight lines. Depending on the lens, you may see these lines seem to curve inward (barrel distortion) or outward (pincushion distortion) towards the outer edges of the image.
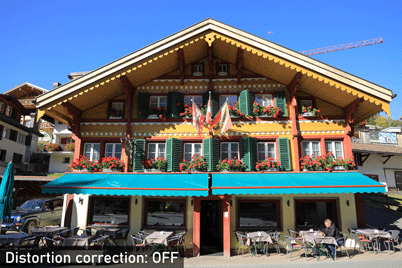
Distortion correction - ON
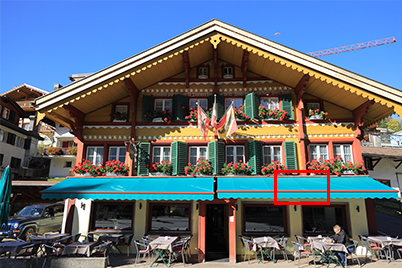
Distortion correction - OFF
Area in red (correction ON)

Area in red (correction OFF)

Both images: EOS R/ RF24-105mm f/4L IS USM/ FL: 24mm/ Aperture-priority AE (f/4, 1/500 sec)/ ISO 100
In the closeup from the image shot with distortion correction set to ‘Off’, we can see that the horizontal lines are slanting slightly upward. Distortion correction straightens the lines and depicts the building more accurately.
Situations where distortion correction is important:
- In landscape photographs with a visible horizon.
- When photographing buildings and structures with straight lines.
- In still life photography, so that the shapes of subjects can be depicted accurately.
Know this: Distortion correction crops off the edges slightly
Distortion correction - ON

Distortion correction - OFF

In the process of correcting distortion, the edges of your shot will be cropped off slightly, such as in the above crops taken from the bottom left corner of the images of the building. The trimming is barely noticeable, but it’s good to keep this in mind in situations where the composition really matters.
3. Digital Lens Optimizer
Corrects multiple sources of image quality deterioration at once
Besides lens aberrations and distortions, there are other factors that negatively affect image quality. One factor is a low-pass filter, which reduces moire and artifacts that occur in high frequency (fine detail) subjects but also results in reduced definition. To correct this and take fuller advantage of your EF or RF lens’ rendering capabilities, keep the Digital Lens Optimizer (DLO) enabled.

EOS R/ RF28-70mm f/2L USM/ FL:28mm/ Aperture-priority AE (f/22, 1/125 sec, EV +0.3)/ ISO 160
DLO - ON
DLO - OFF
Shooting at a very narrow aperture such as f/22 usually results in visible loss of sharpness due to diffraction, but enabling DLO reduces the blurring and colour bleeding, improving the image resolution and clarity.
Know this: On the EOS R system, keeping DLO on will not affect your burst shooting rate
On older cameras before the EOS R, enabling the in-camera DLO function would reduce the continuous shooting speed. However, this issue has been fixed on the EOS R system.

Even if you decide not to enable DLO, you have the option of enabling just the ‘Diffraction correction’ or ‘Chromatic aberration correction’ functions
4. Chromatic aberration correction
Corrects colour fringing
As the different wavelengths of colour in light travel at different speeds, they refract at different degrees when passing through a lens. When you shoot under light that contains multiple wavelengths of colour, the dispersion arising from these different refractive indices results in discolouration, i.e., chromatic aberration (commonly known as “colour fringing”).

EOS R/ RF24-105mm f/4L IS USM/ FL: 24mm/ Aperture-priority AE (f/5.6, 1/800 sec, EV +0.3)/ ISO 100
Chromatic aberration correction – ON

Chromatic aberration correction – OFF

There are two different kinds of chromatic aberration: axial and transverse. Transverse chromatic aberration, which occurs mainly at the edges of an image, is particularly hard to correct via optical design alone, even on high-performance lenses. Enabling the Digital Lens Optimizer or chromatic aberration correction function will correct chromatic aberration more effectively.
Situations where chromatic aberration correction is useful:
- With a telephoto lens, when you have to shoot at maximum aperture in order to obtain your desired depth-of-field.
- When shooting at telephoto angles, when you want to avoid changing the aperture setting as it will affect the look of your image.
- When shooting at wide angles, when you are using an extreme angle of view in order to exaggerate perspectives.
5. Diffraction correction
Sharper details at narrow apertures
When you shoot at narrow apertures such as f/16, f/22 or narrower, the aperture blades obstruct incoming light. This intensifies diffraction, which causes visible reduction in resolution. Enabling diffraction correction digitally restores the lost detail.

EOS R/ RF24-105mm f/4L IS USM/ FL: 33mm/ ISO 100 (Examples below shot at various apertures)
Diffraction correction ON – f/22

Diffraction correction OFF – f/22
Know this: It works even for images shot at wider apertures
Notice how enabling diffraction correction resulted in sharper outlines for the text, even for the following image shot at f/4.
Diffraction correction ON – f/4

Diffraction correction OFF – f/4
Situations where diffraction correction is important:
- When using a very narrow aperture to deep focus a landscape, or create a starburst effect.
- Long exposure photography where a narrow aperture is necessary for exposure control—especially if the scene has lots of fine detail.
Must-know function: In-camera RAW image processing
Need to get your shots out on the spot? You can do basic post-processing on your RAW files in-camera.
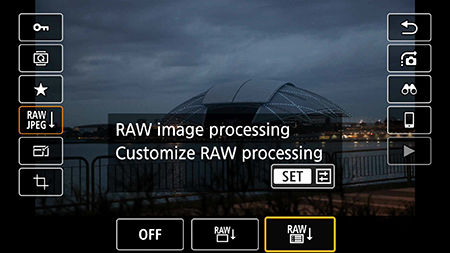
1. In playback mode, press the SET button and navigate to the RAW image processing icon. Select the rightmost icon to customise RAW processing.
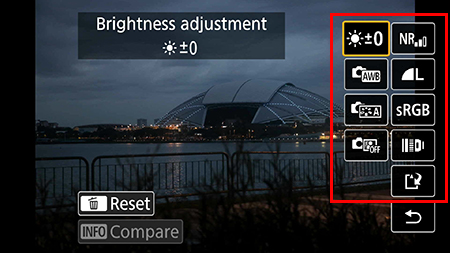
2. These options on the right allow you to do basic adjustments, such as adjust the brightness, white balance, Picture Style parameters, and so on.

3. You can enable and disable lens aberration corrections by selecting the lens icon.
Explore more features and functions that could enhance your images here:
HDR PQ HEIF: Breaking Through the Limits of JPEG
3 Handy New DPP Features for Correcting DPRAW Images
Portrait Relighting: Your In-Camera Lighting Crew
Receive the latest update on photography news, tips and tricks.
Be part of the SNAPSHOT Community.
Sign Up Now!About the Author
A monthly magazine that believes that enjoyment of photography will increase the more one learns about camera functions. It delivers news on the latest cameras and features and regularly introduces various photography techniques.
Published by Impress Corporation
Born in Hokkaido in 1982, Nakahara turned to photography after working at a chemical manufacturing company. He majored in photography at the Vantan Design Institute and is a lecturer for photography workshops and seminars, in addition to working in commercial photography. He is also a representative of the photography information website studio9.


