


[2-Light Technique] Rim Lights: A Way to Add Dimension to Your Shots
So you’ve learned how to use fill lights or reflectors to brighten your subject when shooting in backlight, but somehow, your images still look flat. Or perhaps the background is busy, and the subject seems to blend into them. If you have an off-camera Speedlite, the solution is simple: make the subject pop with rim lights, also known as edge or kicker lights! Commercial action photographer Mark Teo shares how he created them in two different situations. (Images and account by: Mark Teo)

1. What are rim lights?
2. Scene 1: Indoor environmental portrait
3. Scene 2: High-contrast against a white background
Before we start: What are rim lights?
Rim lights are created by lighting the side or back of the subject so that the light seems to outline (or “rim”) the subject. You may have seen them in dramatic low-key images where the subject is captured as a dark silhouette against a dark background, with its shape outlined by highlights.
But besides such effects, rim lights can also be used as part of multiple light setup to make your subject look more three-dimensional. Just look at the two examples below:
No rim light

Rim light
The first image was shot with diffused light to brighten the subject’s face, whereas the second image adds rim lights from the right side of the image to highlight the side of her body. Notice how it separates the subject from the background and gives the image more depth?
It might seem complicated to create them, but once you get the concept, it really is quite easy. In this article, I share how I did it in two different situations.
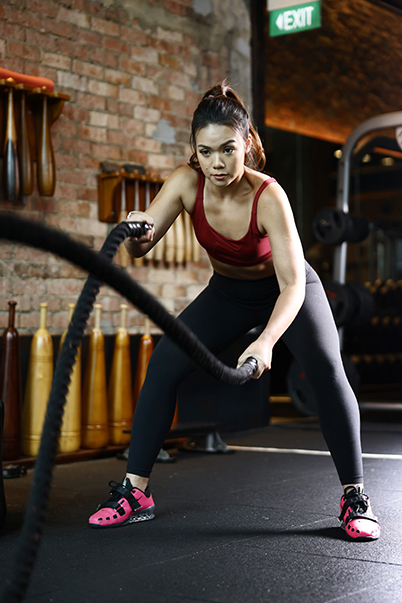
Scene 1: An indoor environmental portrait

EOS R + RF28-70mm f/2L USM @ 62mm, f/2.8, 1/200 sec, ISO 800
2 off-camera Speedlite EL-1 units (no modifiers)
Before you shoot: Assess the shooting scene

The shoot took place in a gym. There were lights streaming in from the windows on camera left, and some dim, warm mood lighting behind the subject and on the right. Overall, the location was dimly lit. The side of the subject facing the camera is in the shadow, so we would need a fill flash to brighten him up.
Ambient light can provide ideas on where to place your rim lights
If you look closely at the behind-the-scenes image above, you might notice that there are already rim lights on the subject. No, the flash on the left didn’t fire—those rim lights were created by the ambient light, and I decided to give them a boost with an off-camera flash. It’s also possible to balance ambient rim lights with a fill flash, although this depends on how you intend to control the background.
Tip: Rim lights stand out more on a darker background
Rim lights work by creating contrast against the background, so they stand out more against a dark background. Take this into consideration when you decide on your framing. With flash photography, you can also adjust your camera settings so that less ambient light is captured, making the background darker.
The setup

A: Off-camera flash as rim light
B: Off-camera flash as fill light
C: Camera with flash trigger

Step 1: Set up the rim light
This light should be diagonally behind the subject, angled so that the light falls on the back of the subject and wraps around to light the edges. For a harder, higher contrast look like what we are achieving here, use hard light and make sure it doesn’t spill over to the front. Take test shots and adjust the lighting angle accordingly.
Adjustment tips
An unmodified Speedlite tends to create intense light that falls on a smaller area. If you need the rim light to fall over a bigger area, move the light further away or use a diffuser.
Harder light

Softer (more diffused) light

Hard light that does not spill over to the front creates an outline that is more defined. Diffused light that is angled to allow light to spill over slightly to the front achieves a softer effect with more gradual edge transitions.
Also see:
Lighting Basic: Hard and Soft Light
What else to watch out for?
- Hotspots and blown details
Make sure that the rim lights don’t blow out things like key facial features or too much of the subject’s hair.
- Flare
If your flash is in the frame or just outside it, it might cause visible flare the image when it fires. You can use it for creative effect, but if not, it can be avoided by adjusting the camera angle or flash position.
Step 2: Set up the fill light
For this shot, I angled the fill light so that besides lighting the subject’s face, it also creates a highlight on the edge of the tyre.
Is there a flash ratio that works best?
There’s no hard and fast rule for setting the flash power ratio of both lights. Some photography guides might recommend that your rim light be set to a higher power than the fill lights, but this really depends on a lot of factors such as the lighting angle, distance from subject, and any modifiers. Get your angles first, and then adjust the rest to taste. For unmodified flashes, I usually start with both flashes around the same at 1/32 or 1/64 power, and adjust based on my test shots.
Step 3: Adjust your camera settings for the background
I set my ISO to 100, the aperture to f/2.8 for the appropriate depth of field, and used the shutter speed to control how much ambient light was captured. In this case, it was set to the camera’s flash sync speed of 1/200 second—sufficient to show the context, but dark enough for the subject and rim lights to stand out.
Flat lighting on the subject is not necessarily bad. See how one photographer used it artistically here:
[Flash Technique] Creating a Pop Art-inspired Night Portrait
Scene 2: High-contrast image on white background
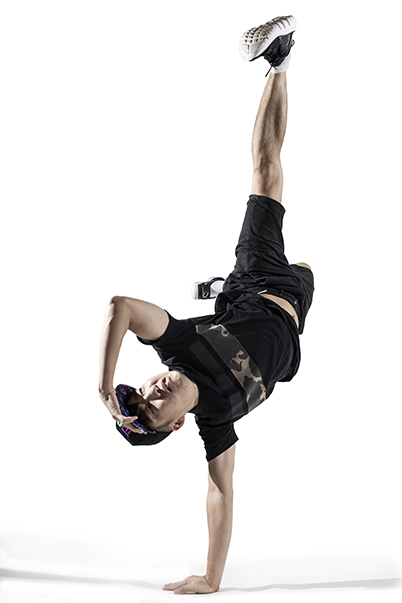
EOS R + RF28-70mm f/2L USM @ 28mm, f/5.6, 1/200 sec, ISO 640
2 off-camera Speedlite EL-1 units (no modifiers)
While rim lights are most visible against a dark background, the same concept that makes them happen (light spill from behind) can help you streamline your setup and define your subjects even on a white background.
The typical 4-light setup, and how I did it with 2 flashes
Usually, for such a setup, you may need as many as four lights: two just to light the background and one or two to light the subject. In that case, your setup might be something like this.
4-light setup

But you can use two flashes instead of four if you keep the subject close to the background.
My two-flash setup


A: Background light
B: Fill light, with some light falling on the background
How it works

Light from Light A and Light B both fall onto the white backdrop, which acts like a giant reflector, reflecting light onto the subject’s back in a way that spills over just enough to light the edges. Shadows are created in front, but Light B is also angled in a way that it acts as fill light for the subject.
Step 1: Position the lights and test
Both lights should be angled so that together, they light the backdrop. Without them, the background would appear grey.
Considering the angle that I wanted my subjects to face the camera, I adjusted Light B on the right slightly so that it also acts as fill lighting for the subject.
Light A is positioned slightly behind the subject and mainly lights the background on camera left. Light falls off as it travels away from the light source, so place this light closer to the backdrop.
Set your flashes to the widest zoom angle to ensure the widest, most even spread possible.
See how you can use the zoom angle creatively in:
[Flash Technique] How to Achieve Dramatic Colours in Backlight
Step 2: Test and adjust until you get a clean silhouette
Get your subject to stand in position, and take a test shot to check the “glow” around the subject. Are the lights spilling too little, too much, or just right?
Too little spill means there won’t be the highlights on the edges of the subject; too much would blow out details and make the subject look faded.
To control this, adjust the distance of the subject from the backdrop. Closer to the backdrop results in more glow; further from the backdrop means less glow. Placing the subject at least 3 or 4 metres away from the backdrop usually removes the glow completely.
Tip: Don’t worry if the background lighting looks slightly uneven
Nothing is brighter than white, so adjust your camera settings so that the dimmest part of the backdrop is blown out. Here, I used the ISO speed to control the background brightness.
Step 3: Fill the subject to taste
Once you have the silhouette you want, adjust the fill light to taste. You may need to tweak the flash power or adjust the angle. And then you’re done!
---
More two-light photography tips in:
A Simple Way to Light Curved Reflective Objects
(Includes basic gear information for off-camera flash photography)
Achieving Edgy Outdoor Images in Broad Daylight
How to Capture Raindrops to Create Surreal-looking Portraits
You might learn things you never knew about your Speedlite in:
Beyond Shutter Speed: Using Flash Duration to Freeze Motion
Start Flash Photography in 9 Steps!
Receive the latest update on photography news, tips and tricks.
Be part of the SNAPSHOT Community.
Sign Up Now!About the Author
Honing his craft with a balance of commissioned content and personal pursuits, Mark examines life through unguarded portraiture and suspended moments. With an abiding interest in adventure sports and urban subcultures, he has photographed MMA fighters, B-Boys, pole dancers, pro skaters, Motocross riders and Formula 1 champions to name but a few. A Semi Finalist in Red Bull’s Prestigious Illume Competition, Mark shares their uncompromised dynamism and raw energy.
His portfolio spans a plethora of clients from commercial work for Nike and Puma to editorial features for the likes of Discovery Channel Magazine, FHM Upgrade and SMILE Magazine for Cebu Pacific Airlines.
Besides being invited to judge Canon’s annual PhotoMarathon in 2013, Mark’s shoots have seen him documenting the beauty of the people and landscape in a self-driven Tuk Tuk across India, to shooting nomadic horse riders in Tibet for Red Bull and most recently documenting a road trip on the back of a Vespa across Vietnam, Cambodia and Malaysia.


