


Starting from the EOS R, some Canon cameras have started to offer the new Flexible-priority AE (Fv) mode alongside traditional modes such as Manual (M) mode, Aperture-priority AE (Av) mode and Shutter-priority AE (Tv) modes. What is this mode and how do you use it? Read on to find out. (Reported by: Kazuo Nakahara, Digital Camera Magazine)

1) What is Fv mode?
2) Step-by-step guide to using Fv mode
3) Usage examples
4) Bonus technique
Reimagining shooting modes: What is Fv mode?
Program (P) mode allows you to set the ISO speed, and leave the aperture (f-number) and shutter speed to be set by the camera.
Aperture-priority (Av) mode allows you to set the aperture and ISO speed, and leave the shutter speed to be set by the camera.
Shutter-priority (Tv) mode allows you to set the shutter speed and ISO speed, and leave the aperture to be set by the camera.
Manual (M) mode allows you to set the aperture, shutter speed, and ISO speed.
So what’s Flexible-priority (Fv) mode? It’s all of these modes combined:

*Cannot be set if ISO speed is manually set
**Cannot be set if all the other exposure settings are manually set
That means you can either choose to let your camera decide on all the settings, or manually set any setting that you prefer—without having to change to a different mode. And just like the traditional shooting modes, you can also choose to use exposure compensation.
This new mode offers such a different way of shooting that it might take some practice to get used to. But once you get the hang of it, depending on your shooting style and preferences, you might never want to switch shooting modes ever again.

Fv mode lets you choose to change the shutter speed, aperture, ISO speed and/or exposure compensation to suit your shooting intent and leave the rest up to the camera, all within the same shooting mode.
Step-by-step: How to use the Fv mode
Step 1: Choose the parameter that you want to set

To change a parameter...
In Live View: Select the parameter you want to change with the touchscreen.
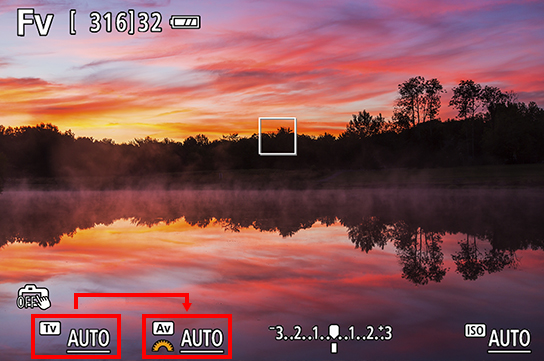
During viewfinder shooting: Turn the Quick Control Dial. The orange dial icon will appear on selected parameter. In the image above, we have selected the aperture setting.


In Live View (using the touchscreen): Select the value you want from the list that appears. You can also turn the Main Dial to scroll to the value.
During viewfinder shooting (using the dials and buttons): Turn the Main Dial to change the value.
Tip: How to reach your intended setting faster
When you change your settings directly from “AUTO”, you will have to scroll through the values from 30 sec or maximum aperture. For a faster way to reach your intended setting, half-press your shutter button first to meter the scene. The camera-determined values will replace “AUTO”, and you can adjust the setting from there.
Step 3: Half-press your shutter button to meter based on the new settings


Half-press the shutter button to meter the scene based on your preferred setting. The camera will adjust the other exposure settings to compensate.
Know this #1: Settings that are set to “AUTO” mode will have a line under them
Underlined: Automatic setting

No underline: Manual setting

After the scene is metered, the respective shoot setting values will replace the word “AUTO” in the shooting information at the bottom of the screen.
The parameters that the camera will automatically set are underlined; the parameters that you set manually will have no underline.
Orange dial icon: Turning the Main Dial will change the values in the parameter with this icon. See Step 2.
Know this #2: How to reset values to “AUTO” mode quickly
To reset the values, use the cross keys.

A (Up/left arrow): Press either one to reset only the selected parameter to “AUTO”
B (Down/right arrow): Press either one to reset all the parameters to “AUTO”
Know this #3: Exposure compensation can never be “AUTO”

The default exposure compensation value is EV ±0, and it won’t change unless you manually adjust it. To reset the value to default, press the left or up arrow on the cross keys.
Note: If your other settings are all manually set, you won’t be able to adjust exposure compensation at all.
Bonus tip: Using an EOS R system? Change your settings even faster with the control ring
On the EOS R system, if you are using an RF lens or the EF-EOS R Mount Adapter with the control ring, you can assign the control ring to control one exposure setting.
For example, if you assign the control ring to control exposure compensation, you just need to turn the control ring and the exposure compensation value will change. This applies in any semi-automatic shooting mode, not just Fv mode, and it helps you get your ideal shot faster.
Usage examples: So when do I use Fv mode?
As Fv mode is all your traditional shooting modes combined into one, you can use it any time for any scene. Here are just a few examples:
1. As an advanced P mode
If you are just graduating from P mode and want to see how changing the shutter speed and aperture will affect your shot, you can use Fv mode as your “training wheels” before going fully manual.
Scene 1: Changing the aperture to change the depth-of-field
Before: f/2

After: f/4

In this indoor setting, when all the settings were left to the camera (equivalent to P mode), the f-number was f/2. However, the depth-of-field was too shallow and some of the food on the plate was outside the in-focus plane. I took over the aperture setting and set the f-number to f/4 to increase the depth-of-field. The camera adjusted the shutter speed and ISO speed to compensate.
Find out more about what’s possible with various aperture settings in:
In Focus: Aperture Settings for Various Scenes
Scene 2: Changing the shutter speed to create motion blur effects
Before: 1/60 sec

After: 1/5 sec

This street scene looked too plain with the camera-determined shutter speed, so I decided to use a slow shutter speed (1/5 second) to blur the motion of passers-by and create a point of interest. The camera adjusted the aperture and ISO speed accordingly.
Learn more about what you can do with various shutter speeds in:
What’s the Best Shutter Speed for a Hair Toss Portrait?
Step-by-step Guide to Capturing Splashing Waves at Fast Shutter Speed Settings
What Unique Images Can I Achieve With Circular Panning?
Sports Photography: How to Emphasize Speed by Contrasting Stillness with Motion
2. As an easier M mode
Familiar with the effects of different shutter speeds and aperture settings, but still trying to grasp how to balance out the different values to get the best exposure? Fv mode will probably be very useful to you too. Simply set your aperture and shutter speed settings, and leave the ISO speed on auto—the camera will adjust it to give you the correct exposure.
Set your own aperture and shutter speed, and still get the correct exposure

Aperture: f/11
Shutter speed: 3 seconds
Exposure compensation: EV ±0
ISO speed: 100 (auto)
I wanted to capture vehicle light trails that went across the entire image frame, so I set the shutter speed to 3 seconds. To retain the details of the background and the asphalt road, I set the aperture to f/11. Leaving the ISO speed to “Auto” allowed the camera to adjust it to compensate, achieving the correct exposure. This is like the traditional M mode on ISO Auto.
---
Bonus technique: Use Fv mode for your C1/C2/C3 custom mode settings
What does the custom mode do?
If you always set your camera a certain way for certain scenarios, you can store those settings for easy future recall in one of the custom mode slots—C1, C2, or C3.
When you do so, all your camera settings at that time are remembered. That means when you turn the mode dial to C1, C2, or C3 (whichever you saved the settings to), the camera will recall everything: not just exposure settings, but also settings like AF modes, custom controls, Picture Style, and even EVF and LCD brightness. It's like creating your own super-customised camera preset.
How Fv mode helps
Depending on which of the saved settings are most important to you, you might want more flexibility to adjust the exposure settings where necessary*. But if you saved the settings under a traditional shooting mode, you will realise that:
Under Av mode: You can't adjust the shutter speed
Under Tv mode: You can't adjust the aperture
Under M mode: Change one setting, and you have to change the other exposure settings to retain the same brightness.
Under P mode: You can only change ISO speed and exposure compensation
If you store your settings in Fv mode, you will be able to adjust any exposure setting you want, any time, without affecting the other saved camera settings. Super convenient, isn't it?
*Saved settings won't be changed unless you purposely overwrite them.
Receive the latest update on photography news, tips and tricks.
Be part of the SNAPSHOT Community.
Sign Up Now!About the Author
A monthly magazine that believes that enjoyment of photography will increase the more one learns about camera functions. It delivers news on the latest cameras and features and regularly introduces various photography techniques.
Published by Impress Corporation
Born in Hokkaido in 1982, Nakahara turned to photography after working at a chemical manufacturing company. He majored in photography at the Vantan Design Institute and is a lecturer for photography workshops and seminars, in addition to working in commercial photography. He is also a representative of the photography information website studio9.

