


Is camera shake ruining your handheld night portraits? Here are 4 tips to overcome that and get that beautiful, blur-free, well-lit shot—and none of them involves a tripod (Reported by: Ryosuke Takahashi)

EOS 5D Mark II/ EF35mm f/2 IS USM/ Aperture-priority AE (f/2.0, 1/30 sec, EV -0.7)/ ISO 400/ WB: Auto
Equipment: Use a fast lens
A fast lens, also known as a "bright lens", refers to a lens with a large maximum aperture, such as the EF35mm f/2 IS USM that I used for the shot above. The light from the store was my only light source, but the bright maximum aperture allowed more light to enter the lens and reach the sensor without the shutter speed slowing down too much (1/30th of a second in this case). The resulting shot was free of both camera shake and subject blur.
The fastest lenses are most often prime lenses. It’s even better if the lens comes with IS (Canon’s in-lens image stabilisation system)—you need all the help you can get to ensure stable shots!
The IS function on the EF35mm f/2 IS USM reduces camera shake by the equivalent of about four shutter speed stops. In addition to the brightness and image stabilisation, wide-angle prime lenses like the one that I used are not only able to capture the context of the scene, they are also usually compact and lightweight—ideal for street photography even at night.

Click here to see details of the EF35mm f/2 IS USM
4 steps to getting a sharp handheld night portrait
Step 1: Set the mode dial to Av mode. Set the f-number to the smallest value.

Unless you have a specific photographic intention in mind (such as a light painting), shoot in Aperture-priority AE (Av) mode and use the widest aperture. Using a narrower aperture slows down the shutter speed (lengthens the exposure time), which increases the likelihood of a blurry shot. Most slow shutter speed techniques (such as light trails) will require you to use a tripod.
Step 2: Raise the ISO speed
Raise the ISO speed according to the brightness of the shooting location until you have obtained a shutter speed sufficient for handheld photography. As a rule of thumb, you are using a lens with a focal length of 35mm, the shutter speed should be about 1/30 second.
If you use ISO Auto, the ISO speed selected by the camera might be too high, resulting in graininess. If you want to ensure pristine quality, it might be better to set the ISO speed manually instead.

Tip: Set a maximum ISO Auto speed

To ensure that the ISO speed doesn’t get too high in ISO Auto mode regardless of how dark the settings are, set a maximum ISO Auto speed. This gives you more control over image quality.
Step 3: Find a light source

Even in low-light conditions, you still need a light source. I posed my model against the doorway of the shop and used the light emerging from within as my main light source.
Tip: To convey the surrounding atmosphere, don’t correct colour temperature excessively
The lights were incandescent lamps with warm tones. Using Auto White Balance helped me to capture these tones without having to make further adjustments.
Find out more about white balance here:
Camera Basics #6: White Balance
Step 4: Watch out for harsh shadows! The key is in where your model faces.
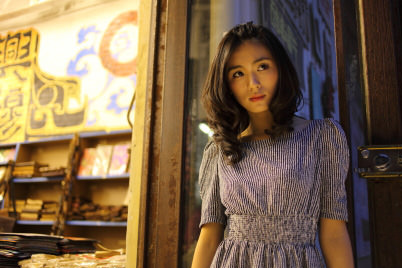
At night, light-shadow contrasts appear stronger. Pay extra attention to your lighting angles to avoid harsh shadows. If the light is shining from the side, such as in this shot, I usually start by getting the model to face the light source. If the shadows are too harsh, adjust her head angle and position accordingly.
You may be interested in:
3 Flattering Techniques to Learn from Professional Models
Ideas for handheld night shots: Play with light and shadow


There are many other things you can photograph at night using the techniques above. Keep an eye out for interesting street scenes or night scenery. Things that you can't really capture in the daytime, such as neon signs or decorative lights, also make ideal night photography subjects!
For more tips and tutorials on night photography, check out :
In Focus: Night Photography
Receive the latest update on photography news, tips and tricks.
Be part of the SNAPSHOT Community.
Sign Up Now!
About the Author
Born in Aichi in 1960, Takahashi started his freelance career in 1987 after working with an advertising photo studio and a publishing house. Besides photographing for advertisements and magazines in and out of Japan, he has also been a reviewer for “Digital Camera Magazine” since the launch of the publication as well as published a number of works. In his product and lens reviews, Takahashi particularly advocates photography techniques that bring out the lens performance through his unique point of view and tests. Takahashi is a member of the Japan Professional Photographers Society (JPS).


