


[2-Light Technique] A Simple Way to Light Curved Reflective Objects
Shiny plastics and other reflective objects can be challenging to photograph, especially if you are trying to control how they are lit. Read on to find out one way to light them using off-camera lighting. (Tutorial and images by: Chee Boon Pin)

EOS R/ EF50mm f/1.2L USM@ f/4, 1/60 sec, ISO 100
Lights: 2 x Speedlite EL-1 (off-camera) at 1/64
1) Assessing the subject
2) The setup
3) Procedure (Steps 1-3)
4) Knowing your equipment
Before the shoot: Assess the subject
Different subjects have different properties that will affect how you shoot it. Here’s what I consider:
- Is the surface of the subject transparent, translucent, matte or reflect light like a piece of mirror?
- What sort of shape does the subject have? Is it flat, is it spherical, is it concave or convex?
- What sort of angles or what part/details of the subject do you want highlighted?
- What is the size of the subject in relation to the space you have to execute the shoot?
- What sort of background do you want to shoot it against?
Here’s our subject for this article, shot with a head-on flash:

The subject has a glossy, curved surface. Such surfaces are challenging because they easily reflect the environment as well as stray lighting. In fact, you can see how using a direct on-camera flash doesn’t flatter our subject—the flash is reflected in the numerous lighting spots on it.
The setup
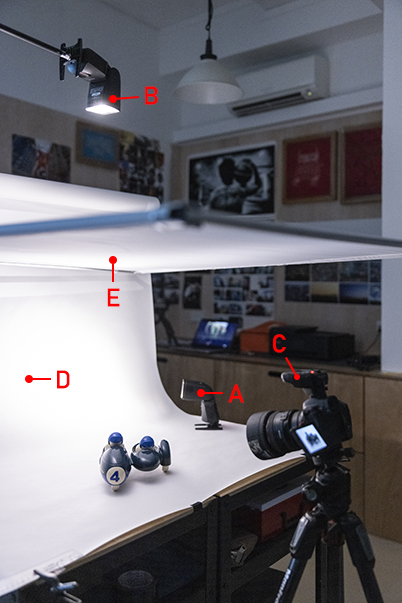
What you need
2 off-camera flashes (or 1 flash, one LED light)
A: Background light
B: Key light (main light)
C: Speedlite Transmitter ST-E3-RT, so that you can fire the flash off-camera.
(Alternatively: A flash that supports the sender function*)
D: White background
E: Light-diffusing fabric to diffuse the top light, positioned directly over the subject.
- This can be any sheer white fabric. It ensures that light is diffused over a wider area, and also prevents ceiling details from being reflected onto the subject.
*More information about sender/receiver functions in ‘Knowing your equipment’.
Step 1: Set up the background light

After setting up the diffusion fabric above the subject, the first thing I set up was the background light. This light should be directed at the background behind the subject.
Due to the shape of the subject (spherical/curvy) it reflects the surrounding light/space easily. The background light ’spills’ onto the subject, becoming edge lighting. I feel that this complements the subject, giving it volume.
Step 2: Add the key lights
Next, I added the overhead light which acts as the key light. The diffusion fabric softens the key light, especially since I didn’t use any modifier over the bare flash. The shadows below the subject has soft edges and does not create overly distracting shadows.
The final product:
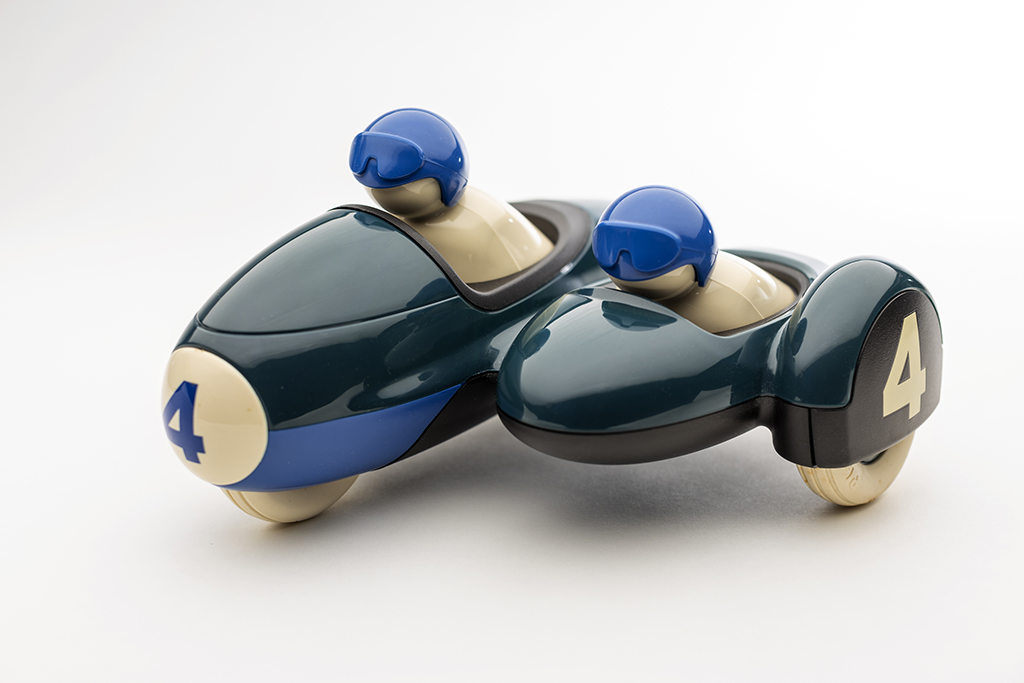
This effect was accomplished with both flashes at around 1/64 on the Speedlite EL-1.
Modifying the lighting angles
Try to understand where or how the light hits your subject and reflect into your camera. If you need the key light to be softer, shift it away from the reflections. You may even try bouncing the light off the ceiling. If reflection is unavoidable, learn to use it to help accentuate the shape of the subject.
Alternative: If you only have one off-camera flash and the other is a continuous light…
Use the flash as your key light, and the continuous light as your background light. That’s because your key light needs to be more powerful, and it helps to be able to adjust the flash head as needed. If the continuous light source isn’t strong enough, use a slower shutter speed to get a brighter background.
Step 3: Turn off the ambient lights
Ambient lights might introduce unwanted reflection or mixed colour/temperature light onto the subject or background. Once you are done with your setup, turn off all the lights in the room–or as many as you can. Light coming in from the windows counts too, so remember to draw the blinds!
If it’s not possible to reduce the ambient light enough, you can darken them further by increasing your shutter speed.
Tips:
1. Use the modelling light to help you
Canon Speedlites have a modelling light that help you see the subject and understand the effect or direction of light on the subject or background. Use it to help you!
Cool fact: On the flagship Speedlite EL-1, you can even adjust the colour temperature and intensity of the modelling light.
2. If you are using an on-shoe Speedlite as the sender, remember to turn off sender flash firing
By default, sender flash firing is usually turned on and the sender is fired as Group A. We don’t want the on-shoe Speedlite to fire here, so set sender flash firing to ‘OFF’. Refer to your Speedlite manual for detailed instructions.
On gear: Knowing your equipment
What gear do I need to fire a flash off-camera?
Besides the Speedlites that you intend to fire off-camera (known as the receiver or slave units), you also need a sender unit (also known as a trigger or master/controller unit). A sender unit is a flash or transmitter attached onto the camera that can trigger the off-camera flashes to fire.

The Speedlite Transmitter ST-E3-RT has an LCD panel that allows you to configure and control off-camera flashes remotely. That’s convenient when the receiver units are not within easy reach, such as the key light in this shoot.
Wireless transmission modes: Radio v.s optical
There are two main ways that Canon sender and receiver units can communicate wirelessly: optical transmission and radio transmission.
Optical transmission is the original wireless transmission method. It requires a line-of-sight connection between the sender and receiver units. This means that the optical sensors of the units need to face each other, and that obstructions (including other strong light sources) can affect communication.
Radio transmission is a newer, more reliable transmission method. It allows the sender and receiver units to communicate with each other even if there is no line of sight. It also provides a larger range of communication (around 30m) compared to optical transmission.
Functions supported by recent Speedlite models

Also see:
Buyer's Quick Guide: Speedlite 600EX II-RT
Buyer's Quick Guide: Speedlite 430EX III-RT
What kind of settings should I watch out for when I set up wireless firing?
- The channel and wireless radio ID
The channels and wireless radio ID help to ensure that two photographers firing flashes in the same venue don’t accidentally fire each other’s equipment. Make sure that your sender and receivers are all set to the same channel and have the same ID. If not, they will not be able to communicate.
- Make sure the LINK lamp is green
This indicates that your sender and receivers are communicating with each other. If it’s red, it might be because the channel/wireless radio ID is not correct.

- Advanced variations: Modify the firing group controls and see what you get
For this project, both receiver flashes were fired using the same mode and output setting. However, the receiver and sender units can be divided into different firing groups with different flash modes and output settings using the “Gr” mode. When you get more familiar with off-camera flash photography, you may want to experiment with these and see what you get.
More off-camera flash photography tutorials in:
How to Capture Raindrops to Create Surreal-looking Portraits
2 Simple One-Light Techniques for Gorgeous Day/Night Wedding Portraits
Learn more about Speedlites and the basics of flash photography here:
Start Flash Photography in 9 Steps!
3 Speedlite Features You Might Not Know
What is E-TTL II Flash Metering?
Receive the latest update on photography news, tips and tricks.
Be part of the SNAPSHOT Community.
Sign Up Now!About the Author
Boon Pin first started photography as a way to document his hobbies and travels. On a constant journey to create better images, he hopes to create photograph that will convey the feelings and energy of the moment to viewers through his photography. Besides shooting travel-related subjects for in-flight magazines, he also shoots for sporting and culture events, which he loves for their infectious energy and excitement. Off-work, he contributes content for a local cycling team and shoots at races whenever his schedule allows. He documents his shooting/cycling adventures under his ongoing “Be Ride Back” project, and is currently waiting for overseas travel to resume so that he can continue those adventures overseas.
Website: http://www.cheebp.com/
Instagram: http://www.instagram.com/cheebp/


