


3 Beginner-friendly Ways to Spice Up Your Urban Nightscapes
New to night photography? Have some fun with these easy tips and techniques that will make your shots look more interesting! (Reported by: Yoshiki Fujiwara, Digital Camera Magazine)

EOS M5/ EF-M11-22mm f/4-5.6 IS STM/ FL: 11mm (18mm equivalent)/ Manual exposure (f/16, 30 sec, EV ±0)/ ISO 200/ WB: Auto
The starbursts in this shot were created by using a very narrow aperture (f/16).
1. Use HDR Art Vivid mode to capture the city lights in intricate detail
The many artificial lights around make night cityscapes high in contrast. It can be challenging to get the exposure to look right if you shoot as usual: the areas with bright lights will look washed out (blown highlights), while the areas with little light will lose detail and look like lumps of black (crushed blacks).
One quick and easy way to handle this is to use the HDR (High Dynamic Range) Creative filters. In these modes, the camera takes a total of 3 exposures: one under-exposed, one correctly exposed, and one over-exposed. These are then merged in-camera to create a single image that contains more shadow and highlight detail than possible in one normal shot.
There are a few different HDR Creative filters that you can choose from. For night photography, I recommend HDR Art Vivid as it slightly enhances the colours with natural-looking results.
Shot in HDR Art Vivid mode

EOS M5/ EF-M11-22mm f/4-5.6 IS STM/ FL: 11mm (18mm equivalent)/ Creative Filters mode: HDR (f/4, 1/4 sec, EV ±0)/ ISO 1600/ WB: Auto
A high contrast night cityscape shot in HDR mode. It appears more vivid and dramatic as the details in the highlights are not blown out.
No HDR

EOS M5/ EF-M11-22mm f/4-5.6 IS STM/ FL: 12mm (19mm equivalent)/ Manual exposure (f/8, 10 sec, EV ±0)/ ISO 400/ WB: Auto
The same shot taken without HDR. The bright areas look extremely bright. Notice how the details and colour in the brightest areas look washed out—this is especially obvious in the Ferris wheel at the top left of the image (see a close-up below).
HDR Art Vivid

No HDR

Shooting procedure
1. Set the camera onto a tripod.
2. Rotate the Mode dial to the Creative Filters mode.

3. Press the [SET] button, and select ‘HDR Art Vivid’.

Want more control over the HDR exposure settings? You can do so with the HDR Mode, found in the menu settings of intermediate and advanced cameras like the EOS RP, EOS 90D and EOS M6 Mark II.
2. Capture the flow of time with light trails
If you take shots of moving cars using a slow shutter speed, the car lights will appear as light trails in your photos. When capturing light trails, try to find a location where cars are passing in both directions so you can capture both headlights and tail lights. If only headlights are visible, you will only be able to capture white light trails. To liven this up with some colour accents, add in red and yellow light trails by making sure that the tail lamps are captured as well.

EOS M5/ EF-M11-22mm f/4-5.6 IS STM/ FL: 21mm (32mm equivalent)/ Shutter-priority AE (f/14, 15 sec, EV ±0)/ ISO 100/ WB: Auto
This was shot over a window sill of a building. I placed a black reflector behind me to remove window reflections. If you need to shoot with a wider angle, a large black cloth might work better.
What settings to use?
My standard settings for shooting light trails are f/8, 10 sec, and ISO 800. I adjust them depending on factors like the brightness of the location, traffic volume, and desired outcome. For example, for the shot above, the cars slowed down as they approached the intersection so I exposed the shot longer (15 seconds) to keep the light trails long.
Tip: The faster the shutter speed, the shorter the light trails become
4 seconds

EOS M5/ EF-M11-22mm f/4-5.6 IS STM/ FL: 21mm (32mm equivalent)/ Shutter-priority AE (f/5.6, 4 sec, EV ±0)/ ISO 100/ WB: Auto
At 4 seconds, the light trails are much shorter. Because cars stop at the traffic light, it is important to observe the movement of the cars and choose a good timing for the shoot.
Shooting procedure
1. Set the camera onto a tripod.
2. Rotate the mode dial to "Shutter-priority AE".

3. Set the shutter speed. Here, I set it to 15 seconds.
4. Release the shutter remotely. This helps to avoid the camera shake that may occur when you press the shutter button.
Useful function: Canon Camera Connect
No remote control? Don’t fret: you can turn your smartphone into one. Simply download the free Canon Camera Connect smartphone app and pair your camera.

Connect to the camera’s Wi-fi access point to use the Remote Live View Shooting function. Besides releasing the shutter, you will also be able to see the scene and adjust basic exposure settings.

If you prefer not to use the Wi-fi connection, you can also use the Bluetooth Remote Controller function to release the shutter.
Want to create unique light trails? Here is how you can use your built-in flash and light trails to make cars look like they are whizzing past at lightning fast speed:
Built-in Flash Techniques #5: Using the Second-Curtain Sync Mode for Fast, Furious Light Trails
Ultra Wide-angle Lens Technique: Light Trails from a New Perspective
3. Create starbursts to accentuate the image
In night photography, strong point light sources such as street lamps are another element you can use to make your photos more interesting.
When shooting at maximum aperture, light sources are captured as small dots. However, when you narrow the aperture to at least f/11 to f/16, they will grow rays and appear to sparkle like tiny stars. This is called the starburst effect. which allow you to apply some sparkle to your photos. The narrower the aperture and the stronger the light source, the longer the rays become.
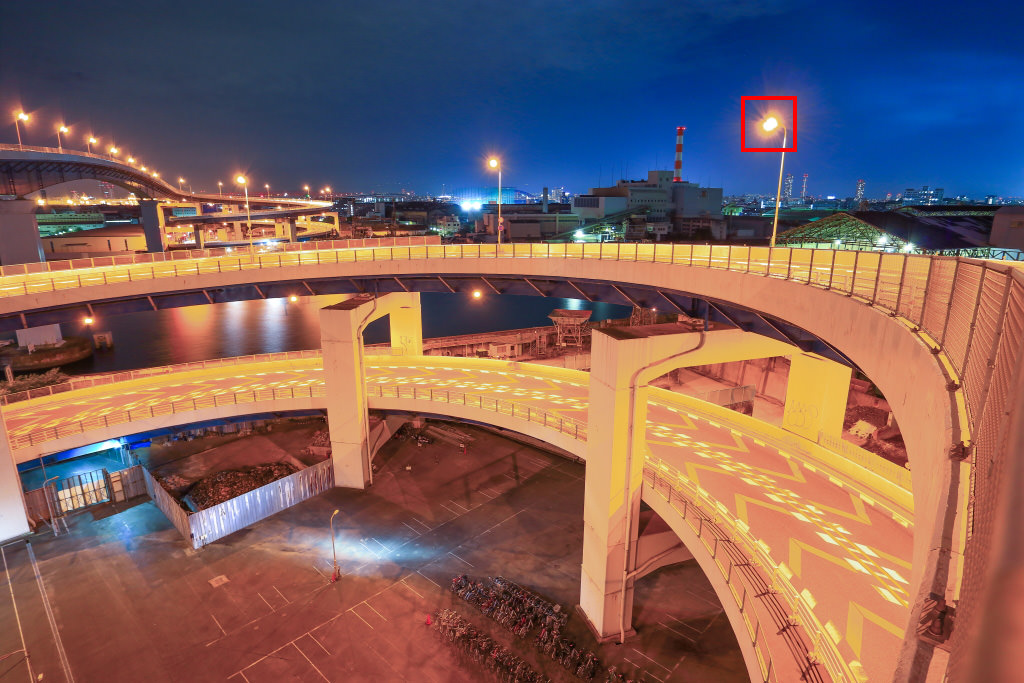
The shot below was taken using an aperture of f/16. At such narrow apertures, the shutter speed will slow, so take steps to stabilise the camera. Use a tripod and remote shutter release if necessary!

EOS M5/ EF-M11-22mm f/4-5.6 IS STM/ FL: 12mm (18mm equivalent)/ Aperture-priority AE (f/16, 30 sec, EV ±0)/ ISO 200/ WB: Auto
Taken looking over a railing that appears in the right edge of the photo. I set my camera on a tripod that was more than 2m tall. Even though I stood on a stepladder, the camera was positioned higher than myself! Luckily, the fully articulating Vari-angle LCD screen could be tilted downward, allowing me to see the shot easily.
Tip: If the aperture is not narrow enough, the camera will not be able to capture beautiful starbursts
EOS M5/ EF-M11-22mm f/4-5.6 IS STM/ FL: 12mm (18mm equivalent)/ Aperture-priority AE (f/4, 6 sec, EV ±0)/ ISO 200/ WB: Auto
f/4

f/16

When I used an aperture of f/4, there were hardly any starbursts in the photo. Hence, the narrower you set the aperture, the longer the streaks of the starbursts. You should also note that at the same ISO speed, the shutter will become slower the narrower you set the aperture.
Shooting procedure
1. Set the camera onto a tripod.
2. Attach a hood to prevent unwanted light from entering the lens.
3. Rotate the mode dial to "Aperture-priority AE".
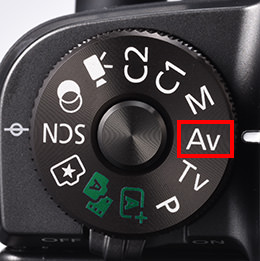
4. Rotate the Main dial* to set the aperture to f/16.

*Your main dial may look different depending on your camera model.
5. Enjoy your starbursts! If the effect is not enough, try a narrower aperture.
For more easy night photography techniques and tutorials, see:
Night Photography: Adjusting Contrast for a Picturesque, Surreal-looking Image
3+ Camera Functions that Could Change Your Night Cityscapes
What’s the optimal shutter speed for shooting nightscapes?
Receive the latest update on photography news, tips and tricks.
Be part of the SNAPSHOT Community.
Sign Up Now!About the Author
A monthly magazine that believes that enjoyment of photography will increase the more one learns about camera functions. It delivers news on the latest cameras and features and regularly introduces various photography techniques.
Published by Impress Corporation
Formerly a professional snowboarder, Fujiwara took the opportunity to embark on a second career as a photographer after retiring due to an injury. He has since won a number of international photography awards for his nature photography and cultural portraits. In 2019, he became the first Japanese person to win an award in the 'People' category of the 2019 National Geographic Travel Photo Contest. Besides providing photos for National Geographic, Fujiawa also contributes to camera magazines in Japan and abroad, and engages in a wide range of activities including books, talk shows, and company calendars.
http://www.yoshiki-fujiwara.com/
Instagram: @yoshiki_fujiwara

