


When it comes to learning how to make people look more attractive in photos, you would be surprised by how much photographers can learn from professional models, whose job is to look good for the cameras. As such, they often know at least as much, if not more than photographers about lighting directions and angles that cover flaws and present a subject in the most flattering light. Here, professional model cum photographer Nozomi Inoue shares some of such tricks that she learnt from being on both sides of the camera. (Reported by Nozomi Inoue)

1. Chest-up shots: Shoot from a slightly higher angle. Use a white wall as your reflector, not as your background
Technique applied
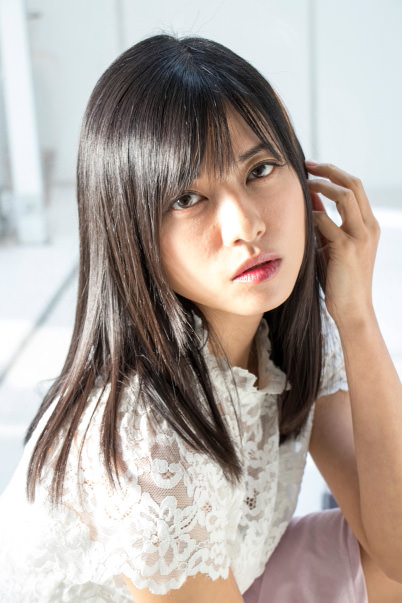
Use a dark background, and reflect light off a white wall to brighten up the model’s face.

Technique not applied
Using a white wall as the background will make the model’s face look dark.

EOS 77D/ EF-S18-135mm f/3.5-5.6 IS USM/ FL: 22mm (35mm equivalent)/ Manual exposure (f/3.5, 1/160 sec)/ ISO 400/ WB: Auto
The underlying concept: Make sure that the face is gently lit

To make your subject look younger and more attractive in a chest-up shot, you only need to remember two things:
1. Shoot from a slightly higher angle (which makes eyes look bigger), and
2. Make sure that the face is gently lit.
In the “Good example” image above, the model was leaning against a dark-coloured wall, and the wall opposite her was white in colour.
Many people have the impression that a white wall is the best background for portraits. However, this means that light will reflect off the wall and come from behind the subject instead. The face will look darker with less light falling on it, which not only affects how facial expressions are depicted but also results in a less appealing image.
For better lighting, it helps to remember this simple tip: White walls should always be in front of, not behind, the model. Whether you are using natural or artificial lighting, the wall will act as a reflector, and the light that bounces off it will be soft and yet sufficient to brighten your model’s face without harsh shadows or overexposure.
Related technique: Bounce flash photography
Shooting procedure

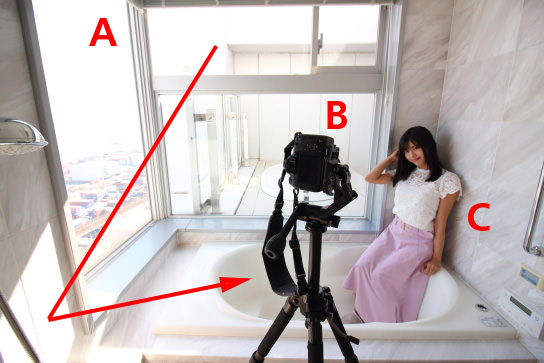
A. Find a white wall that has light shining on it, and sit the model opposite it.
B. Set the camera onto a tripod, and position it so that it is tilting slightly downward at the model.
C. If you are taking a self-portrait, you can use the Remote Live View Shooting function on Camera Connect to preview your image and release the shutter with a self-timer.
Tip: For subjects with black hair, you might need to adjust the position and background so that the hair also catches the light
Glossy, healthy-looking hair makes a person look even more attractive. However, if your subject has black hair, the hair may blend too well into a dark-coloured background and become indistinguishable from the latter.
To avoid that, shoot from above the head at an angle where the light falls onto the hair. This will put some highlights into the hair and make it look glossy and healthy. If you cannot find an angle that achieves that effect, choose a background that is slightly brighter than the colour of the model’s hair.
2. For smooth, radiant skin, shoot in a well-lit place
Technique applied
Skin looks smooth and luminous when lit with bright, reflected light.

Technique not applied
Direct sunlight from the side can create a dramatic, chiselled look. However, it also makes flaws in the skin more obvious.
EOS 77D/ EF-S18-135mm f/3.5-5.6 IS USM/ FL: 50mm (80mm equivalent)/ Manual exposure (f/5, 1/160 sec) / ISO 800/ WB: Auto
The underlying concept: Soft but bright lighting creates smooth, radiant skin

The most fundamental way to make skin look radiant is to take a high-key photo by bouncing a soft but bright (not yellow or dim) light onto the model’s face. Note that this will reduce the shadows on the face and hence make it look less angular, but in return, you get skin that looks smooth and luminous. Lighting from this angle also results in catchlights in the eyes, which makes your model look lively and spirited.
Doing the opposite, i.e. using strong light and shining it directly from the side, will create strong shadows on part of the face. This is useful for when you want to make the model’s face sharper for a chiseled, dramatic look. However, with such lighting, skin imperfections can look even more obvious.
Whichever lighting technique you choose to use, make sure your focal length is at least 80mm, so that the shape of the face is captured faithfully without distortions caused by wide-angle lens characteristics.
You might be interested in:
Why the EF85mm f/1.8 USM is Ideal for Portrait Photography
EF85mm f/1.4L IS USM Review: An Excellent Portrait Lens for Handheld Shooting
Shooting procedure
A. Choose a place with white walls and natural lighting. This shot was captured in the bathroom of a high-rise building with large windows.
B. Set up the camera on a tripod some distance away. If you are using zoom lens, avoid using the wide-angle range.
C. If you are taking a self-portrait, you can use the Remote Live View Shooting function on Camera Connect to preview your image and release the shutter with a self-timer.
Tip: To make skin look radiant in close-up shots, use exposure compensation and zoom in
When you use an auto-exposure (AE) mode to shoot in a brightly-lit location, your camera will most likely automatically compensate exposure to the negative, which can cause faces to be underexposed. Brighten this up by increasing exposure compensation by 1 – 2 EV to the positive end.
Also note that shooting with the wide-angle range of a zoom lens makes the face look broader. If you want to take a close-up shot of the model’s face, do not move closer to shoot handheld. Instead, use a tripod, and place it some distance away so that your lens is set to a telephoto focal length. This will help to ensure that the shape of the face is captured faithfully.
3. Placing hands near the face = Instant face slimming effect
Technique applied
Framing the face with hands can give the illusion of a smaller face as well as add life to the pose.

Technique not applied
If the subject is not used to the camera, not posing the hands might make them might look too fierce or awkward

EOS 77D/ EF-S18-135mm f/3.5-5.6 IS USM/ FL: 50mm (80mm equivalent)/ Manual exposure (f/5, 1/160 sec)/ ISO 800/ WB: Auto
The underlying concept: Use the hands to “outline” the face

Pose the hands so that they frame the face. This not only makes the face look smaller, the entire pose will also look more expressive. This is especially useful if your subject is shy in front of the camera and finds it hard to smile naturally, which could make her look upset, awkward or lifeless in the photo.
The key is to make sure that the hands form a ‘V’ shape. Make sure that the palms are not resting against the cheeks as that could “squash” the face and make it look chubbier instead. The pose will look even more natural if the model rests her elbows on a chair or table.
Making shy subjects smile
The best portraits are those with genuine, natural expressions, and that requires the subject to be comfortable in front of the camera. If your subject is camera-shy, building trust and rapport with them will help to put them at ease, so keep engaging them in conversation as you shoot.
People find it easier to smile at familiar sights. One simple trick to coax a genuine smile out of your subject is to place something that they love, or a photo of it, behind the camera where they can see it. This can be a favourite toy, or the photograph of a loved one or pet. Hold the camera at a level slightly higher than the face, and be ready to capture the moment when it comes! This also works for self-portraits.
Shooting procedure

A. Resting the elbows on a table or chair will make this pose look more natural.
B. Use the telephoto range of a zoom lens and position the camera some distance away at a level slightly above the face.
C. Engage the subject in conversation, and be prepared to shoot the moment she gives a natural smile. If you are taking a self-portrait, you can use Camera Connect as described in the two techniques above.
Tip 1: Tilt the head slightly to exude some girlish charm
When taking chest-up or close-up shots, tilting the head slightly (by about 5° off the vertical axis) will make the subject look friendlier and more approachable. On the other hand, having the head straight and upright suggests a strong sense of purpose, which can also make the subject appear intimidating.
Tip 2: Use Remote Shooting on Camera Connect for finer control over your self-portraits

When it comes to taking self-portraits, the remote shooting function on Canon’s Camera Connect app is your best friend. With it, you can adjust your camera settings, preview the image and release your camera shutter by simply operating your smartphone or tablet, without the need to move to and from the camera each time you want to check and reshoot a shot. Feel free to experiment with different poses and reshoot to your heart’s content.
We recommend setting the self-timer on Camera Connect, and then hiding your smartphone/tablet so that it remains out-of-sight in the photo. The larger screen of a tablet is particularly convenient for checking your shots.
For more about Camera Connect, check out the following articles:
Useful Tips for Backing Up Photos on the Camera Connect App
Fun Ways to Use Your Camera’s Wi-Fi (Part 1) : Introduction to Wi-Fi Features
Fun Ways to Use Your Camera’s Wi-Fi (Part 2) : Real-Life Examples
More portrait photography tips are available in the following articles:
How To Become A Better Instagram Boyfriend and Perfect Your Girlfriend’s #OOTD
How Do I Capture Portraits With Background Bokeh Under Backlit Conditions?
Step by Step: How to Capture Dramatic Portraits Using Backlight from the Window
Receive the latest update on photography news, tips and tricks.
Be part of the SNAPSHOT Community.
Sign Up Now!About the Author
A model and photographer, Inoue writes regular columns about photography in photography magazines and a travel information site. She has also published a book on how to take photos that make a person look attractive, using insight gained from her experience as a model. She aims to visit all countries in the world. Balancing her activities as a talent and model with travel, she has already visited over 60 countries, and shares her photos and travel experiences in her web column “NON★TRIP”.


