


Things don’t always go to according to plan during a shoot. Sometimes, Mother Nature doesn’t cooperate. Other times, such as when we participate in events like the Canon PhotoMarathon, we find ourselves shooting under time pressure and situational limitations. But the most brilliant yet simple hacks can arise from such constraints. Here, three photographers share how they worked around less-than-favourable situations. (Reported by: Takashi Namiki, Shugo Takemi, GOTO AKI, Digital Camera Magazine)

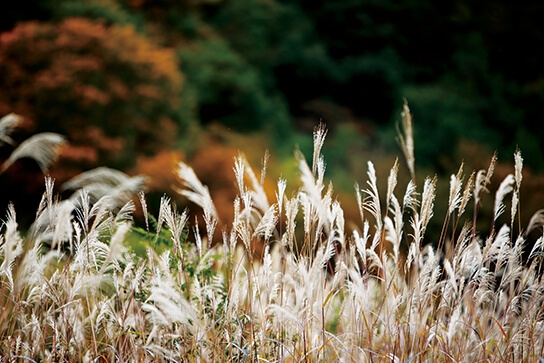
EOS 6D/ EF70-200mm f/2.8L IS USM/ FL: 200mm/ Aperture-priority AE (f/2.8, 1/500 sec, EV±0)/ ISO 400/ WB: Daylight
By: Takashi Namiki
1. The situation: Too little wind to create movement
The hack: Use Multiple Exposures to “create” motion blur
The usual way to make fields of grass look like they are swaying in the breeze is to create motion blur by using a slow shutter. However, the wind was so weak when I was shooting this patch of susuki grass (also known as maiden silvergrass) that the motion blur did not look good at all.
To save the shot, I decided to use the Multiple Exposure function on my camera. I took several continuous shots without changing the framing.
This is the shot I got when I didn’t use Multiple Exposures. There is much less movement, which makes the shot look less impressive.
Here's a GIF of the two images so that you can compare the difference:
Tips:
- Shoot by hand to get the motion-blur effect
Don’t use a tripod for this. Instead, shoot by hand as normal. You will naturally shift the camera a little each time you take an exposure. When the exposures are merged, that natural shifting will be just enough to create an effect that is similar to the motion blur that you would get if there really was a strong breeze.
- Set the Multiple Exposure Control to “Average”
This setting automatically controls the exposure of the final merged shot. If you choose “Additive”, you will have to set negative exposure compensation to prevent the shot from becoming overexposed. As a start, take about five exposures. You don’t have to follow this strictly, but I find that five is usually a good number to start with.
- Create background bokeh to cover up the unattractive blurring in the background
Real motion blur occurs only on the moving object—backgrounds should not move! But when you simulate motion blur with Multiple Exposures, the background will also look like it has motion blur. Cover it up by creating background bokeh.
For other ways to use the Multiple Exposure function, check out:
EOS 80D Shooting Techniques: Nightscapes (Technique 03)
Multiple Exposure Fireworks: A Detailed Guide to Nailing the Shot
Photographing Sakura in Japan: Scenic Spots & Pro Photography Tips (3) (Scene 3)
2. The situation: Too many other photographers at the same location
The hack: Improvise a unique frame to make your shot stand out

EOS-1D X/ EF16-35mm f/2.8L USM/ FL: 16mm/ Aperture-priority AE (f/16, 1/800 sec, EV±0)/ ISO 500/ WB: Auto
By: Shugo Takemi
There were more than ten other photographers covering the skiing competition at the same location. I really wanted my shot to be different from theirs, and got the idea to make use of snow.
If there was one thing that left a very strong impression about the location, it was the bone-chilling cold. I turned the snow into a prop for expressing the cold by patting a layer of it onto the protective filter on my lens. I then narrowed the aperture to f/16 so that the snow would not be blurred into soft, fluffy foreground bokeh, but instead retain a hard texture that makes it look like ice.
The resulting frame not only preserves memories of the freezing cold on that day, but also adds a unique touch to the shot of the skier gliding on the snow.
Things to be careful of:
- Don’t put the snow directly on the front lens element

I patted snow along the edges of the filter on my lens, and then used my finger to neaten the makeshift “frame”. To keep your gear safe, it is important to put the snow on a UV or clear filter, not directly on the front element of the lens itself!
- Make sure that moisture doesn’t seep into your gear
The heat from your fingers will melt some of the snow as you are arranging it. Be very careful not to let the moisture seep into other parts of your lens or camera.
Find out how Canon PhotoMarathon Asia Championship 2018 winner Mohammad Norfahan Bin Bahron used a similar framing technique during a photo challenge in:
Through Different Lenses: An Interview with the CPMC 2018 Winners
You may also be interested in:
How to Protect Your Camera for Cold Weather Photography
Creative Ways to Frame Your Travel Photos
3. The situation: Water surface with glaring reflected light, no PL filter
The hack: Use the reflected light as backlight and achieve a distinctive, graphical look

EOS 5D Mark IV/ EF100-400mm f/4.5-5.6L IS II USM/ FL: 400mm/ Aperture-priority AE (f/5.6, 1/4,000 sec, EV±0)/ ISO 400/ WB: Daylight
By: GOTO AKI
Strong, glaring sunlight reflecting off a water surface can prevent you from getting the shot that you want. But instead of reducing it with a PL filter, why not make good use of it? In the shot above, the light creates two different effects:
i) It passes through the translucent lotus flower and showcases its colour and translucency.
ii) It cannot pass through the opaque parts of the lotus, and therefore causes them to be turned into silhouettes.
For scenes like that, we tend to focus all our attention only on the subjects on the water surface. But here, by paying attention to the backlight created by the light reflection, I managed to achieve a rather distinct look that resembles those monochrome shots that carry a pop of colour.
Tip: Find a position where the reflected light becomes backlight

The shot above was shot from a different angle where the reflected light doesn’t become backlight. In such a position, the opaque elements will not become silhouettes. Instead, their colours are captured. Not necessarily a bad thing, but the flower now has to "share the spotlight" with these other elements.
For more tips on how to make use of backlight, check out these articles:
4 Steps to Capture a Soft, Dreamy-looking Backlit Portrait
How to Photograph Steam, Smoke, and Vapour Trails
Decisions in Landscape Photography: Front Light or Backlight?
Built-in Flash Techniques #4: How to Shoot Portraits Against the Sunset
---
Have you ever handled a challenging shooting situation in a creative way? What are your favourite photography hacks? Share them with us on My Canon Story or in the comments section below!
Receive the latest update on photography news, tips and tricks.
Be part of the SNAPSHOT Community.
Sign Up Now!About the Author
Born in 1972 in Kanagawa Prefecture and graduated from Sophia University and Tokyo College of Photography. Goto published a photo collection work titled "LAND ESCAPES" and is also actively engaged in works such as “water silence” an installation that merges photographs with videos.
A monthly magazine that believes that enjoyment of photography will increase the more one learns about camera functions. It delivers news on the latest cameras and features and regularly introduces various photography techniques.
Published by Impress Corporation
Born in 1985, Takemi graduated from the Department of Photography at Nihon University’s College of Art. After completing his studies he relocated to Vancouver in Canada where he worked for a local newspaper, MINKEI NEWS VANCOUVER. After returning to Japan, he was involved in photography activities in various genres. His work included photography for magazines, posters for sports events and programmes. He was also a photographer for the application committee for the Tokyo 2020 Olympic Games and Paralympic Games. Currently, he is active as a freelance photographer.
Born in Tokyo in 1971. After attending the Tokyo School of Photography (current name: Tokyo Visual Arts), he became a freelancer. He currently publishes works for various magazines. He continues to produce mainly works of flowers as a motif. Lecturer at EOS Gakuen School.

