


Tempted to try out bird photography? Here’s your step-by-step beginner’s guide to your first bird photography shoot, from what you should prepare, to where and when you should shoot and some recommended camera settings to start with.

Step 1: What equipment do I need?
A lens with a long reach
Bird photography is one genre where having more reach is always better—physically getting too close could stress the bird out and cause it to fly away.
While the best focal length to use depends on the size of the bird, your distance from it, and how large you want it to be in your composition, most of the time, you need a full-frame equivalent focal length of at least 200mm, i.e., a telephoto lens.


Tip: Teleconverters (also known as extenders) can give you even greater reach. Consider getting one if your lens is compatible.
For casual bird photography, it doesn’t matter which camera you use as long as it lets you shoot at long focal lengths. But you do have an advantage if you are using an APS-C camera: The 1.6x crop factor gives you more reach than the same lens on a full-frame camera.

Black: Full-frame
Red: APS-C format (1.6x crop)
For example, shooting at 200mm on an APS-C camera gives you an angle of view equivalent to 320mm on a full-frame camera. This is recorded using the full camera resolution, providing even more flexibility for further cropping and printing.
Other camera features to look out for
- High speed continuous shooting
- Larger, denser AF coverage
- Faster AF acquisition
Tip: Familiarise yourself with your camera’s operations.
Birds move very fast. You don’t want to fumble with your gear and miss the shot! Make sure you are familiar with how to operate your camera before the shoot.
Binoculars
Before you start photographing birds, you need to be able to spot them! A good pair of binoculars will be very handy.
For casual birdwatching and bird photography, a pair of binoculars with a magnification of 8x or 10x should be sufficient. A 12x or 14x binoculars is good for observing smaller birds and details.

8x20 IS
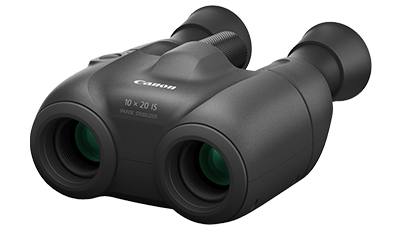
10x20 IS
Choosing binoculars: What's in a name?

(1) Magnification: The larger this number, the closer objects appear.
(2) Objective lens effective diameter: The larger this number, the wider the field of view and the brighter the image that you see.
(3) Image Stabilizer: Keeps the image steady, even at high magnifications.
Cool fact: Image shake caused by hand movement becomes even more obvious at high magnifications. The Image Stabilizer (IS) technology on Canon's binoculars keep the image steady, making it easier to spot birds and track them.
Tripod
Not compulsory, but good to have when you are waiting for a subject to move into a specific spot or using a heavier lens.
Step 2: Where and when to find birds to photograph?
Where to look?
Parks and places with trees are an obvious choice, but don't forget about places with or near such as ponds, rivers, lakes, or even swampy areas. Do some research online to learn more about which birds you can expect to see in your area. Your local birdwatchers' interest group might also have put up a database, like the Singapore Birds Project. You might also want to get hold of a field guide that helps you identify birds, too
Also see: Avibase - Bird Checklists of the World: Southeast Asia: This is a database of bird species, with photos and recordings of their calls.

EOS R/ RF800mm f/11 IS STM/ Aperture-priority AE (f/11, 1/2500 sec, EV -0.3)/ ISO 800
Besides ducks and swans, there are many other species of birds you might find in or near water, such as kingfishers, herons, or raptors that eat fish, such as sea eagles.
Tip: It's harder to get a good shot of flying birds! The easiest birds to photograph are the larger, slower ones. With these, try different ways of framing the shot: Look for elements like lines or symmetry.
When is the best time to shoot?
Generally, most species of birds are at their most active early in the morning in the first few hours after sunrise, as well as in the late afternoon or evening in the few hours before sunset.

EOS R6/ RF800mm f/11 IS STM + Extender RF 2x/ Aperture-priority AE (f/22, 1/500 sec, EV +1.3)/ ISO 10,000
Just like other forms of photography, beautiful light helps. Why not take advantage of the golden hour?
Tip: Leaving some negative space can make your composition stronger. Here, it draws our attention to the collared kingfisher's gaze into the distance.
Other preparation tips
- You don’t want to stand out too much from your surroundings. Wear clothes in neutral, dull colours.
- Use a backpack to keep your hands free. You need both hands to hold the camera steady.
Know this: “Baiting” wild birds get your shot is controversial
Thinking of feeding wild birds to get your shot? You might want to reconsider. Many people, including photographers, frown on it as it could harm the birds and alter their natural behavior. In some public places, it is against the law.
Step 3: What settings do I use?
In general:
- Fast shutter speed
- Narrow aperture
- ISO Auto
- Servo AF
- Continuous shooting
Shutter speed: Start with 1/500 sec or faster

EOS R5/ RF100-500mm f/4.5-7.1L IS USM/ FL: 254mm/ Manual exposure (f/7.1, 1/2000 sec)/ ISO 400
The actual speed depends on how much the bird is moving. 1/500th of a second might be enough if the bird is relatively still, but you will need at least 1/1,000th of a second to freeze a bird in flight.
Tip: To make your shot more captivating, shoot at the eye level of the bird.
...but a slow shutter speed can create dynamism

EOS R/ RF800mm f/11 IS STM/ Aperture-priority AE (f/11, 1/40 sec)/ ISO 1600
If the situation allows, you could also use a slow shutter speed to create motion blur and add some movement to the shot. If you are game for a challenge, try a panning shot of a bird flying!
Tip: Remember that your shutter speed will affect elements other than what you are trying to turn into a motion blur. Find the speed that gives the best balance.
Aperture: Probably narrower than you think

EOS R6/ RF800mm f/11 IS STM + Extender RF 2x/ FL: 1600mm/ Aperture-priority AE (f/22, 1/320 sec, EV +0.3)/ ISO 12800
At long focal lengths, the depth of field is so shallow that you can get beautiful bokeh even at f/22.
Tip: Make sure that your subject is inside the focal plane. Bump up the ISO speed if you need a faster shutter speed.
AF: Back button AF, Servo AF mode
Use Servo AF mode and enable Continuous AF so that the camera will keep tracking the bird even when it moves. But if the bird is very still, you should be able to get good results with One-Shot AF.
Set up your camera to use back button AF so that if you have to recompose the shot after acquiring focus, half-pressing the shutter button won't cause the camera to refocus on something else.
An AF area mode that uses entire AF area like Face Detection + Tracking Priority mode should work in most scenes. However, if the background is busy or if you are photographing a bird in flight, to reduce the chances of the AF getting “distracted”, you might want to use a smaller AF area mode such as Zone AF or Large Zone AF instead.
Make sure that the bird’s eyes are in sharp focus

EOS R6/ RF70-200mm f/2.8L IS USM/ FL: 147mm/ Manual exposure (f/2.8, 1/800 sec)/ ISO 400
Bird photography is like portrait photography—it is crucial for the eyes to be sharp, especially for head shots like this one. Use a narrower aperture where necessary.
Tip: Try to incorporate catchlights. It makes the subject look livelier.

EOS R5/ RF100-500mm f/4.5-7.1L IS USM/ FL: 324mm/ Manual exposure (f/7.1, 1/5000 sec)/ ISO 800
For birds in flight, achieving focus precisely on the eyes might be harder. Make sure that at least the head is in focus.
Cool fact: Canon’s Animal Detection AF, which debuted on the EOS R5 and EOS R6, can automatically detect not just the bodies and heads of birds, but even their eyes!
Last but not least: Dos and don’ts
Don’t...
- Approach nests. It could cause birds to abandon their nest and nestlings.
- Get too close to the bird. If it shows signs of stress, move away.
- Make sudden movements and loud noises. Be calm and quiet, even if you see something exciting.
Do...
- Avoid using a flash where possible. It doesn’t just scare birds, it might even cause some to go blind.
- Research about birds and their behaviour. It not only enriches your experience but helps you anticipate their movements better!
- Respect the birds and their habitat. Be aware of your surroundings, take only photos, and leave only footprints.
- Respect other bird photographers/bird watchers.

EOS R6/ RF100-500mm f/4.5-7.1L IS USM/ FL: 500mm/ Manual exposure (f/7.1, 1/4000 sec)/ ISO 1600
- Be patient. You might need to stay still for a while in the same spot before the birds get used to you. That perching bird might be facing away from you now, but if you wait quietly for a while, it might turn around and give you a better photo opportunity.
---
Happy shooting!
Check out our interviews with experienced bird photographers in:
Discover How Photographer Edwin Martinez Shoots Atlantic Puffins with EOS R
Enchanted by Thailand’s Nature
Receive the latest update on photography news, tips and tricks.
Be part of the SNAPSHOT Community.
Sign Up Now!

.jpg "trending tips")
.jpg "trending tips")


