


Composition is a photography fundamental. Good composition can make the difference between a shot that looks like it was taken by a beginner, and one that looks more polished. In this article, we learn about two aspects of composition: Framing, and keeping horizontality and verticality. (Reported by: Tatsuya Tanaka)

What is composition? How does it affect my shots?
Composition refers to how the different elements in an image are arranged.
There is no such thing as a “correct” or “wrong” composition. However, different ways of composing a shot can leave a different impression on viewers. If a shot looks “off”, chances are that the problem lies with the composition. Hence, before you shoot, it is good practice to have an idea of what you want your image to look like, and then choose the composition accordingly.
Broadly speaking, there are 2 key factors that can change the look of the composition:
1. How much of the frame the subject occupies, and
2. Where the subject is facing.
In this article, we look at two fundamental aspects of composition: Framing, and horizontality and verticality.
Framing: How much of the scene to capture?
How much of the scene you decide to capture can make your shot look dramatically different. This is very much related to the angle-of-view captured by your camera, i.e., your focal length. For example, take a look at the three shots below.

Close-up
This was taken with a telephoto lens, which makes faraway things appear larger than how the human eye sees them. The church draws our attention more than the other elements in the frame.

Normal
The image above was taken with a standard lens, which gives an angle-of-view similar to that of the human eye. The church appears smaller, but it still draws our attention. However, you also see a lot more of the landscape in the background.

Wide-angle
This image was shot at a wide-angle. It draws more attention to the grand landscape, and you barely notice the church.
How to adjust your framing

1. Look through the viewfinder or rear LCD monitor and decide on what you want your primary subject to be.
2. Determine how much of the scene you want to capture.
3. If you are using a zoom lens, zoom in or out until you get your desired results.
If you are using a prime lens, either:
i) Move closer or further away until you get your desired results, or
ii) Switch to a prime lens with a different focal length.
Tip: To practice, re-frame the way you see the world
Practice framing even when you don’t have your camera with you. Observe the things around you, and try to visualize how they would fit together in a frame. The square format is good as it makes you think more about balance, space and placement. You can even create your own visual framing aid: Cut a square in the centre of a piece of paper, carry it around, and look through it to better visualize your scene.
Click here to find out more about how to compose for different aspect ratios
For tips and techniques on how to make your square shots look Instagram-worthy, check out:
3 Composition & Styling Techniques for Food Photography
Simple Product Photography: Flowers & Confectionery
Simple Product Photography: Accessories
Food Photography: 2 Ideas for Photographing Jelly Desserts
Verticality and horizontality: The key to stable-looking images
An image that is straight and stable looks more visually assuring to viewers. The key to that is ensuring that your image is horizontally level (“horizontality”), and that the vertical lines are perfectly perpendicular to the horizon (“verticality”).
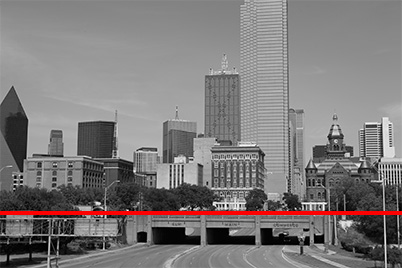
Not horizontally and vertically level

This shot looks unstable because it is tilted towards the right.

You can see that the most obvious horizontal line (the bridge), shown in red, is not horizontally level. This often happens when you shoot handheld.
Horizontally level
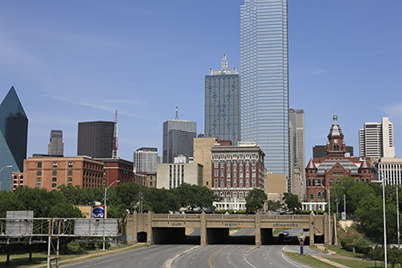
This shot looks more stable. The obvious horizontal lines are parallel to the straight bottom edge of the image..
Ensuring horizontally also helps to make the image vertically straight. The tall buildings are also no longer tilted.
How to ensure horizontality and verticality?
![]()
Maintaining horizontality and verticality is especially important when photographing landscapes and architecture. These subjects hese tend to have obvious vertical and horizontal lines, so ths slightest bit of tilting will also be very obvious. To avoid that:
- Make sure your camera is straight when you shoot. Displaying the grid lines and electronic level helps a lot!
If you are using a wide-angle lens, the peripheral areas of the image may appear distorted if your camera is not level. Pay attention to the centre of the image as you adjust your camera position, and make sure that the lines remain straight towards the ends of the image.
Two techniques to effectively make use of horizontality and verticality
1. Raise the position of the horizon

This shot of summer clouds over the sea has a very distinct horizon.

When we raise the the position of the horizon, the bottom part of the image (the sea) occupies a larger part of the image, which makes it look more stable.
2. Even the most unlikely scenes might have a horizontal line. Look for it!

The objects on this display shelf in a wine shop are an assortment of different heights and shapes. For scenes like this, the horizontal line might not be very obvious at first glance, but it is still there.

Here, the horizontal line is created by the box in front. Keeping this line level as you compose your image will anchor the shot and make it look more stable.
Tip: It’s okay to tilt your shot, but use it appropriately
While maintaining verticality and horizontality is a good rule of thumb follow most of the time, you don’t always have to ensure that your shots are perfectly straight. Sometimes, it’s okay to tilt the shot for creative reasons. For some natural landscapes and close-up scenes, tilting the camera might even make your shot look more stable. Do what you think is the most appropriate for your shot.
Receive the latest update on photography news, tips and tricks.
Be part of the SNAPSHOT Community.
Sign Up Now!About the Author
Born in 1956, Tanaka is one of the rare photographers who produce works across a wide variety of genres from an original perspective. These genres range from objects in our daily lives, such as insects and flowers, to landscapes, skyscapes, and celestial bodies. Besides photography, Tanaka has also developed his own approach in post processes including retouch and printing.

