


The Road To The Stars – Hack Your Way To Astrophotography
Astrophotography can be tricky, but fret not, as there are many things you can do to make it easier to start off. We find out some tips from award-winning astrophotographer, Mark Gee.
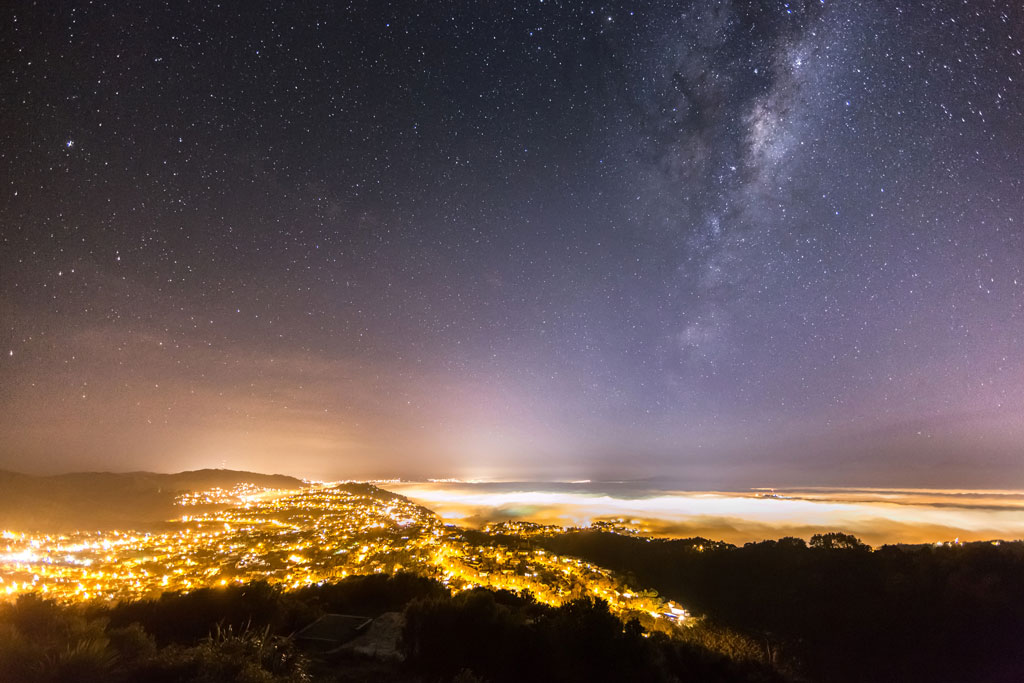
EOS 5D Mark III, EF14mm f/2.8L II USM lens, f/2.8, 10sec, 14mm, ISO3200
Light painting:
Light painting is one way a photographer can get some additional illumination into the foreground of their astrophotography photos. I rarely do it myself, but when I do, I like it to be subtle, so the glow of my display on my phone is usually bright enough to throw some additional light onto the landscape.
Other tools you can utilize can be as simple as a head torch. But don’t expose your landscape for too long with the light otherwise it will blow out. One technique is to either diffuse the light on your head torch with a t-shirt over the lens (preferably white or a neutral colour) and you can fold it over the torch lens a few times to lessen the light intensity. Or bounce the light off an object behind the camera and back onto your landscape. That could be a rock, or you could even bring along a piece of white polystyrene to bounce the light off as well.
You can also buy lanterns and other LED lighting systems to light paint with as well. My advice is get a quartz halogen light rather than a LED, as the colour temperature is similar to the colour temperature that you would most likely set your camera to during an astrophotography shoot, between 3000 - 3500 kelvin. LED lighting kits can also come with adjustable white balance, so if you can afford to spend a little more on your lighting, then that might be the way to go.
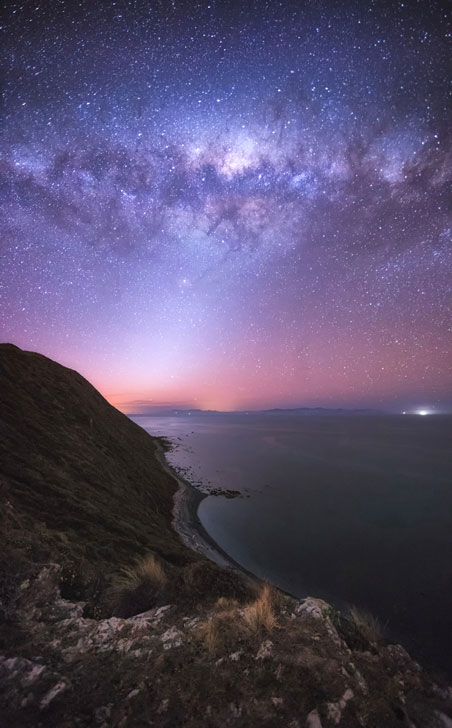
EOS 6D, EF14mm f/2.8L II USM lens, f/2.8, 30sec, 14mm, ISO6400
On 360 degree photos:
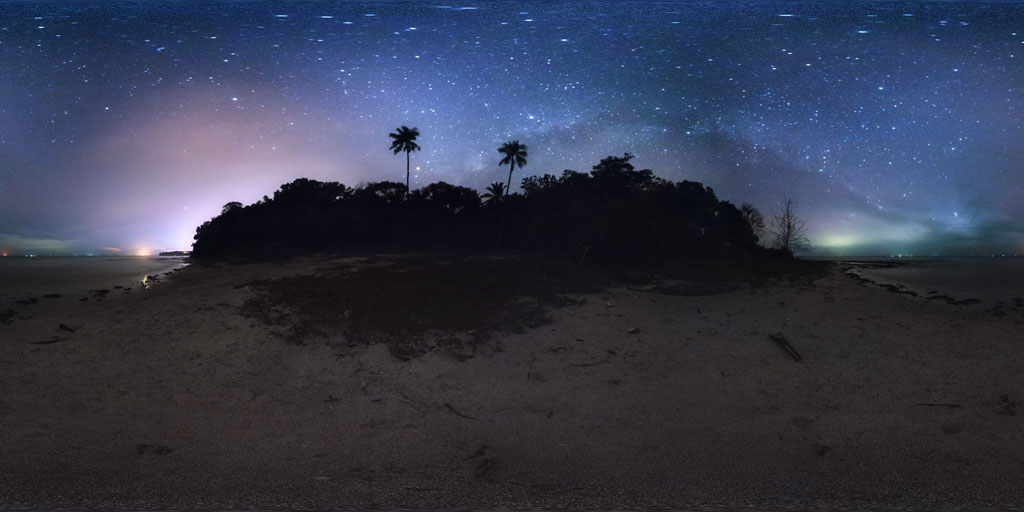
360 degree photos have become popular over the past few years with social media platforms like Facebook supporting the format with an interactive viewer. There are numerous ways to shoot 360 photo, but usually it consists of shooting multiple photos with overlaps between each photo until you cover the 360-degree field of view. You then stitch the photos together, using either Lightroom or Photoshop, or with a dedicated panoramic stitching software like AutoPano or PTGui.
The best way to capture the 360 panorama, is to shoot in portrait mode so you get as much vertical coverage as possible. Use a sturdy tripod that either has a tripod head that can rotate around the axis of your tripod, or a panoramic head - Nodal Ninja is an example of that. It’s also important to have the tripod setup level on the ground. Although you can shoot 360 panoramas with super wide angle and fisheye lenses, I would suggest you start with something like a 24mm or longer lens. This way you are dealing with less lens distortion, and you will get an easier stitch from your software. When taking the photos, make sure you have between a 30-40 percent overlap between each image which also helps with more accurate stitching.
Other tools you can use when shooting 360 panoramas is a robotic head like the GigaPan or iOptron IPano. The Syrp Genie Mini, although intended as a motion control nodal time-lapse unit, also has a panoramic mode which is really handy, as this unit is small and can be easily carried in any camera bag. These robotic head solutions make it a lot easier to shoot a 360 panorama with accuracy which gives you better results once you get to the stitching stage.
As for the stitching software. If you are going to do a lot of 360 panoramas, especially astrophotography ones, then I recommend you use dedicated panoramic software, as that will give you more control and do a much better job at stitching than what Lightroom or Photoshop will do.
On handy apps:
There are a couple of free apps which will help you with your astrophotography, although to get all the features of these apps you’ll need to pay for additional features. Two of the free ones are Star Chart, and Night Sky Lite. Both of these are very similar in what they do. You simply hold your phone up at the night sky to see exactly what you are looking at.
As for an app worth paying for, I would have to recommend PhotoPills. It’s like the Swiss army knife of astrophotography and photography apps, and has many features of various other apps built into a single app. At the time of writing, PhotoPills is only available for iOS, but an Android version is due in the 2nd quarter 2017.
EOS 5D Mark IV, EF11-24mm f/4L USM lens, f/4, ISO6400
On astrophotography in general – what are some tips and tricks you can advise readers?
Take the time to plan and compose your shots - do the location scouting in the daytime if possible, and on the night itself, give yourself plenty of time to set up and test shoot before the night sky moves out of your planned composition. Use astrophotography apps to work out where features of the night sky are and how they work as far as timing and direction within your planned composition.
A sturdy tripod is a must. When you are out in the field you can weigh your tripod down with either a bag of sand or rocks, and that will help prevent any unwanted camera shake.
Since you will be doing a long exposure to photograph the stars, to prevent any unwanted vibrations from setting the shutter off, you can either shoot with a cable release, or use your camera’s built in timer. You can also shoot in mirror lock mode or live view to prevent the rotation of your mirror in your DSLR camera adding extra vibrations.
Shoot with everything on manual - and that includes manual focus. Focusing on the stars is the thing most newcomers have issues with. I suggest using the live view method where you point your camera at the brightest star in the sky and magnify your live view on the back of your LCD as much as you can. Rotate your focus ring until the star is pin sharp, and then you have your focus set.
For best results, find a dark sky location where there is little to no light pollution. As far as your settings in a dark sky location, shutter speed can be anywhere between 25-30 seconds. Open your aperture right up to the smallest f number it can go to with your lens, and start with an ISO of 1600. If your image looks too dark, push the ISO higher, but be careful as the higher your ISO goes, the noisier your image will be. Some cameras will perform better than others – with the EOS 5D Mark IV in a dark sky location, I usually shoot at 30 second shutter, at f/2.8, ISO 3200, and that is with a EF14mm f/2.8 II USM lens.

EOS 5D Mark III, EF27-70mm f/2.8L USM lens, f/2.8, 24mm, 30sec, ISO3200
Watch the video from the series here:
EOS 5D Mark IV (Body)

EF11-24mm f/4L USM

EF24-70mm f/2.8L II USM
This article is part of “The Road To The Stars” series. Read more articles from this series from:
The Road To The Stars – Justin Mott Shoots Astrophotography For The First Time
The Road To The Stars – Mark Gee Reviews the EOS 5D Mark IV for Astrophotography
The Road To The Stars – Hack Your Way To Astrophotography
The Road To The Stars - Astrophotography in Kudat
Receive the latest updates on photography news, tips and tricks by signing up with us!
About the Author
Mark Gee is an award winning photographer and time-lapse filmmaker based in Wellington, New Zealand. Wholly self-taught, Mark ventures out to the darkest, most remote locations all around the country, enjoying the challenge of combining New Zealand’s striking landscapes with the ethereal beauty of the night sky in new, creative ways.
His short film, ‘Full Moon Silhouettes’ gained him international acclaim after going viral online, and in 2013, Mark won the prestigious Astronomy Photographer of the Year. Not only did he win it overall, but Mark also won the Earth and Space category, and the People and Space category which had never been done before in the competition's history.

