


Looking for something else to try with your portraits? Here are two techniques that will make your shots look even more exciting. Why not try them on your next outing? (Reported by Seigi Takakuwa, Digital Camera Magazine; Model: Yuka Tsuji (Conerot))
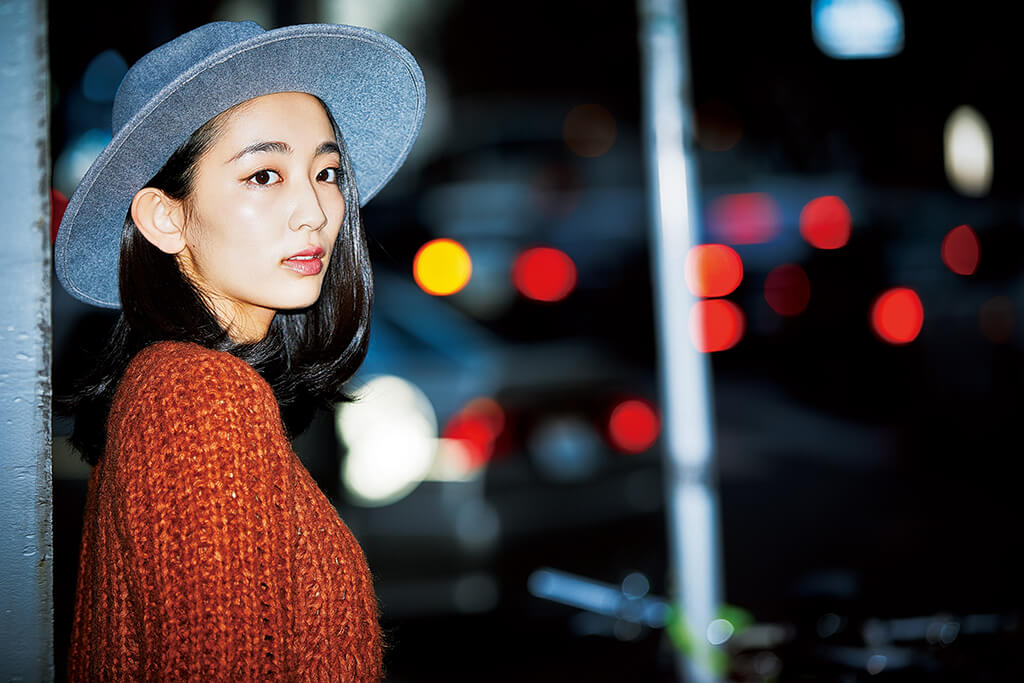
EOS 5D Mark IV/ EF70-200mm f/2.8L IS II USM/ FL: 160mm/ Manual exposure (f/3.5, 1/200 sec)/ ISO 100/ WB: 5,800K
1. Make your portrait look like it was shot at night
What you need
- Telephoto zoom lens
- Speedlite (built-in flash might not reach far enough)
- Neon point light sources (e.g: traffic lights and car brake lights)
How it works
i) Create bokeh circles with the telephoto lens
The shallow depth-of-field of a telephoto lens makes it easier to turn the neon light sources into bokeh circles. The telephoto perspective compression effect will make the bokeh circles appear to be near your portrait subject, giving the impression that it is night.
Need a recap on creating bokeh circles? See:
Lens FAQ #8: Where Should I Focus On to Capture Beautiful Bokeh Circles?
ii) Light your subject from the front
Shining a flash on your model head-on will give your subject’s skin a lustrous sheen that suggests that the shot was taken at night. It is especially effective when you shoot in the early evening, just after the street lights are turned on but when the surroundings are still bright.
The front lighting from the flash will also prevent the subject’s face from becoming too dark, hence balancing out the contrast with the background.
Note this:
- Using a long telephoto length requires you to shoot a bit further away from the model. Make sure that you have enough space.
- The light from a built-in flash might not reach far enough. For better results, use a Speedlite, which is more powerful. While you're at it, why not try using an off-camera flash to light your shot?
Tip: The size of the bokeh circles and the darkness of the background matter!
To enhance the illusion of night, use a wider aperture setting to create bigger bokeh circles. Adjust the shutter speed to make the exposure darker so that only the bokeh circles stand out in the image. You can also make the bokeh circles appear even larger by shooting further away from the model and using a longer focal length, which will increase the perspective compression effect.
Insufficient compression = Doesn’t look like night

You need to use the perspective compression effect of a long focal length to “pull in” the dark areas. This image was shot with a wider angle where there is no compression effect, resulting in insufficient difference in the brightness of the subject and the surroundings. As a result, it doesn’t have the “shot at night” effect.
2. Use a slow sync flash to“freeze” motion and draw all eyes onto your model
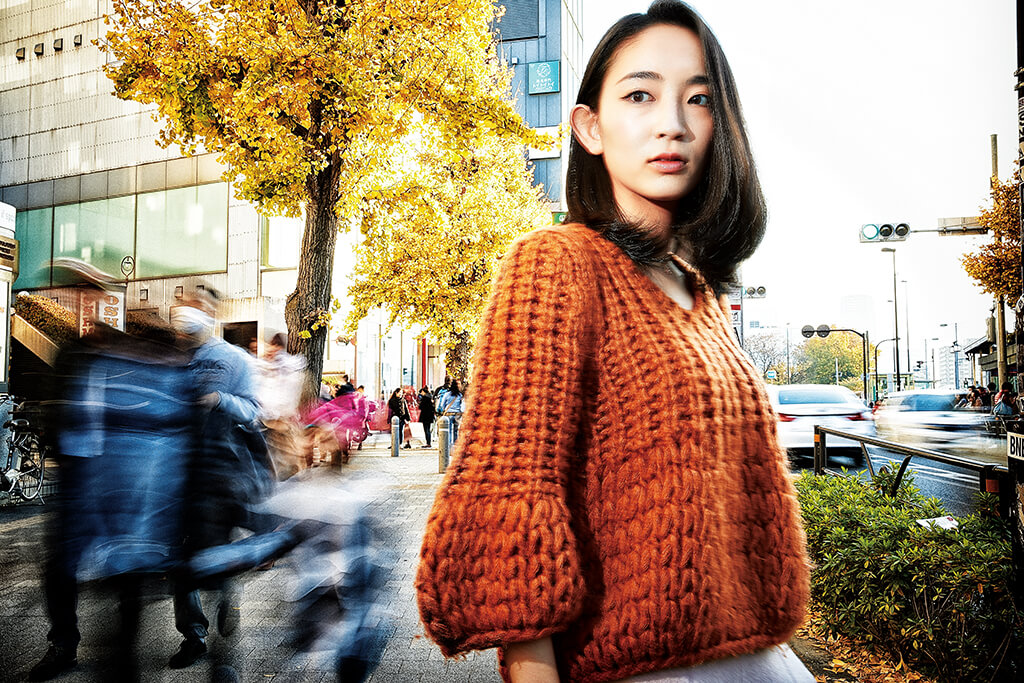
EOS 5D Mark IV/ EF24-70mm f/2.8L II USM/ FL: 35mm/ Manual exposure (f/22, 1/2 sec)/ ISO 100/ WB: 5,500K
What you need
- Tripod
- Speedlite
- A shoot location with lots of passers-by
Recap: How slow sync flash usually works
Slow sync flash is when you fire your flash while using a slow shutter speed. It is usually used when shooting portraits in low light conditions, such as at night. In such scenes, there is a difference in brightness between the subject and the background. The slow shutter speed helps to ensure that the background is exposed properly, whereas the flash lights the subject. This balances out the exposure in the final shot.
To adjust the exposure of the background elements, adjust your aperture.
To adjust the brightness of your subject, adjust the external flash settings.
How it works here: Create contrast between stillness and movement
When you use slow sync flash to shoot a portrait on a busy street, the slow shutter speed blurs the motion of passers-by in the background, whereas the flash keeps the subject relatively still. The resulting image captures the contrast between stillness and movement, and the viewer’s attention falls on the element that looks still: Your portrait subject.
Here’s a different technique for contrasting stillness with motion, used in sports photography
Tips:
- Use a shutter speed of 1/15 sec or lower
This will ensure sufficient motion blur. Remember to use a tripod to prevent camera shake!
- Shoot when it's cloudy, or use an ND filter
If it's too bright, you will be forced to use a narrow aperture to prevent overexposure. You don't want to shoot too narrow as it increases the chances of diffraction, so avoid it by shooting when it's less bright or using an ND filter.
Caution: Make sure your subject doesn’t move

The shot above is an example of what happens when your subject moves during the exposure. To avoid such blurring, make sure that they remain as still as possible.
Want to learn more portrait techniques? Here are some more articles to check out. Go try all of them, and share your outcomes with us on My Canon Story!
5 Portrait Photography Techniques to Take You from Day to Night
[Flash Technique] Creating a Pop Art-inspired Night Portrait
How to Create Dreamy, Colourful Portraits with Foreground Bokeh
If you're a fan of bokeh, here's one RF lens to take note of:
RF85mm f/1.2L USM DS: The Ultimate Portrait Lens for Bokeh Lovers
Receive the latest update on photography news, tips and tricks.
Be part of the SNAPSHOT Community.
Sign Up Now!About the Author
A monthly magazine that believes that enjoyment of photography will increase the more one learns about camera functions. It delivers news on the latest cameras and features and regularly introduces various photography techniques.
Published by Impress Corporation
Seigi Takakuwa’s first job was with a publisher, where he first worked as a photographer’s assistant before breaking off on his own to become a freelance photographer. He currently shoots mainly for beauty and fashion advertisements, magazines and catalogues. He is well-acclaimed in the industry for the quality of his entire workflow, from photography all the way to retouching, and has earned accolades especially for beauty photography. In 2012 and 2013, he achieved Honorable Mentions in the Professional- Advertising: Beauty category of the prestigious International Photography Awards.
Website: https://www.seigi-photograph.com/


