


The EOS R7 is touted as the true successor to the EOS 7D Mark II, Canon’s advanced APS-C DSLR renowned for its speed and performance. How are they different? What can you expect if you’re upgrading from a DSLR camera? In this two-part series, find out how your shooting experience will change and pick up some usage tips along the way. Part 1 focuses on the buttons, dials, and viewfinder. (Reported by: Kazuo Nakahara, Digital Camera Magazine)

Button and dial configuration: New, improved, yet familiar
A new, improved button and dial configuration designed for the EOS R7’s body size
If you are switching over from the EOS 7D Mark II and other EOS DSLRs, the new buttons and configurations will take some getting used to. However, the new layout was designed for the camera’s body size, and will start to feel intuitive very quickly.
Here’s a closer look at what’s new and what’s changed.
Front of camera

A: Focus mode switch
B: Depth of field preview button
C: No built-in flash
A: Focus mode switch
The EOS R7 is the first EOS R series camera to feature this switch, which lets you toggle the lens’ focus mode between AF and MF. It’s especially useful for lenses that don’t have such a switch on their bodies, such as the RF-S lenses. On lenses that have an AF/MF switch, the setting on the lens overrides the setting on the camera switch.
B: Depth of field preview button
The electronic viewfinder (EVF) and Live View preview images display the depth of field based on the lens’ maximum aperture, regardless of your actual aperture setting. This button stops down the aperture so that you get a preview of your image at the aperture setting that you have set.
Pro tip: You can set up the EOS R7 to always preview the actual depth of field along with exposure simulation. This will free up the depth of field preview button to be assigned another function.
C: No built-in flash
The EOS R7 has no built-in flash, which simplifies the top of the camera. This shouldn’t cause much of an issue due to the camera’s vastly improved low-light AF performance and high ISO capabilities! If you need a flash, you will have to use an external one.

The built-in flash on APS-C DSLR cameras.
Rear of camera

D: Vari-angle LCD monitor
E: Quick Control dial/ Multi-controller
D: Vari-angle LCD monitor

If your DSLR camera was released before 2016, it probably has a fixed LCD screen. In comparison, the EOS R7 has a fully articulating Vari-angle LCD monitor that provides more flexibility in composition: it flips out and rotates to allow you to see your shot even when shooting at awkward angles. It also supports touchscreen operations, allowing quicker, easier access to features and settings.
Here’s what you can do with the touchscreen and Vari-angle LCD. You might discover something you didn’t already know!
Touch & Drag AF Customisations for Better EVF Shooting
The EOS 80D Touch-screen and 5 Convenient Things You Can Do With It (also applies to all EOS cameras with touchscreens)
E: Quick Control dial/ Multi-controller
The Quick Control dial and Multi-controller (which works like a joystick), are very frequently accessed controls. Entry-level DSLRs don’t have a Multi-controller, which was originally intended for faster AF point selection on cameras with many AF points. On the cameras that have it, such as advanced DSLRs like the EOS 7D Mark II, it is usually located away from the Quick Control dial:
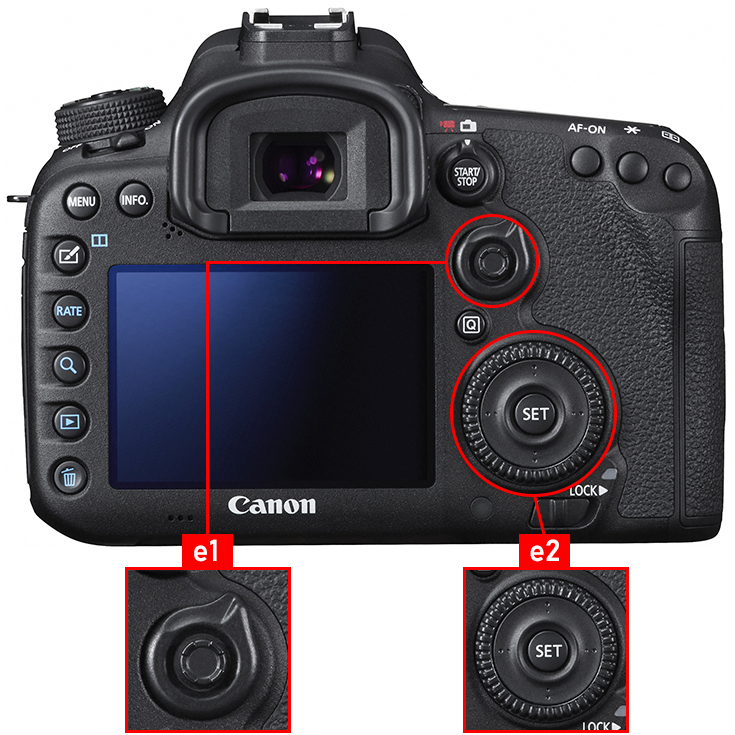
EOS 7D Mark II
e1: Multi-controller
e2: Quick Control dial
However, the EOS R7 integrates the Multi-controller and Quick Control dial, reducing the distance that your fingers have to move between them. You can now change settings faster than before, which makes a huge difference when capturing moments! Cross keys occupy the space to the right of the LCD screen where the Quick Control dial used to be.
Top of camera

F: Mode dial
G: Multi-function lock button
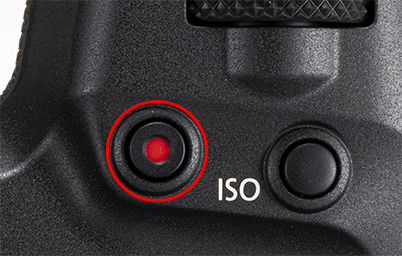
H: Movie shooting button
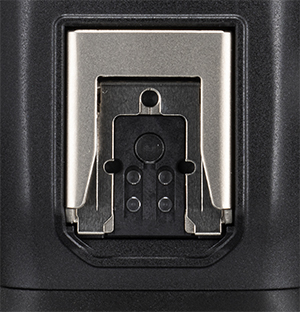
I: Accessory shoe
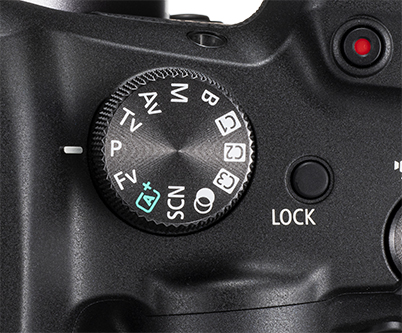
F: Mode dial
EOS R7
Advanced APS-C EOS DSLR cameras
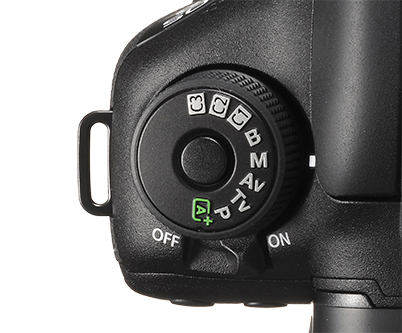
On advanced APS-C EOS DSLR models such as the EOS XXD series and the EOS 7D Mark II, the mode dial was on the left-hand side. On the EOS R7, it is on the right-hand side, allowing easier one-handed operation. The EOS R7’s dial features new modes, including the Fv mode and special scene mode (SCN). There is no dedicated lock mechanism.
G: Multi-function lock button
EOS R7
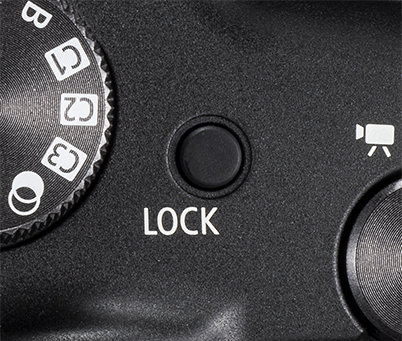
APS-C EOS DSLR cameras
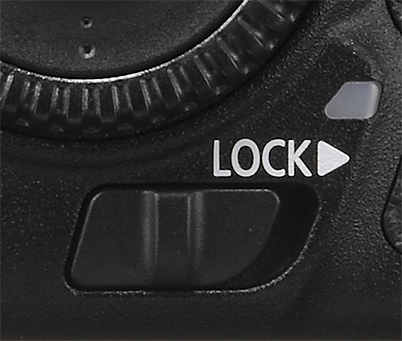
This button locks functions like the touchscreen function, Quick Control dial, Main dial, and control ring to prevent unintended changes to settings caused by their accidental operation. On the EOS DSLR cameras that have it, it usually takes the form of a switch and is located at the bottom right of the camera rear. The EOS R7 has it on the camera’s top panel in button form.
H: Movie shooting button
EOS R7
EOS DSLRs
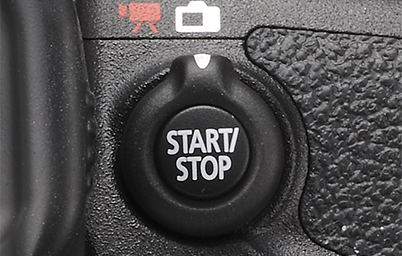
On most EOS DSLR cameras including the EOS 7D Mark II, you must switch to movie shooting mode before you can start recording videos. On the EOS R7, you simply need to press the red button to start recording. You can also assign other functions to this button.
I: Accessory shoe (Multi-function shoe)
EOS R7
EOS DSLRs
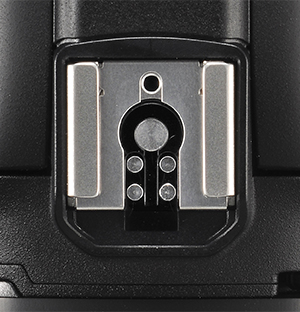
The accessory shoe on the EOS R7 is called the Multi-function Shoe. It has a new communications terminal that allows external microphones, transmitters, and other compatible accessories to be connected to it without cables—in addition to the usual hotshoe accessories such as Speedlites!
Summing up:
- The biggest changes to button layout are to the top and rear of the camera body: While advanced EOS DSLRs have a row of 4 buttons both on the top of the camera and to the left of the rear LCD screen, the EOS R7 does not.
- The position of the Quick Control Dial has changed, even compared to other EOS R series cameras.
EVF v.s OVF: The view through the viewfinder
EVF v.s. OVF: The view through the viewfinder
Previously, electronic viewfinders (EVFs) could not compare to optical viewfinders (OVFs) when photographing action: display lag and an unnatural rendering of colours were some common complaints. However, EVF technology has since improved tremendously. The EOS R7’s 2.36-million-dot OLED EVF display gives an excellent view, the speed and performance required for wildlife and action photography, and conveniences such as exposure simulation and shooting information display.
EVF: Shows a lot more shooting information
EOS R7
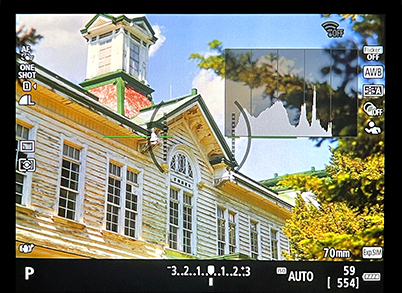
Information about shoot settings is mainly displayed at the bottom, left-hand, and right-hand side of the EVF display. These can be toggled on and off. When you turn the camera to vertical orientation, the display realigns to match.
EOS DSLR cameras
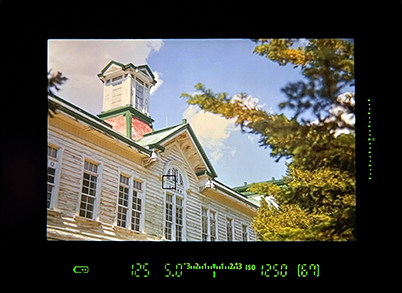
Displays only the most basic shooting information and minimal icons at the bottom of the viewfinder. These, as well as other information such as the electronic level, can be hard to see.
Like the EOS 7D Mark II and other DSLR cameras, basic shooting information is shown at the bottom of the viewfinder display. However, with the EVF on the EOS R7, you can also display much more, including:
- Icons for other shoot settings on the left and right side of the screen
- Grid
- Electronic level overlay
- Histogram overlay
You can even change settings without taking your eye off the EVF, reducing your chances of missing an unexpected moment. Pressing the Q button displays the Quick Control menu overlay so that the scene is always in sight. You can also display the main menu and play back images in the EVF. This is useful when shooting under strong sunlight where it may be hard to see the rear LCD display.
Pro tip: Toggle between different displays
Prefer to have a clean display without icons blocking your view? You can toggle between different EVF display screens with just a push of the INFO button. It’s also possible to customise the information that shows in the display.
Find out how a landscape photographer uses this to his advantage, and get introduced to a stunning scenic spot in Hong Kong in:
#Hellofrom Hong Kong: Breathtaking Views from Hong Kong’s Highest Peak
EVF usage tips
1. Action photography: Enable the 120 fps ‘Smooth’ display performance

EVFs are constantly reading and refreshing the display with image information from the image sensor, so OVFs, with their direct view from the lens, will always have an advantage in terms of smoothness. However, the EOS R7’s EVF supports display performance as fast as 120 fps. This provides a better viewing experience for scenes with frequent, quick changes to what’s in the frame, including:
- Action scenes
- Telephoto scenes
The seamlessness is comparable to that on an OVF.
Tip: Enable the “Suppress lower frame rate” option for smoother display of low light scenes, too.
Know this: When you half-press the shutter button and AF operation starts, the display performance will switch to 60 fps until after the image is taken.

i) The display rate is 120 fps as you find and frame the subject.
ii) When you set focus on the subject and half-press the shutter button, the display rate switches to 60 fps.
iii) You fully press the shutter button and start high-speed continuous shooting.
Power saving tip: 60 fps display performance is more than enough for non-action scenes
If you aren’t shooting action, a display rate of 60 fps should be enough. Switch the display performance to ‘Power-saving’ mode to reduce power consumption for longer battery life.
2. Get a better view of tones and details in OVF simulation view assist mode
The OVF simulation view assist mode on the EOS R7 uses HDR processing technology to reduce blown highlights and crushed blacks, providing an EVF view that resembles that through an OVF.
Step 1

On the SHOOT9 menu, select “OVF sim. View assist”.
Step 2

Enable OVF sim. view assist.
Note: Exposure simulation will not be applied
You won’t be able to preview the results of your exposure, white balance, or Picture Style settings.
3. New setting: Preview depth of field along with exposure simulation
Exposure simulation applies your exposure settings to the preview image, but by default, the depth of field (e.g., bokeh) shown is that at the lens’ maximum aperture. With the EOS R7, you can also set the camera to preview the depth of field as well: go to the SHOOT menu and set “Display simulation” to “Exposure+DOF”. This lets you check that bokeh appears the way you desire.
Step 1

On the SHOOT9 menu, select “Display simulation”.
Step 2

Select “Exposure+DOF”.
Move on to:
Part 2: Core Capabilities
About the Author
A monthly magazine that believes that enjoyment of photography will increase the more one learns about camera functions. It delivers news on the latest cameras and features and regularly introduces various photography techniques.
Published by Impress Corporation
Born in Hokkaido in 1982, Nakahara turned to photography after working at a chemical manufacturing company. He majored in photography at the Vantan Design Institute and is a lecturer for photography workshops and seminars, in addition to working in commercial photography. He is also a representative of the photography information website studio9.
.JPG "trending tips")

