


EOS 200D for Beginners: How to Use Creative Auto Mode for Further Creative Expression
If you are new to DSLR cameras, the Creative Auto mode on the EOS 200D provides an easy way to achieve photos with vivid colours and lovely background blurs. Here are examples of what the mode can do. We have also provided the settings used so that you can try to replicate them on your own! (Photos & text by: Sayaka Suzuki)

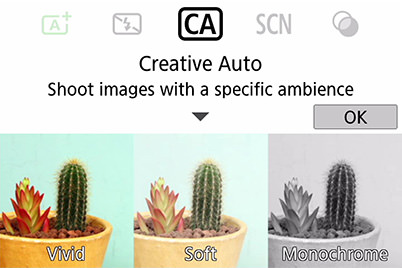
Creative Auto — a mode that helps you achieve images the way you envision
When you have mastered Scene Intelligent Auto and the Special Scene modes, you can start thinking about "expression", or the kind of image you want to achieve. DSLR cameras offer a ton of shooting features that let you change how your pictures look, and as you get more familiar with your camera, it can be quite fun to play around with the semi-automatic modes such as the Program AE (P), Aperture-priority (Av), or Shutter-priority (Tv) modes, which let you control settings such as white balance, aperture and shutter speed. But if you feel you are still not quite ready for them, the Creative Auto mode on the EOS 200D offers you an easy way to take creative control without worrying about such settings. All you need to do is to select one of the ‘Ambience’ settings.
Let's take a look at the photos we took using Creative Auto mode.
Scene 1: A child's room bathed in the warm light of the afternoon

EOS 200D/ EF-S18-55mm f/4-5.6 IS STM/ FL: 55mm (88mm equivalent)/ Creative Auto: Warm (f/5.6, 1/200 sec, EV+0.3)/ ISO 6400/ WB: Auto
The toys look as if they are waiting for a child to come and play with them. We chose to render the picture in warm colour tones to capture this happy moment.
The calmness of warm colours
The light passing through the yellow curtains bathed the whole room in yellow. To best portray this colour, we use the 'Warm' setting. There were many round, retro wooden toys giving off a soft, cosy atmosphere, so we decided to emphasize that up by using an orange hue to achieve a nostalgic finish.
When your subject and settings involve extreme colours, you are more likely to achieve the image that you envision if you highlight the outstanding features of the location. Since it takes time to set up your camera, the light conditions will have changed by then, so use your instinct to determine the ambience setting to use. Here, we set the effect to 'Low' so that the orange colour does not come out too strong.
Creative Auto settings
●Finish: Ambience …… Warm
●Finish: Effect ………… Low
●Background blur ……… 1
●Drive mode …………… Single shooting
●Built-in flash firing …… Built-in flash off
Scene 2: Vividly capture a child full of energy

EOS 200D/ EF35mm f/2 IS USM/ FL: 35mm (56mm equivalent)/ Creative Auto: Vivid (f/2.8, 1/125 sec, EV±0)/ ISO 2500/ WB: Auto
This shot was taken on a cloudy day, where the light entering the house was weak. The child was engrossed in play. Here, we used ‘Creative Auto – Vivid’ to create an image that featured bright, candy colours while conveying that it was taken indoors.
Adding some variety into your images with vivid colours
The ambience of the room was dark with reduced saturation, but we wanted to achieve a bright, vivid image that matched the energy of the child. We therefore set the ambience to 'Vivid'. To further increase the vividness of the colours in the image, we placed a transparent balloon in the foreground and defocused it. This is the source of the rainbow-coloured accent to the left of the image.
The 'Vivid' mode makes colours appear bright and vivid, which is especially useful for capturing cute photos even when lighting conditions are not ideal. After all, those picture-perfect moments do not necessarily occur in the daytime!
We set 'Built-in flash off' for this image, as the strong light might ruin the softness of the image otherwise.
Creative Auto settings
●Finish: Ambience …… Vivid
●Finish: Effect ………… Strong
●Background blur ……… OFF
●Drive mode …………… Continuous
●Built-in flash firing …… Built-in flash off
Possible settings in Creative Auto
The possible settings in Creative Auto are explained below.
●Finishing
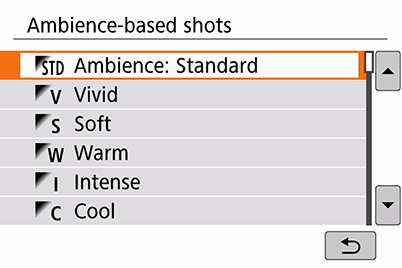
Select the desired 'Ambience' according to the colour tone, brightness, etc., that you want to convey in your image. There are 9 types of Ambience settings available: Ambience: Standard/ Vivid/ Soft/ Warm/ Intense/ Cool/ Brighter/ Darker/ Monochrome. After you select the ambience, select 1 of the 3 effect levels: 'Low', 'Standard', or 'Strong'.
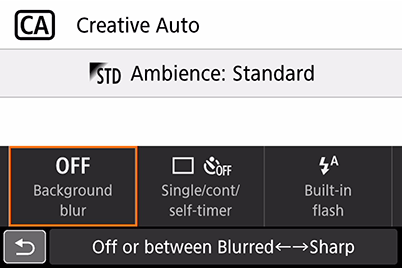
●Background blur
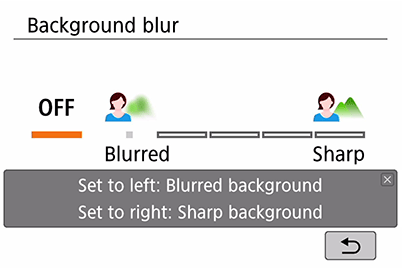
Depending on the lens you are using, you can use the 3 or 5 levels of background blur to adjust the degree of blurring.
OFF

Low

Standard

Strong

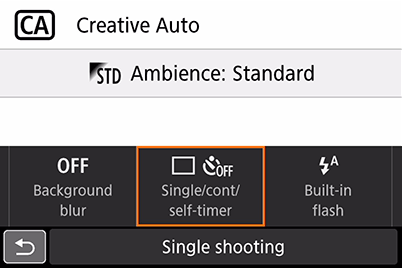
●Changing the drive mode
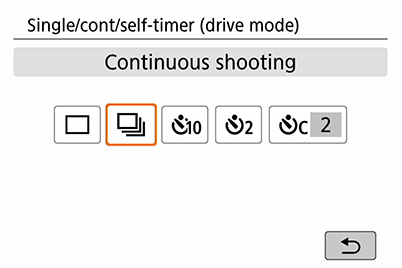
Even in Creative Auto mode, you can still use continuous shooting and the self-timer functions. This helps you capture moving objects as well as self-portraits.
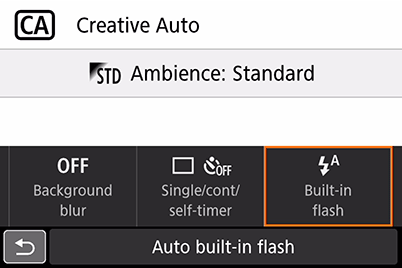
●Using the built-in flash
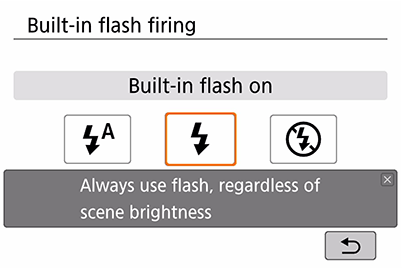
You can enable or disable the built-in flash. You can easily disable the flash without a fuss when you are shooting in locations where use of the flash is prohibited.
Configuring the Creative Auto mode settings
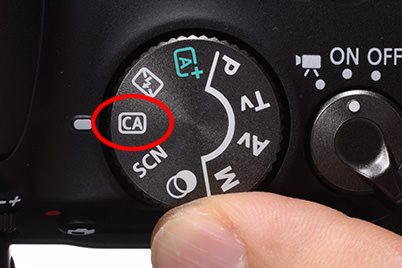
1. Set the Mode Dial to 'CA' (Creative Auto).
2. Tap 'OK'.
3. Press the Quick Control button and tap 'Ambience'.
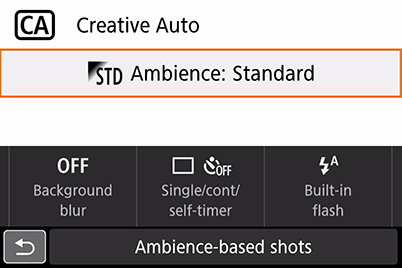
4. Tap the ambience setting you want to use and press 'SET'.

5. Tap Effect and select from 'Low'/ 'Standard'/ 'Strong'.

6. Tap 'Background Blur', and select from 3 or 5 levels for the degree of blur.
7. Tap Drive mode and select from 'Single shooting'/ 'Continuous shooting'/ 'Self-timer: 10 sec. remote control'/ 'Self-timer: 2 sec.'/ 'Self-timer: Continuous'.
8. Tap 'Built-in flash firing', and select from 'Auto built-in flash'/ 'Built-in flash on'/ 'Built-in flash off'.
For more reviews and sample images from the EOS 200D, check out the following articles:
Landscape Photography with the EOS 200D: A Review with Sample Images
EOS 200D Review: Travel and Street Photography
EOS 200D: A Review with Sample Images
Receive the latest update on photography news, tips and tricks.
Be part of the SNAPSHOT Community.
Sign Up Now!About the Author
A monthly magazine that believes that enjoyment of photography will increase the more one learns about camera functions. It delivers news on the latest cameras and features and regularly introduces various photography techniques.
Published by Impress Corporation
After graduating from the Department of Design in the Tokyo University of Art and Design, Suzuki worked in video production before becoming an independent photographer in February 2012. A versatile photographer who shoots a variety of genres ranging from daily life photography to advertising work, her passion revolves around "lifestyle". She seeks to cherish the things within a 5-metre radius of herself in her personal projects. Suzuki also runs AtelierPiccolo, a shop that brings together the two things she loves most: lifestyle and photography.
Website: http://suzukisayaka.pupu.jp/about.html
Instagram: @sayakasuzuki_photo


