


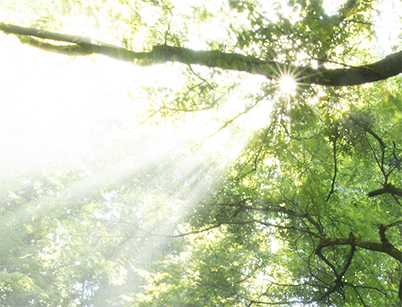
Even if you prefer images that look more natural, depending on the shooting conditions, you may still need to make adjustments to the image after you shoot so that it resembles your impression of the scene more closely. Here’s how landscape photographer Takashi Karaki post-processed and retouched this image of sunbeams at a waterfall to bring out their radiance against the vivid greenery. Time taken? Less than 3 minutes! (Reported by: Takashi Karaki, Digital Camera Magazine)

EOS 5DS R/ EF16-35mm f/2.8L III USM/ FL: 16mm/ Manual exposure (f/22, 5 sec)/ ISO 100/ WB: Auto
Editing software: Adobe Lightroom
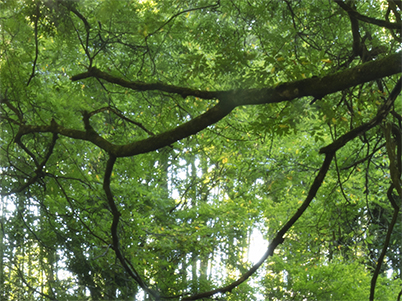
Before editing

What areas needed adjustment?
I wanted my final image to more closely resemble the scene that I saw. To better capture the form of the sunbeams, I shot with a 5-second shutter, and as a result, narrowed the aperture to f/22. This came with some unwanted “side effects”: the RAW image had harsh contrasts and looked dull. To brighten the shot and restore clarity so that the image expressed the light, refreshing feel of early summer, I identified four things that needed to be done:
A) Make the sunbeams look brighter.
B) Make the bright green leaves stand out more.
C) Remove the haziness across the entire image.
D) Correct lens distortion.
I made the necessary adjustments in 3 steps. Most of the adjustments were basic adjustments, with some masking at the end. The edits were done in Adobe Lightroom, but they should be possible in any post-processing software with similar functions.
Procedure
Step 1: Dehaze and improve clarity to make the sunbeams clearer
Step 2: Make the leaves look fresh and bright—Adjust the greens
Step 3: Fine-tune overall brightness—Linear gradient mask for spot adjustments
Here are more details about what I did in each step.
Step 1: Dehaze and improve clarity to make the sunbeams clearer
Before I did anything else, I went to the ‘Lens Corrections’ panel and enabled profile corrections, which corrects lens aberrations based on the lens used. This is a fundamental step and ensures that you are working on a clean slate.
Forest air is full of moisture in the morning, and this particularly affects areas near waterfalls, causing images to look hazier. To correct this, I went to the ‘Dehaze’ slider and increased the Dehaze level until the rays of light appeared as desired.

To make the sunbeams stand out against the foliage, I also increased the vibrance slightly.
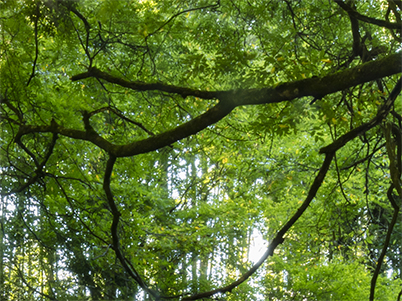
Before
After
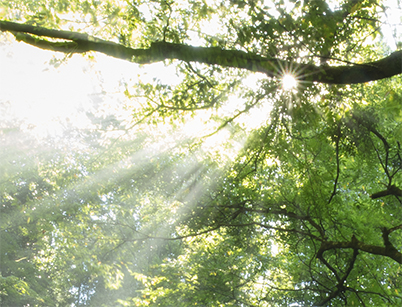
Time taken: 15 sec
Step 2: Adjust tone, contrast and greens and blues
Applying the Dehaze function made the image less hazy, but it also gave a “harder” feel and changed the colours slightly. Adjusting them took 3 actions.
Adjust the tones

I reduced the highlights, lifted the shadows, and increased the exposure and contrast.
When you shoot, it’s also important to ensure that highlight areas like the sunbeams are not overexposed to the point that details can’t be recovered! See:
Understanding Dynamic Range: How to Avoid Unnecessary Blown Highlights
Adjust blues and greens
The greens and blues of the image appeared slightly different from the actual scene, so I reduced the green hues…

…and also slightly desaturated the blues.

Before
After
Time taken: 60 seconds
Step 3: Linear gradient masks for spot adjustments
After the adjustments in Steps 1 and 2, this was what I got:

However, I felt that the contrast between the sunbeams and the area at the base of the waterfall too harsh. To remedy this, I made use of several linear gradient masks to carry out spot exposure adjustment, reducing highlights and lifting the shadows.
Tip: It is very important to keep checking the overall balance of the tones as you edit. Overdoing the adjustments would give you unnatural results.
i) With the linear gradient mask on, select the sunbeams from the top left


For this part, I reduced the exposure and highlights to recover detail in the sunbeams.
ii) Next, mask the hazier part on the left


Increasing the Dehaze level slightly cleared up the haziness near the waterfall.
iii) Lastly, mask the shadows on the right


I gently increased the exposure to lift the shadows on the right side of the image. With this, I brought the image much closer to my impression of the scene,
Time taken: 90 seconds

Total time spent editing: 2 minutes 45 seconds
For tips on how to shoot similar scenes, see:
Composition Decisions: Sunbeams to Enhance Clear Waters
Picture Style Techniques to Level Up Your Landscape Photography
For more ideas on how to capture expressive images of waterfalls, see:
Landscape Colours: The Subtle Beauty of a Waterfall in Blue & White
Photographing Waterfalls: To Freeze or to Blur?
Designing and Composing Waterfall Photographs: A Visual Approach
Receive the latest update on photography news, tips and tricks.
Be part of the SNAPSHOT Community.
Sign Up Now!About the Author
A monthly magazine that believes that enjoyment of photography will increase the more one learns about camera functions. It delivers news on the latest cameras and features and regularly introduces various photography techniques.
Published by Impress Corporation
After some experience as a sports instructor followed by 10 years in magazine production and editing, Karaki moved to Yonago City in Tottori Prefecture, where he became known for his landscapes of the San’in region of Japan. His works have been published in Amazing Village, a booklet of beautiful Japanese villages produced through a CANON × Discover Japan collaboration in 2017, and his shot of the sea of clouds at Akechi Pass in Tottori Prefecture was among 12 images selected by the Japan National Tourism Organization (JNTO) to represent Japan.
Instagram: @karakky0918


