


Previously only available in Singapore, the Canon EF Lens Simulator is now also available in South and Southeast Asian Countries! With the release of different language versions, including Indonesian, Malay, Thai, and Vietnamese, the "EF Lens Simulator," is an application that allows you to compare and review Canon's EF lenses that you are interested in on a smartphone or tablet device. Not only can it be used as a catalogue for comparing the different lenses, this remarkable application also provides visual simulation of the differences in the depth of field as well as the angle of view for each lens, which are important considerations when purchasing a lens. In this article, I will give you an overview of the features available on the "EF Lens Simulator." (Reported by Takahiko Masuda)
"EF Lens Simulator" - A Handy Application for Lens Comparison
The "EF Lens Simulator" application allows you to view the specs, MTF graphs, and lens construction diagrams of all EF lenses at a glance. On top of that, you can simulate the angle of view at different focal lengths using sample images, as well as enjoy interactive demonstration of the varying photographic effects according to the aperture value and shutter speed. By selecting a value for the aperture, you will be able to view differences in the bokeh effect, for example, which is helpful when you are trying to make a lens purchase decision. With this handy application, you can easily select a lens that suits your shooting requirements best.
EF Lens Simulator
You can download the application for free from Google Play onto devices compatible with Android 2.1 or later versions (33MB), or from iTunes Store onto those compatible with iOS 4.3 or later (44.4MB).
Enjoy using the application on smartphones and tablets
You can browse all contents without Internet connection.
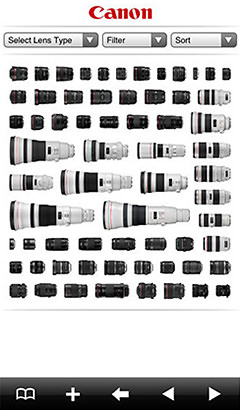
You can set filters such as by using the focal length or selecting the EF or EF-S series to narrow down your lens search. The order of display can also be sorted according to your preference, such as the price or maximum aperture value.
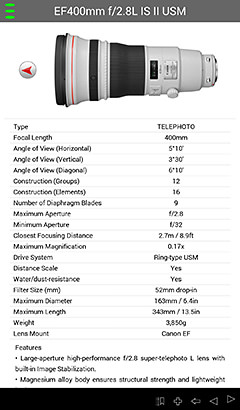
Displays all specs available on the catalogue, including the minimum and maximum aperture values, lens construction, and filter size.
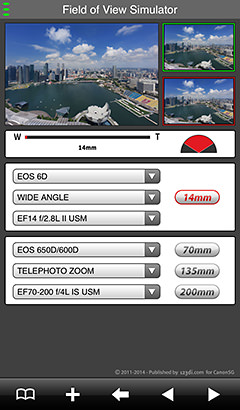
Enables comparison of the angle of view of two selected lenses while simulating the area captured by each using a sample landscape shot.
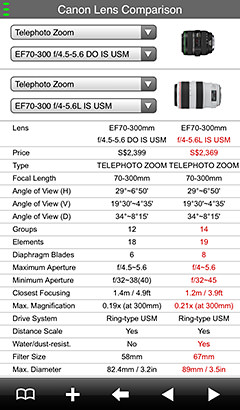
Displays the specs of two lenses side by side for comparison. Items with different values are highlighted in red to ease identification at a glance.
Changes in the bokeh effect are visible when the aperture value is altered
One of the characteristics of EF Lens Simulator is the features available to help you understand the relationship between aperture and bokeh. For example, the "DOF (Depth of Field) Simulator" allows you to see how the depth of field varies according to the aperture value, through an image that shows changes in the extent of the bokeh effect.
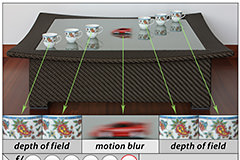
Another feature of the application that I would like to highlight is the "Exposure Simulator". The Exposure Simulator is a feature that simulates changes in the depth of field and subject blur by altering the aperture value and shutter speed combination for achieving proper exposure. For example, by selecting the Av (Aperture-priority AE) mode and setting the aperture value to f/2.8, the shutter speed becomes 1/1000 second. With the fast shutter speed, the toy car that is moving appears sharp, but bokeh is created in the cups on both sides because of the small aperture value. On the contrary, when the aperture value is increased to f/16, the cup on both sides turn out sharp, but the slow shutter speed causes subject blur to occur on the mini car. However, the brightness (exposure) level remains the same in both cases. From such simulations, we can better understand the relationship between aperture value and shutter speed, which not only allows you to control the exposure freely, but the depth of field and degree of subject blur as well.
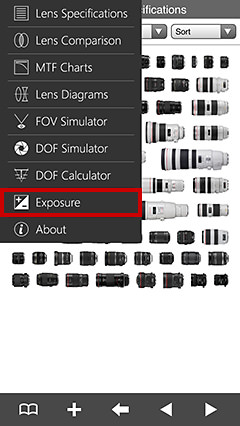
1: Tap [Exposure] in the top menu.
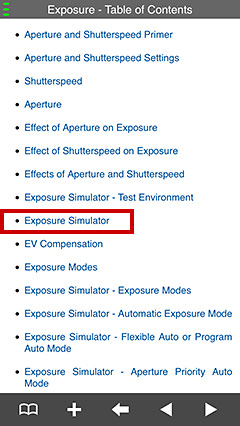
2: After [Exposure-Table of Contents] appears, tap [Exposure Simulator].
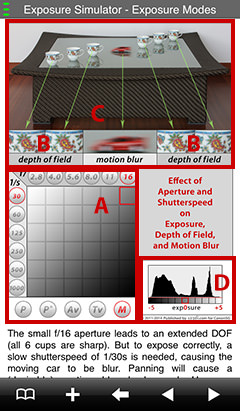
3: After the Exposure Simulator appears, you can simulate the effects of bokeh, subject blur, as well as the exposure using each of the blocks from A to D.
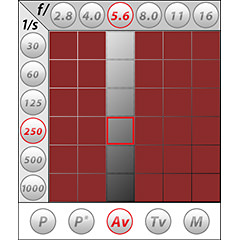
A: Select the shooting mode, aperture value, and shutter speed in this area. Choose the shooting mode that you make use of frequently from the options at the bottom row (P, P*, Av, Tv, M). Next, by selecting either the aperture value or the shutter speed, the outline of the corresponding grey cell in the grid is highlighted in red, enabling you to get an idea of the exposure (brightness) level of the image. In the illustration here, [Av] and f/5.6 are selected. Moving the red frame up or down has the same effect as performing increased or decreased exposure compensation. When [P] is selected, an image captured in the Auto mode is shown. In this case, the aperture value and shutter speed cannot be selected.
B: This block shows the effect on the image based on the aperture value and shutter speed you have selected in A. You can look at the teacups to identify the amount of bokeh created.
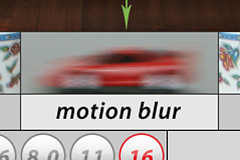
C: The area here shows the effect on the image based on the aperture value and shutter speed you have selected in A, particularly the degree of subject blur caused by the shutter speed. Strictly speaking, although the amount of blur also varies with the speed of the subject, the simulation here nonetheless provides a useful reference.
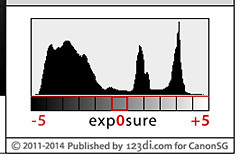
D: A histogram corresponding to the captured image is displayed here. The graph is skewed to the right if the image is overexposed, and skewed to the left if underexposed.
* This article was written based on the information as of May 2014. With the release of new updates for the application, new features may be added or changes may be made to existing ones.

Masuda moved to the U.S. in 1994, and had been capturing photos in the West Coast while working as a graphic designer. After returning to Japan in 2008, Masuda releases his works as a freelance photographer at exhibitions and other events, and started contributing articles to camera magazines. He is a member of the Japan Professional Photographers Society (JPS), and a member of the Denjuku HQ Steering Committee.

