


Built-in Flash Techniques #2: When the Flash Makes Your Subject’s Face Too Bright
If you are shooting indoors, using a flash helps to brighten your subject. However, the default flash setting may be too bright. In this article, we learn how to adjust the light output from a built-in flash for better results. (Reported by: Teppei Kohno)

EF50mm f/1.8 STM/ FL: 50mm (80mm equivalent)/ Manual exposure (f/2.0, 1/125 sec, EV±0)/ ISO 200/ WB: Auto
The built-in flash is too bright. Now what?
When you shoot indoors, there is less light, which makes your subject appear dark when you shoot without a flash. Depending on where your light source is located, there might even be strange shadows cast on and around your subject's face.
In the previous article, we learned that the built-in flash can help to reduce the shadows on your subject when shooting in backlight. This is also true for indoor shots. However, for both scenarios, the light from the flash might end up too bright, which makes your subject look flat and unnatural.
Take a look at the examples below. Do they look familiar?
No flash: Too dark

FL: 50mm (80mm equivalent)/ Manual exposure (f/2.0, 1/100 sec, EV±0)/ ISO 200/ WB: Auto
The ambient light in this shot is a beautiful warm tone, but it's not bright enough to illuminate the model, whose face and clothing are cast in shadow.
Built-in flash (default settings): Too bright

FL: 50mm (80mm equivalent)/ Manual exposure (f/2.8, 1/80 sec, EV±0)/ ISO 200/ WB: Auto/ Flash exposure compensation: EV±0
For this shot, a built-in flash was used at default settings. The lighting is a little too strong, which makes the model appear flat and unnatural.
Solution: Use flash exposure compensation to adjust the flash brightness

FL: 50mm (80mm equivalent)/ Manual exposure (f/2.8, 1/80 sec, EV±0)/ ISO 200/ WB: Auto/ Flash exposure compensation: EV-1
Flash exposure compensation works just like exposure compensation: You can decrease or increase the value in 1/3 stop increments and this changes the amount of light emitted by the flash accordingly. For this shot, flash exposure compensation was set to EV-1, which reduced the flash output by one stop. The flash lighting blends better with the ambient light, providing more natural results.
How to set flash exposure compensation
*Menus may differ depending on camera model
1. Take a test shot
Take a test shot with the built-in flash, without any flash exposure compensation. Does the shot look too dark or too bright?
2. Display the Quick Control screen
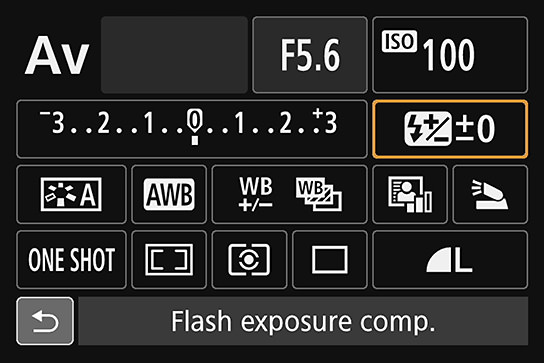
Press the [INFO] button and cycle to the Quick Control screen. Press the [Q] button to change the settings, and select the flash exposure compensation icon, highlighted in orange.
*If flash exposure compensation is set to '0', the flash exposure compensation icon will not be displayed until you press the [Q] button.
3. Set the compensation level

You can adjust the level in 1/3 stop increments. Just like exposure compensation, a negative compensation value makes the shot darker, and a positive value makes the shot brighter.
When you're done, press the [SET] button to lock in the settings.
Know this: The effects of different flash compensation levels

FL: 50mm (80mm equivalent)/ Manual exposure (f/2.0, 1/60 sec, EV±0)/ ISO 200/ WB: Auto
These shots show the different outcomes of 5 different flash exposure compensation values. Notice how the the look and feel of the shot also changes.
Blown highlights and crushed blacks aside, sometimes, deciding how much flash exposure compensation to use is also an issue of aesthetics: Do you want a brighter, airier feel or a darker, more sophisticated look? Choose a value that works for you.
Things to note
- The flash exposure compensation setting does not reset even after you switch off your camera. It's good practice to return the setting to '0' after you have taken your shot.
- You won't be able to preview the effects, even if you are shooting in Live View or with the EVF. Review your image after each shot to see if the flash exposure compensation setting needs any further adjustments.
- Flash exposure compensation affects only the output from the flash. It does not affect your exposure compensation settings. You can still apply exposure compensation if you feel that the entire image needs to be brighter or darker.
---
In the next article, we will learn how you can use flash exposure compensation to create a "spotlight effect" in outdoor portraits.
For more tips on shooting portraits, check out:
5 Portrait Photography Techniques to Take You from Day to Night
Shoot Beautiful Night Portraits with No Tripod, No Flash
Step by Step: How to Capture Dramatic Portraits Using Backlight from the Window
Techniques for Posing and Directing Portrait Subjects
Receive the latest update on photography news, tips and tricks.
Be part of the SNAPSHOT Community.
Sign Up Now!About the Author
Born in Tokyo in 1976, Kohno graduated with a Social Work degree from the Department of Sociology of Meiji Gakuin University, and apprenticed with photographer Masato Terauchi. He contributed to the first issue of photography magazine PHaT PHOTO and became an independent photographer after that, in 2003. The author of many books, Kohno not only shoots all sorts of commercial photographs, but also writes prolifically for camera and other magazines.

