Fast-paced, unpredictable and dynamic, extreme sports is rich fodder for dramatic shots. Here are some tips on how to make the best of an extreme sports shoot. (Reported by: Mark Teo)

EOS 7D/ EF70-200mm f/2.8L IS USM/ FL: 200mm/ Aperture-priority AE (f/2.8, 1/5000 sec, EV±0)/ ISO 400/ WB: Auto
Extreme sports photography: What does it really entail?
Sports photography is challenging: You have to juggle fast-paced action in conditions where available lighting may not be ideal, and external factors like weather can cause unforeseeable problems. With extreme sports, you have the added issues of unpredictable movements and dynamic environments.
Of course, capturing an extreme sports athlete performing a limb-risking, death-defying stunt can result in a jaw-dropping shot if done well. However, as the action is no longer constrained to field or a court, going in without proper preparation could also put you at risk of damaged equipment or even physical injury. Once, I went too close to a break dancer and got kicked in the face. While my camera lens survived, I ended up with deep cuts on my face and bruised fingers.
Keeping safety in mind, here are some tips on how to make the best of an extreme sport shoot safely!
1. Equipment: Pack smart and light
In most situations, extreme sports shoots happen in hard-to-reach areas or places where you can’t just leave a whole bunch of equipment unattended while you get your shots like in the city. You also want to have the mobility to find the best positions or angles to catch the action. Pack smart and light: Take only the lenses you need, and bring a spare camera body where possible.
Camera body: Something weather-resistant
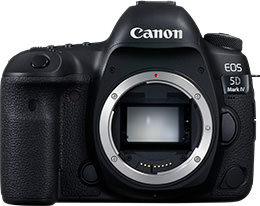
Because of the ever-changing environment and weather conditions, it definitely helps to have a weather-resistant body, such as the cameras in the Canon EOS 5D or EOS-1DX series.
Lenses: Depends on the sport and distance from the action
I choose my lenses depending on the nature of sport and how close I can get to the action.
If I am only allowed to shoot the action from a distance, such as from a spectator stand or behind large crowds, then a telephoto zoom lens such as a 70-200mm f/2.8 lens or longer will be useful. However, if I can get right up to the action, I generally would go for wide angles to maximise the impact of the athletes’ moves.
My personal favourite lenses will definitely be a wide-angle lens like a fisheye lens or a 16-35mm f/2.8 lens. When the athletes are doing their moves, we want the wide angle to help show how big the action is. We can do just that by making use of the tendency of wide-angle lenses to stretch distances.
Tip: How to make the best of a wide-angle lens
To maximise the wide-angle effect, get in close and keep low to the ground. For best results, capture the action at its peak so that the jump is at its highest point.
Image A: Lower angle, nearer the action

EOS 5D Mark II/ EF16-35mm f/2.8L II USM/ FL: 16mm/ Manual exposure (f/8, 1/320 sec, EV±0)/ ISO 100/ WB: Auto
For this shot, I got low to the ground to bring out the height of the jump. This also helped to maximize the wide-angle effect.
Image B: Further away from the action

EOS 5D Mark II/ EF16-35mm f/2.8L II USM/ FL: 16mm/ Manual exposure (f/8, 1/400 sec, EV±0)/ ISO 100/ WB: Auto
This was shot slightly further away from the action at a higher angle. Notice how now the height of the jump looks smaller?
Image A

Image B

Both shots were taken with the same lens, but from different angles and distances. The skateboarder looks like he jumped two-thirds of the frame in Image A, but only one-third of the frame in Image B.
2. Camera settings: Play around with the shutter speed
Everyone knows that fast shutters freeze action, but slow shutter speeds can create beautiful motion blur effects that help show how fast the athlete was moving. In fact, in some situations such a mountain bike race, freezing the action does not do the fast pace justice!
In big races or events, backgrounds can be busy and full of distracting elements like sponsor banners, spectators and even just vegetation. Panning the camera at slower shutter speeds can also help “mute” these background elements and draw the focus back to your subject.
Tip: To create panning shots at a faster shutter speed, use a longer lens
Panning motions at 1/30th of a second can cause too much blurriness due to our natural tendencies to shake the camera. To increase your chances of a successful panning shot, use a longer focal length, such as a 70-200mm lens. Longer lenses create more movement in the background, which ensures that even at shutter speeds as fast as 1/100th of a second, there is a good chance of the athlete being sharp while the background contains motion blur.
Freezing action with a fast shutter speed works in some cases...

EOS 5D Mark II/ EF16-35mm f/2.8L USM/ FL: 35mm/ Manual exposure (f/4, 1/3000 sec, EV±0)/ ISO 500/ WB: Auto
...But not always.

EOS 5D Mark IV/ EF70-200mm f/2.8L IS USM/ FL: 115mm/ Manual exposure (f/8, 1/800 sec, EV±0)/ ISO 400/ WB: Auto
Notice how the biker looks like he is almost still. There are also a lot of distracting elements in the background.
Panning helps to add movement and declutter the background

EOS 5D Mark IV/ EF70-200mm f/2.8L IS USM/ FL: 150mm/ Shutter-priority AE (f/6.3, 1/160 sec, EV-0.3)/ ISO 100/ WB: Auto
The same biker as the previous shot, panned at 1/160th of a second. The biker now has more focus and looks like he is travelling at some speed.
3. Frame and compose for impact
In extreme sports photography where it’s all about showing the context. Most of the time, we want to show the viewer how difficult the stunt was: Is the jump high? Is the terrain difficult and dangerous? Where is this all happening?
To know that, viewers need to see where the athlete took off from, the climax of the action and even where he/she could possibly land. Framing and composition are vital. You don’t want to diminish the impact of the action by making obstacles look smaller than they are. You also don’t want the image to be too abstract for the viewer to understand what is going on.
1. Showing expressions v.s showing context

EOS-1D X/ EF70-200mm f/2.8L IS USM/ FL: 195mm/ Manual exposure (f/2.8, 1/1000 sec, EV±0)/ ISO 800/ WB: Manual
Sometimes, you might also want to get in close to draw attention to facial expressions, such as when the athlete in deep in focus or just being in the moment—just like in this shot. However, the tight framing means you can’t see the point of take-off, landing, or have a sense of place. The sense of action is weaker.

EOS-1D X/ EF70-200mm f/2.8L IS USM/ FL: 70mm/ Manual exposure (f/2.8, 1/1000 sec, EV±0)/ ISO 1250/ WB: Manual
The same athlete framed with the environment in mind. Now, you can see where he started as well as peak of the action.
The best way to think of it is that extreme sports calls for “extreme” angles: Either go wide to capture the context, or get in super close to capture emotion!
2. The importance of timing

EOS 5D Mark IV/ EF70-200mm f/2.8L IS USM/ FL: 135mm/ Aperture-priority AE (f/3.5, 1/2500 sec, EV±0)/ ISO 125/ WB: Auto
Timing is essential to achieve shots with maximum impact. Compare this shot with the one below. The jump here looks smaller because it didn’t capture the peak of the action.

EOS 5D Mark IV/ EF70-200mm f/2.8L IS USM/ FL: 135mm/ Aperture-priority AE (f/3.5, 1/2500 sec, EV±0)/ ISO 125/ WB: Auto
The athlete is framed nicely with the background and at the highest point of the jump. His posture and the cropping gives us an idea of where he is and where his movements are taking him.
4. Do your prep work
At the end of the day, just like any form of photography, extreme sports photography is also all about prep work. With the high level of risk involved, the action can only be done a handful of times if there’s any chance of repeat at all. You want to be prepared to get the shot within those few tries.
Always:
- Stay inspired: Creative ideas are everywhere. Look at what people are doing and think about how to put your own spin to it.
Before an actual shoot:
- Familiarize yourself with the sport. One way to do so is to go online to watch videos on the sport you are shooting.
- Take the time to do a proper recce of the shoot location if you can. This also helps you to plan angles and get ideas for shots.
- Communicate with the athletes. Show them the photos from your recce and talk to them about your ideas. This also gives people the confidence that you know what you are doing, and assures them that they will not be risking injury for bad shots.
Bonus tip: Keep communicating with your athletes, and keep positive!

EOS 5D Mark IV/ EF70-200mm f/2.8L IS USM/ FL: 105mm/ Aperture-priority AE (f/2.8, 1/1250 sec, EV±0)/ ISO 125/ WB: Auto
Keep the athletes motivated, and show them the shots so that you can communicate any adjustments that need to be made. When they see a good shot, they’ll be more than happy to keep going.
Receive the latest update on photography news, tips and tricks.
Be part of the SNAPSHOT Community.
Sign Up Now!About the Author
Honing his craft with a balance of commissioned content and personal pursuits, Mark examines life through unguarded portraiture and suspended moments. With an abiding interest in adventure sports and urban subcultures, he has photographed MMA fighters, B-Boys, pole dancers, pro skaters, Motocross riders and Formula 1 champions to name but a few. A Semi Finalist in Red Bull’s Prestigious Illume Competition, Mark shares their uncompromised dynamism and raw energy.
His portfolio spans a plethora of clients from commercial work for Nike and Puma to editorial features for the likes of Discovery Channel Magazine, FHM Upgrade and SMILE Magazine for Cebu Pacific Airlines.
Besides being invited to judge Canon’s annual PhotoMarathon in 2013, Mark’s shoots have seen him documenting the beauty of the people and landscape in a self-driven Tuk Tuk across India, to shooting nomadic horse riders in Tibet for Red Bull and most recently documenting a road trip on the back of a Vespa across Vietnam, Cambodia and Malaysia.


