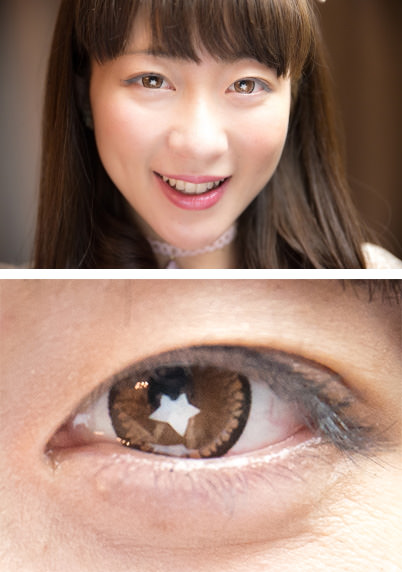
You have the pose, the lighting and the camera angle all perfect. Your model is in position, looking into the lens with lively, bright eyes. You focus and shoot, thinking you've nailed it. But somehow, the final outcome is not quite what you wanted, and you realise that it's because the eyes still look dull. Sounds familiar? Here’s the solution: Catchlights. (Reported by: Oliya T. Yabuta)

Catchlights can change how a portrait subject looks
Catchlights, also known as eye lights, are lights that are reflected in the eyes of a subject in a photograph. They are indispensable to professional portrait photography. If you look closely at the professionally-shot portraits of celebrities, for example, you will notice that the eyes always sparkle because of the light that is captured in them. They make an enormous difference to how the portrait subject looks, as you can see below. But they are not difficult to create!


The two photos above were taken at the same place, and in both, the model had the same facial expression. The only difference is whether or not there were catchlights.
They’re simple to create!
All you need to do is to shoot in a location where there is a bright object or light source in sight.
Key things to note
- For day shots, choose a place where the sky is in view
- For night or indoor shots, choose a place where a light is in view
- Do not look directly into a bright light source
- Do not cast coloured light on the face
Outdoor shots: The daytime sky creates the best catchlights
You don't have to worry about flashes and lighting equipment if the sky is in sight. All you need to do is make sure that it's in your model's line of vision, and it will act as a huge catchlight.
Caution: Don't look directly at the mid-day sky! Not only is it harmful to the eyes, light that is too glaring will cause him/her to squint—not quite the huge, bright eyes you want to achieve.
Indoor shots: Make sure the subject isn't looking somewhere dark
When indoors, make sure that your subject isn't looking into somewhere dark, as that means no light will be reflected in his/her pupils (= no catchlights). If you are shooting in the day, see if you can position him/her so that a window brightened by sunlight is in his/her line of sight. You can use some other diffused light source (such as a lamp) if you are shooting at night.

For an indoor shot at night, include a lamp with a large shade in the direction you are looking into. You may not be able to obtain the desired catchlight effect if the light is too small.
Pro tips
1. If it's difficult to put the light source in your subject's line of vision, use a reflector
A reflector is also good for making sure your subject's face is well-lit, especially if the main source of light is behind him/her. (See: Step by Step: How to Capture Dramatic Portraits Using Backlight from the Window)
2. The 10 o' clock, 2 o' clock rule-of-thumb
One common rule-of-thumb that many portrait photographers have is to place their catchlights at the 10 o' clock or 2 o' clock position in the eyes, or somewhere in between. The belief is that these positions look the most natural since it's also where catchlights will be naturally created if you were shooting outdoors under the mid-day sun. Why not try and see if it works for you?
Have fun: Create heart-shaped/star-shaped catchlights


How to do it

1. Cut a large, white board cut into the shape of a heart or a star.
2. Place it in the direction the subject is looking into.
3. Cast light onto the white board.
4. The white board will form a heart- or star-shaped catchlight when reflected in your subject’s eyes.
Taking a selfie? Here’s how you can make your eyes look big and bright:
[Part 1] Achieve Large Bright Eyes in Your Selfies!
You can use this technique in animal photography too:
Cat Photography: Catchlights and Other Tips for Lively, Adorable Kitten Portraits
Learn about other techniques for making your subjects look good in:
5 Portrait Techniques to Express Your Love for Her
Cosplay Photography Techniques (2): Fundamentals of Lighting
Cosplay Photography Techniques (3): Examples of Different Lighting Setups
Receive the latest update on photography news, tips and tricks.
Be part of the SNAPSHOT Community.
Sign Up Now!About the Author
Before becoming a portrait photographer, Yabuta worked in a television programme production company, and then handled advertisements for an electronics manufacturer. He has made appearances on various Japanese television programmes as an expert on how take beautiful self-portraits. In recent years, his approach to posing models, which is based on human anatomy and bone structure, has been very well received. His book on this approach is on sale in various countries.


