


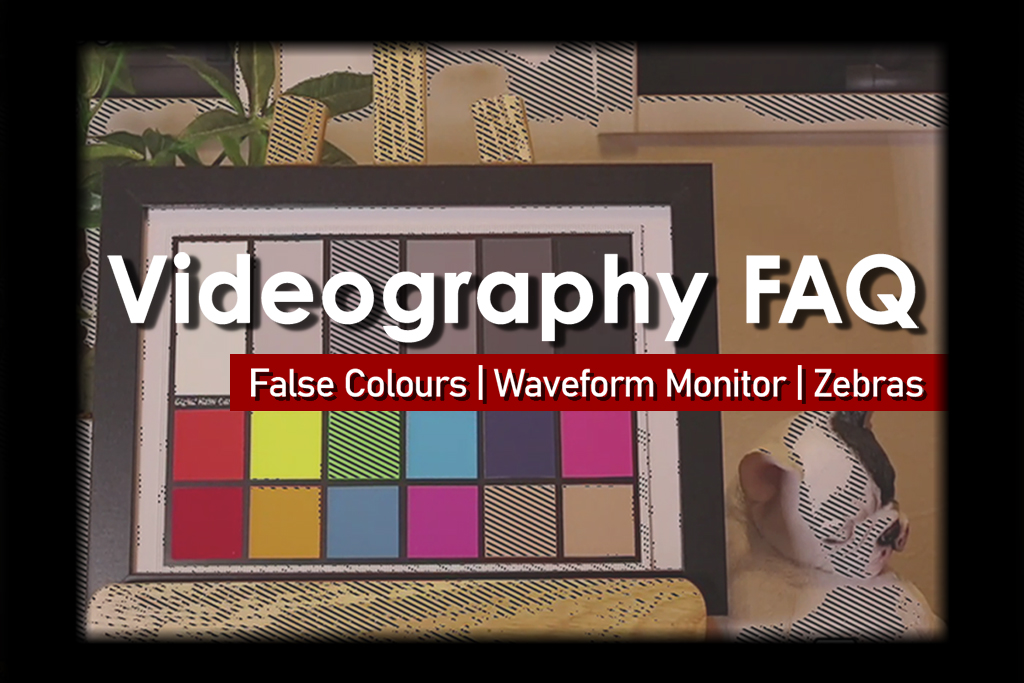
Getting proper exposure on set is crucial for ensuring visual quality: if the shot is over- or underexposed, you would lose highlight or shadow detail, and it can be difficult or impossible to recover them in post-production without affecting other things. This is where visual aids like zebras, false colours, and waveform monitors, come in. They can be found on Cinema EOS cameras and some EOS R series cameras, and in this article, we learn what they do and how we can use them effectively.
Proper exposure and brightness level: the basics
1. “Proper exposure” is subjective
“Exposure” refers to the brightness of your footage. While it is essential to ensure “proper exposure”, how bright or dark that translates to is subjective and depends on your shooting conditions as well as the intended mood and tone of the scene. For example, you would probably want a comedy or outdoor daytime scene to be brighter than a crime thriller or production that deals with emotionally dark themes.
Even then, it’s good practice to determine a reference for exposure, such as the ambient brightness if you are filming outdoors, and then under- or over-expose based on your needs.
2. Watch out for blown highlights and clipped blacks
Regardless of the overall look you are aiming for, it is important to be aware of clipped blacks and blown highlights. Of course, this doesn’t mean you should avoid them: they might be inevitable when you prioritising properly exposing important elements. They might even be part of your intended look. However, they do mean lost tonal details that will be difficult or impossible to recover in post-production. Be very intentional about your exposure choices, and remember to consider storytelling and post-production needs!
3. Don’t trust your eyes when setting exposure
Ambient lighting impacts the brightness of your monitor display, which is why it’s not a good idea to set exposure solely based on what your eyes see. Tools like zebras, false colours, and waveform monitors provide a data-driven visualisation of the actual exposure—which will give you more consistent, professional-looking results (and reduce the time spent matching clips).
4. IRE
In video production, the exposure (luminance) levels of video signals are measured using IRE units. 0 IRE refers to crushed blacks, whereas 100 IRE indicates clipped whites. There are optimal IRE levels for various subject types, but these are references rather than hard and fast rules.
| IRE | Subject |
| 0 | Pure black (Crushed blacks) |
| 10 to 30 | Black background |
| 20 to 40 | Black clothing; shadows |
| 40 to 60 | Green (mountains, forests, plants); medium to darker skin tones |
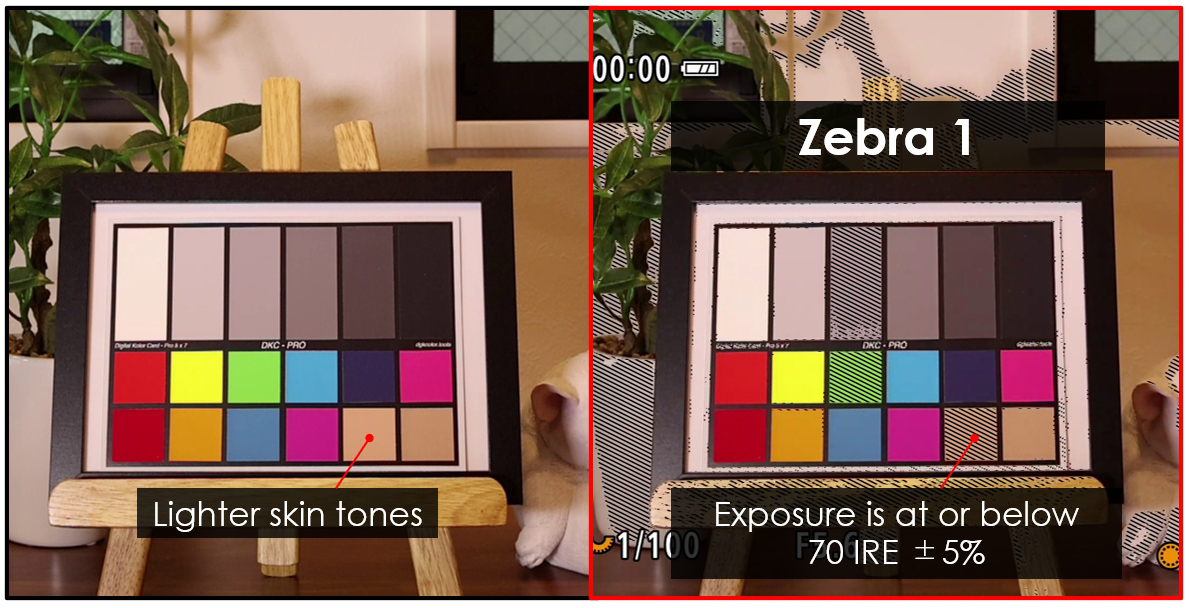
| 60 to 70 | Lighter skin tones |
| 60 to 80 | Blue sky |
| 80 to 95 | White clothing; white textured cloth |
| 90 to 100 | White clouds; cups and plates; white backgrounds; reflective parts of metallic and mirrored surfaces |
| 100 | Pure white (clipped whites) |
1. Zebras
Available on: R50/ R50 V/ R10/ R7/ R8/ R6/ R6 Mark II/ R5/ R5 Mark II/ R3/ R1/Cinema EOS cameras
Zebras are a striped overlay that indicates the parts of a scene with a predetermined exposure level or exposure level range. They can be displayed in video standby mode and during recording. While a histogram tells you that you have crushed blacks and clipped whites, zebras tell you exactly where those crushed blacks and clipped whites occur.
Besides this, you can also use them to check your exposure.
How to use Zebra 1 and Zebra 2
EOS cameras with the zebra display function have two types of zebra display.
Zebra 1 indicates areas with an exposure level ±5% of a predetermined level.
Zebra 2 indicates areas brighter than a predetermined level.
The two types of zebras can be used together.
Zebra 1
Indicates exposure levels within ±5% of a predetermined value. (The value corresponds to the IRE)
Appears as: Lines that slant downward towards the right (\\\\)
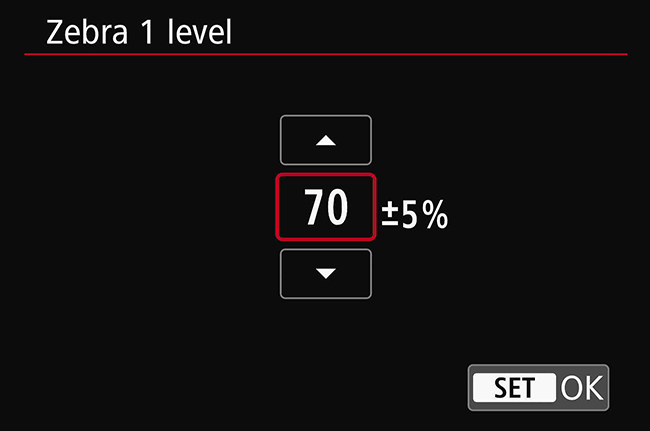
Zebra 1 is useful for determining the exposure level based on a specific subject. For example, if you want the standard proper exposure on a person, you can set the Zebra 1 level at 70 IRE, and then adjust the exposure until the person’s skin begins to show zebras.
You can set the exposure level from 5 to 95 IRE in 5 IRE intervals.
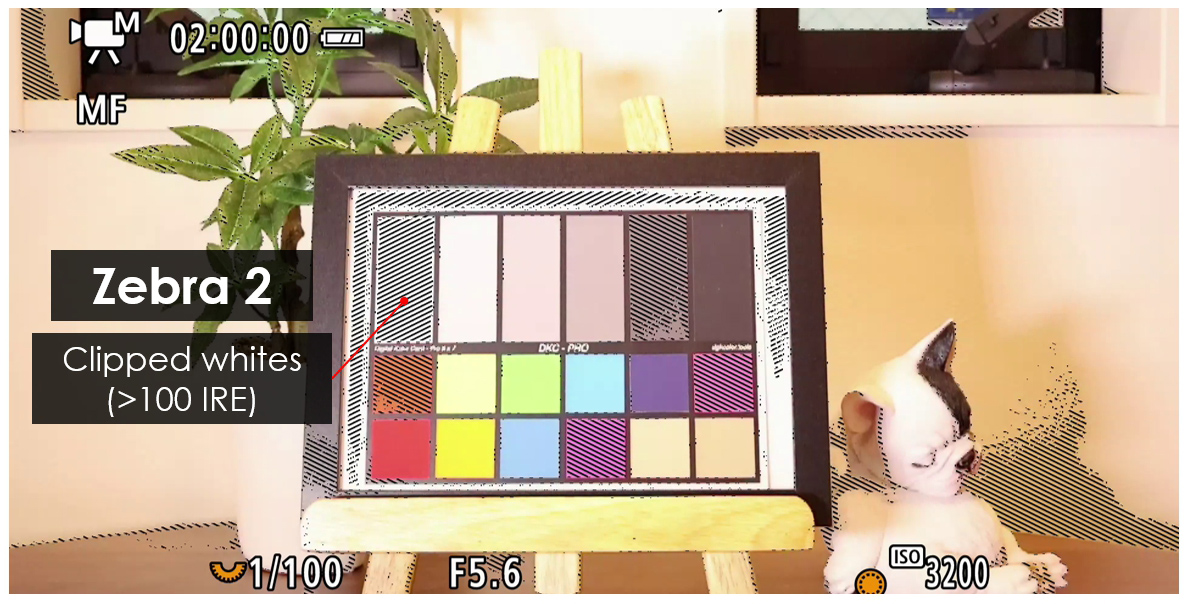
Zebra 2
Indicates areas with an exposure level brighter than a predetermined value.
Appears as: Lines that slant upward towards the right (////)
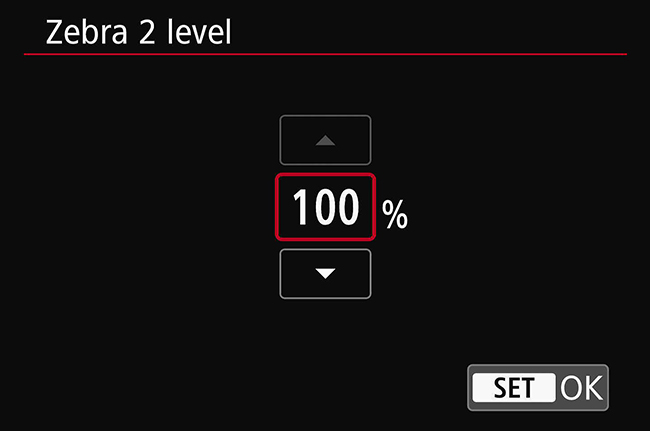
By default, the Zebra 2 level is set to “100”, which allows you to check for clipped whites.
The set value shouldn’t be too low or you would end up with Zebra 2 lines on everything in the frame. We recommend leaving it at 100 to check for clipped whites, or reducing it slightly to see the highlight areas at risk of clipping.
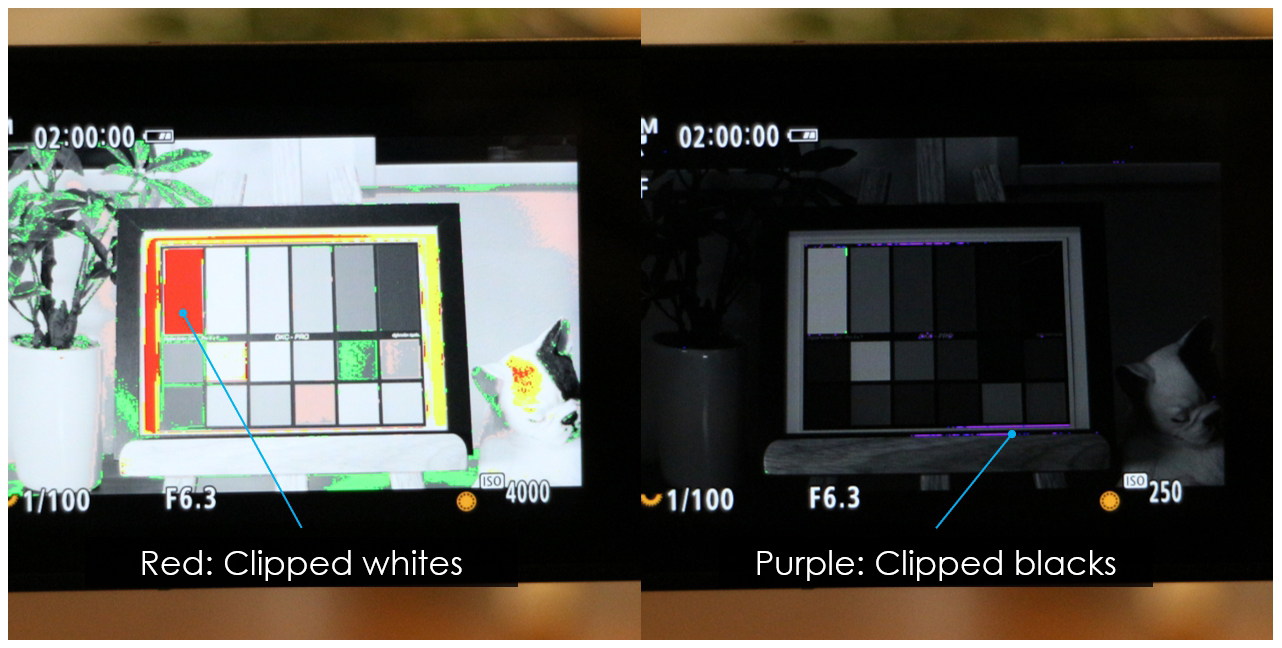
False colours
Available on: EOS R50 V/ EOS R8/ EOS R6 Mark II/ EOS R5 Mark II/ EOS R1/Cinema EOS cameras
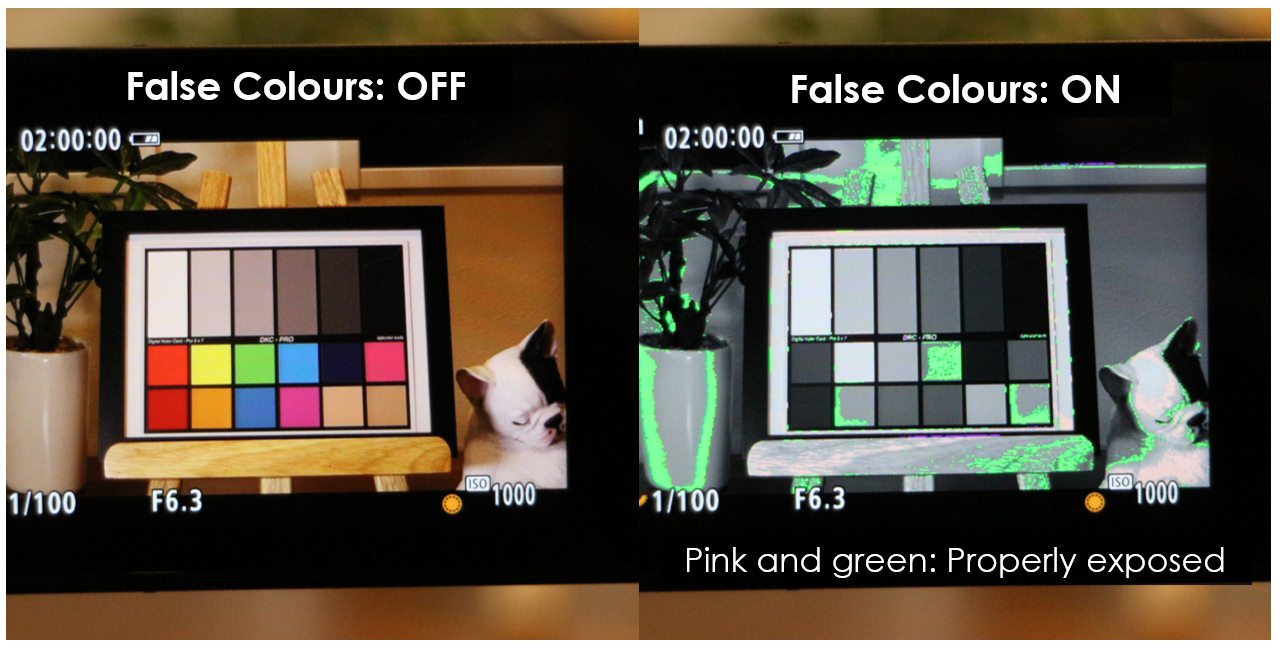
False colours visualise the exposure levels of different parts of the image by using a colour-coded overlay. They show not only the areas with clipped blacks and whites, but also the exposure level range of other areas. This makes it useful for setting exposure, including skin tones, correctly. All you need to do is familiarise yourself with the exposure level range that each colour represents, and you’ll be nailing the exposure intuitively and efficiently!
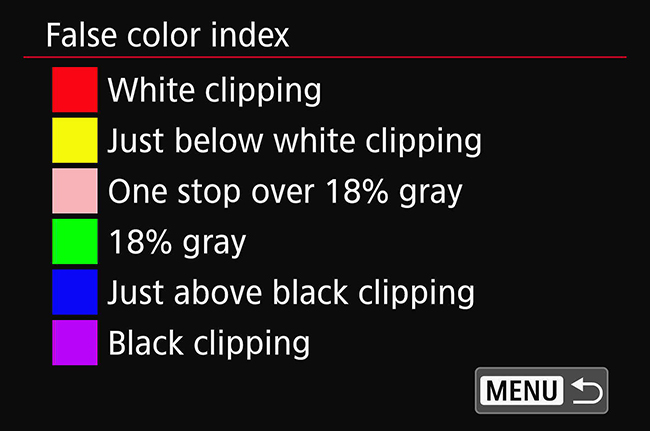
The false colour index on Cinema EOS and EOS R series cameras
| Colour | Meaning |
| Red | White clipping |
| Yellow | Just below white clipping |
| Pink | One stop over 18% grey |
| Green | 18% grey |
| Blue | Just above black clipping |
| Purple | Black clipping |
| Neutral colour | Brightness other than above |
For example, when exposing for people with light to medium skin tones, adjust so that the highlights on their skin appear pink. For people with dark skin tones, you might want to expose at 18% grey (green overlay) to preserve details without over-brightening. If you are using a grey card to help you set the exposure, you will also want to adjust so that the grey card appears green.
Know this: Fluctuating false colours might be a sign of flicker
Flicker causes exposure to change, and if the change is big enough, the false colours might fluctuate. If you notice that, adjust the shutter speed. If the colours stop fluctuating, you probably have solved the flickering issue too.
Waveform monitors
Available on: EOS R5 Mark II/ Cinema EOS cameras
The horizontal axis of a waveform monitor represents the image from left to right; the vertical axis shows the exposure values. So if there is a bright object in the middle of a frame that is generally dark, you would see a spike in the middle of the monitor.
Like a histogram, the waveform monitor can be displayed in a corner of your screen, where you can see it in both standby and recording mode.
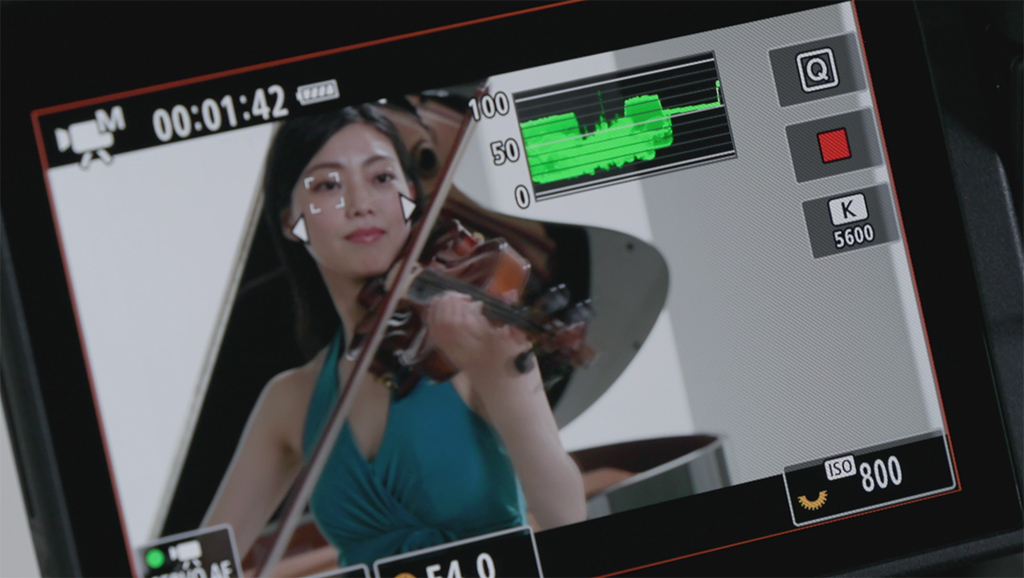
Line
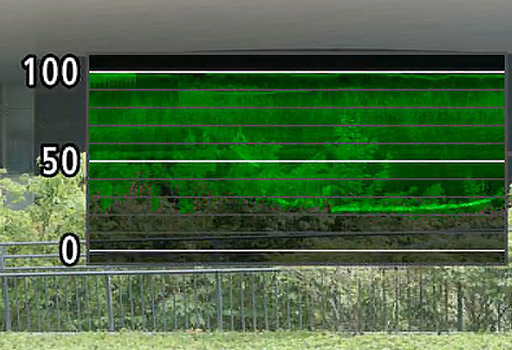
The horizontal axis represents the image from left to right; the vertical axis shows the exposure values. Shows the brightness and colour information for the whole image.
RGB
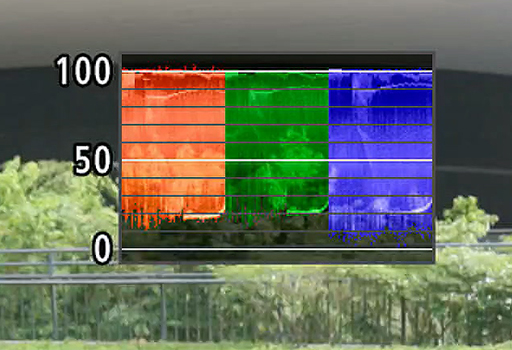
The waveforms for the RGB (red, green, and blue) channels are shown side by side in an RGB parade. The vertical axis shows the exposure values; the horizontal axis of each colour waveform represents the image from left to right.
There are different waveform monitor displays; the two most basic are the line and RGB waveforms. The RGB waveform can be used to check for colour cast, among other things.
Some Cinema EOS cameras also have Line + Spot, Field, and YPbPr parade waveforms.
Usage tips
1. Assign a button for toggling between displays
This allows you to turn the zebras/false colours/waveform monitor on and off so you can view the display without distractions where necessary.
2. Some recording modes don’t support zebras/ false colours/ waveforms
For example, you can’t display zebras and false colours simultaneously, and false colours are not supported when shooting Timelapse Movies, HDR videos, or with MF peaking, among some other functions. Check your camera manual for more details.

