


Pro Tips for Live Concert Photography (1): 4 Tips for Getting Ready
Learn more about what goes into preparing for a live concert photography gig in this article, where professional photographer Hajime Kamiiisaka shares some tips on what he has learnt from his experience photographing numerous artists, including Momoiro Clover Z, AKB48, and Arashi. If you’ve ever wondered how to get started in or get better with your live concert photography skills, look no further! (Reported by: Hajime Kamiiisaka)

Getting Ready 1: Understand that live concert photography starts before the performance begins
To skilfully photograph an artist at a live concert, you should realise that the photoshoot starts even before the performance begins. Don’t forget to keep the following 3 points in mind.
Point 1: Visualise the kind of photos you will take and mentally rehearse how to take them
Firstly, have an image of the photos you want in mind. Strive to undertake live concert photography with a clear image in mind as to what kind of photos you would like to take and which performing artist you would like to capture in your shots. I usually prepare myself by viewing live videos of the artist(s) whom I will be shooting, so that I can predict the moments when they do certain actions such as jumping.
Point 2: Check where you can photograph from during the live concert
Next, secure your shooting position. It is important to confirm whether you will be able to move freely around the venue to take your shots. If you are unable to do so, secure a position where you can take the kinds of shots you have in mind.
Point 3: Prepare techniques for handling your shoot flexibly
Finally, be able to adapt to any shooting condition. Conditions, such as lighting and direction, might differ for events held at a live music club that accommodates a crowd of 100, as opposed to events held in a concert hall with a capacity for 10,000 or more. Remember to practise your photography techniques in advance so that you can ascertain and deal with the differences between what you had in mind and the live concert conditions. This way you’ll be one step closer to successful shots in live concert photography. While there are various techniques available, if you are able to freely move the AF point around as intended, you will be able to take better shots.

f/5, 1/50 sec., ISO 2000
I aim to create shots that are not only close to what I had in mind, but also suit the atmosphere of the venue.

f/4.5, 1/100 sec., ISO 4000
The lighting differs for each live venue. It is important to study the performances and personality of the artist so that you can have an idea of what you would like to shoot, and be able to flexibly deal with the conditions of the live concert.
Getting Ready 2: Know the ISO range available on your camera
A live concert venue can be darker than you imagine. However, it is a must to have a shutter speed of 1/125 second or higher. This is particularly important when you are capturing a shot of the vocalist, as you will not get the desired result if the movement of the mouth is not "frozen". You will want to have a certain depth of field as well, so as a guide, set your aperture to f/4-5.6. However, as you increase the ISO speed, the shots you can take will eventually be limited by the capabilities of your camera.
High ISO speeds inevitably produce noise. The degree of noise differs depending on the type of camera you use. When limited to live concert photography with a lot of dark scenes, I have found that ISO speeds of up to ISO 1600 are fine on the EOS 760D. While high-end cameras are able to keep noise to a minimum even at high ISO speeds, my preference is to limit the ISO speed to ISO 2500 on the EOS 5D Mark III as nothing beats a beautifully captured photo.
To readily determine which ISO speeds are suitable for your camera, you can increase the ISO speed and take test shots in the comfort of your own room. It’s a good idea to take this opportunity to check the ISO speeds that you can set on your own camera.

f/5, 1/20sec, ISO 200

f/5, 1/500sec, ISO 3200
The graininess of the noise according to different ISO speeds is easy to spot. Take some test shots to check the ISO speeds that you can set for your camera.
Getting Ready 3: Prepare a telephoto lens for any close-up shots
If you want to take close-up shots of an artist, you will need a telephoto zoom lens. With only a standard kit lens (e.g. EF-S18-55mm f/3.5-5.6 IS STM), the focal length will not be sufficient in many cases. Some affordable lenses that I would recommend are the EF-S55-250mm f/4-5.6 IS STM and EF70-300mm f/4-5.6 IS II USM. One way to try out the effects of telephoto zoom lenses is to attend a Canon Photo Party, where you can borrow equipment to try out for yourself.

f/4, 1/100 sec., ISO 640
It is hard to capture close-ups of artists with kit lenses as they have a shorter focal length.

f/3.5, 1/400 sec., ISO 1250
Example shot taken at a focal length of 200mm. I took this photo from the same location and was able to get a rather close-up shot of the artist.
Getting Ready 4: Know the shooting angle for capturing great shots of artists
You should also learn the basic angles for taking great shots of artists.
For vocalists, focus on the mouth. Place the mouth of the vocalist clearly in the frame to "freeze" the movement of their mouth. Even if you are able to get a close-up shot of an artist, if the movement of their mouth isn't "frozen" due to a slower shutter speed, or if the shape of the mouth appears unnatural, this will spoil the finish of your photos.
For guitarists, bass players, etc., focus on their instruments. Keep the surfaces of the instrument in mind when composing your shots so that they can be seen clearly. When you keep the surface of the instrument in mind, its form and shine will complete the image. It is also very important to find out the artist’s dominant hand in advance so as to avoid being on the opposite side instead when you are in your shooting position.

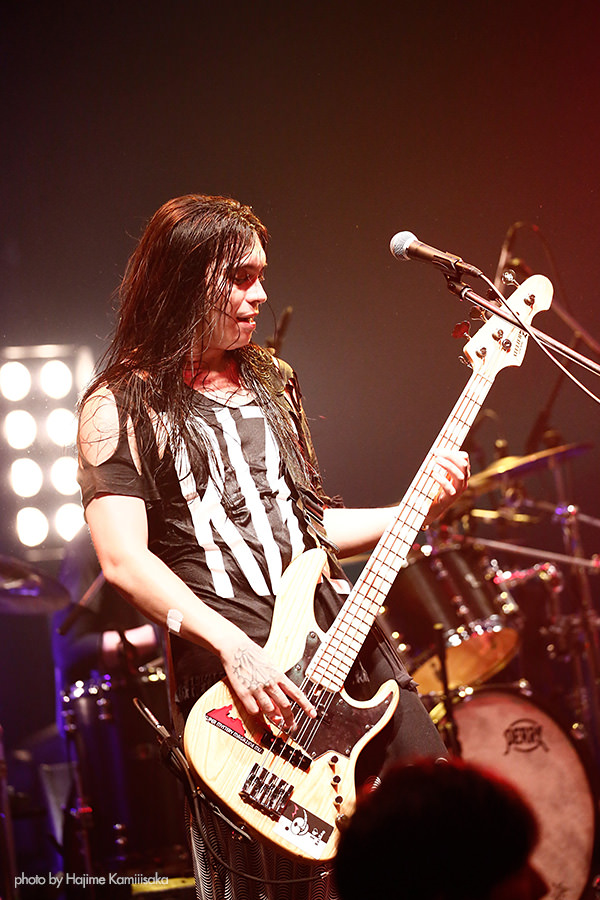
There are angles for capturing great shots of artists. As a guideline, remember to "freeze" the mouths for vocalists, and make sure to clearly show the surface of the instruments when shooting instrumentalists.
And there you have it, some of the basics to getting ready for live concert photography! Naturally, it is possible to put this into practice by composing your shots to boldly bring the neck of the guitar into the foreground to bring out a sense of depth in your photos.
The last tip comes from my personal experience: I have noticed that shooting someone's face from the left side produces a sharper image, while shooting from the right side captures an image that leaves a softer impression. However, ultimately, the artists themselves also have an image to maintain. Check out their websites and photos, and you might make new discoveries as to which side (left/right) they prefer.
Summary: Getting ready in advance will help you bring out an artist’s appeal
Having shot for numerous live concerts, I can say that advance preparation is of utmost importance. Find out everything you need to know about the venue, such as the shooting location, distance from the stage, lighting and direction, and the progression of the programme. At dark live concert venues, it is harder to check the equipment you have on hand, and you won’t have much time to do so. Hence, don’t forget to practice using your equipment on a daily basis so that you can operate it smoothly on your own.
It is also important to study the artist's image, dominant hand, habits, and so on. For me though, I think the real thrill of live concert photography is in being able to communicate with artists through the shoot. While your own tastes are important, ideally you should be able to shoot with an understanding about the artist's musicianship and preferences for their performance.
Each of these points on their own might not be particularly remarkable, but when you put them all together, you will be able to get results. Aiming to get a shot that exceeds the artist’s expectations is the first step toward becoming a pro.
Get so familiar with your camera that you can operate it freely without having to look at the controls.
Receive the latest updates on photography news, tips and tricks by signing up with us!
Entered Epic/Sony Records in 1993, joining the design production division after gaining experience as a promoter and in A&R. Left in 2002 to become an assistant to fashion photographer JFKK, before striking out to take on photography assignments on his own. Since then, he has been active mainly in the commercial fashion, film, music and visual arts scenes.

