


Forget pretty portraits with pastel colours and not a single hair out of place. If you want something edgier, here’s a look that you can try to recreate, even if you’re at home. And if you are a lady (or happen to have long hair), you don’t even need a model—it can be a self-portrait! (Reported by: Yuriko Omura, Digital Camera Magazine)

EOS 5D Mark III/ EF24-105mm f/4L IS USM/ FL: 60mm/ Manual exposure (f/5.6, 1/125 sec)/ ISO 200/ WB: Daylight
Step 1: Planning and preparation
Psyche yourself into it (if you have to)
Self-portraits are an earnest record of how you look. So although I shoot portraits as a profession, somehow, I still feel a little shy taking portraits of myself. If you’re like me, it might feel less challenging when you think of it as simply inserting yourself into part of an image. If you don’t want to show your face or full body, you could even capture only your hands or your legs.
It also helps that we’re releasing the shutter remotely. That way, you can frame the image so that it looks like it was shot by someone else and doesn’t resemble a selfie.
Think of what you want to express
For this shot, I wanted to express the idea of “mental fragility”, so I decided to create an atmosphere that suggested that I was at breaking point. As there were limits to what I could show using the space I had at home, I used a projector to project an image of glass shards over myself, which enrichens the image.
Things you need
- Tripod
- Wireless release/ Smartphone with Camera Connect
- Lamp
- Projector
- Hairdryer
- An empty white wall
Step 2: Prep the scene
Finding the best setup
1. Use the projector to project the image onto the white wall.
2. Find the best angle and framing. Set up your camera and tripod accordingly.
3. Stand where you think achieves the most balanced composition. (Tip: Check the composition easily with the Remote Live View Shooting function in the Camera Connect smartphone app)
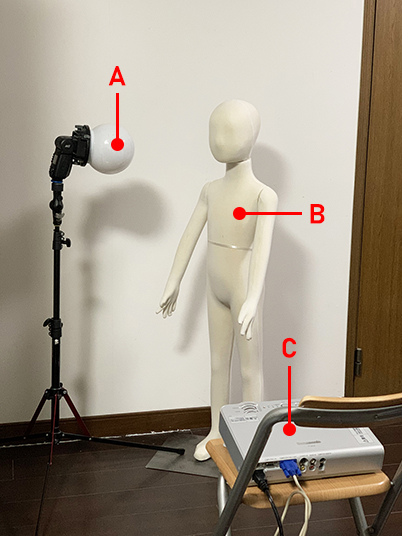
A: Light
While the projector provides some light, it wasn’t enough to light me, so I placed one in a position that would provide front lighting for my face.
The light that I used here was a normal household lamp on a stand. It didn’t result in appealing colours, which is why I made the final image monochrome. Perhaps you’ll have a better alternative lying around!
B: Yourself
To get the shadows on the wall to look the way I wanted, I stood close to the wall and faced the side. I placed the light so that it was facing me.
C: Projector
Make sure that the projection lamp is head-on with the wall. If not, the projected image could become distorted.

This is the image I used for the projection. I found it in a free-to-use image library.
Need more tips on how to choose a projector and select a backdrop image? See:
Creating Backdrops: Introduction to Cosplay Photography with a Projector
Step 3: Use the hairdryer to create the windswept look
If you have long hair and keep your clothes simple (like the tank top that I was wearing), it’s quite easy to create a portrait that has a sense of motion even at home. All I did was hold the hairdryer with my right hand, pointing it upwards so that it blew my hair around.

Not a hair-dryer ad. Make sure that the hairdryer is hidden from view when you shoot!
Caution:
- If you leave the hairdryer on for a long time, it could overheat and short circuit.
- The hot air setting might burn if you are going to hold the position for a while. Use the cold air setting if available.
It's amazing how hair can make an image look more dynamic. Want a hair toss image? Take a look at this:
What’s the Best Shutter Speed for a Hair Toss Portrait?
Step 4: Take the shot
You can either set the 10-second self-timer on your camera, or use a remote shutter release like I did. You can also use your smartphone as one with the Remote Live View Shooting or Bluetooth Remote Controller functions in the Camera Connect app. Just make sure that your remote control/smartphone is not visible in the final image!
Take it further: Play with colourful backgrounds
I did this shoot in black and white. But or more variation, why not try projecting a background that’s more colourful and shoot in colour? Free image libraries will have lots of high-resolution colourful texture backgrounds to choose from, so you could download a variety of them and play around. Who knows, you might stumble across a background-subject combination more amazing than what you imagine!

You could try putting the background image out of focus…

It’s easier to see colours against a white wall. Play with shadows to add depth to the shot.
Pro tip: Shooting in colour can make images with human subjects look very raw. For a more polished look, use lighting that enhances shadows.
Also see:
7 Fun Indoor Photography Ideas to Try At Home
7 Ways to Improve Your Photography Indoors
Need better lighting? Here's how you can create your own light modifiers:
3 Product Photography Essentials You Can DIY
For more self-portrait inspirations and portraiture tips, see:
Capturing Travel Self-Portraits with a Difference
5 Fundamental Lighting Patterns for Portrait Photography
How to Shoot Macro Portraits That Tell a Story
2 Instant Techniques to Liven Up Your Outdoor Portraits
Receive the latest update on photography news, tips and tricks.
Be part of the SNAPSHOT Community.
Sign Up Now!About the Author
A monthly magazine that believes that enjoyment of photography will increase the more one learns about camera functions. It delivers news on the latest cameras and features and regularly introduces various photography techniques.
Published by Impress Corporation
Born in 1983 in Tokyo. Previously a shop assistant at a camera store, Omura currently engages mostly in photo shoots for artists and photo albums.

