Useful Camera Functions for Capturing Nightscapes with a Difference
Love photographing the city at night, but looking for a new approach? Here are two camera functions that will help you expand creative possibilities—the Multiple Exposure and Multi Shot Noise Reduction features. Photo examples are from the EOS 6D Mark II. (Reported by Yuta Nakamura)

Technique 01: Use the Multiple Exposure function to give the night city a magical finish

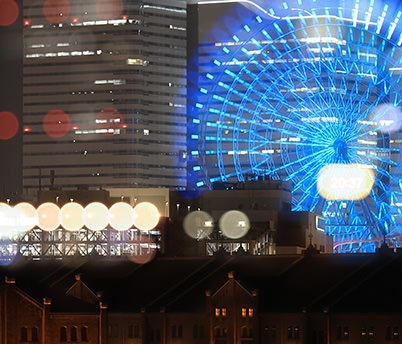
EOS 6D Mark II/ EF70-200mm f/4L IS USM/ FL: 121mm/ Aperture-priority AE (f/4, 1 sec, EV-0.3)/ ISO 100/ WB: Auto
Create layers of defocused light with the Multiple Exposure feature
Photographing the city at night, with all its lights and vibrancy, can be delightful, especially if you own a camera with a full-frame CMOS sensor such as the EOS 6D Mark II and the EOS 5D Mark IV. The images in this article were photographed with the EOS 6D Mark II, which reproduces colour gradations excellently and also boasts outstanding ability to depict fine details with its 26.2 megapixels, resulting in stunning photos of night scenery.
With a combination of good equipment, a solid grounding in the camera basics and, of course, experience, you could achieve some excellent shots your usual way. But should you ever want to explore a different way of shooting, how about layering multiple images into a single photo in a multiple exposure? Doing this when photographing nightscapes lets you present lights in a way that makes them look magical.
One way of creating multiple exposures is to take multiple shots and then use image editing software to combine them. However, some Canon cameras have a Multiple Exposure function that you can use to merge the shots in-camera*. All you need to do is to specify the number of shots to combine, and then press the shutter the same number of times. You get to monitor the progress of the merging after each exposure is taken I recommend using a tripod for the shoot to ensure that the photos remain aligned.
*Including the EOS-1D X Mark II, EOS 5D Mark IV, EOS 5DS/5DS R, EOS 6D, EOS 6D Mark II, EOS 7D Mark II, and EOS 80D. (Information correct as at date of publication of this article).
Enabling the Multiple Exposures function from the shooting menu
You can set the Multiple Exposures function from the shooting menu. For the settings, select ‘Additive’ if you are layering exposures that were taken at different locations. If layering exposures taken at the same location, select ‘Average’.
When using ‘Additive’, the image will become brighter as you increase the amount of photo layers, so you need to apply negative compensation accordingly during the shoot. See below for some recommended compensation settings based on the number of images to be layered.
Recommended exposure compensation for the number of exposures to be layered:
2 exposures: -1 stop
3 exposures: -1.5 stops
4 exposures: -2 stops

Adjusting the size of the bokeh
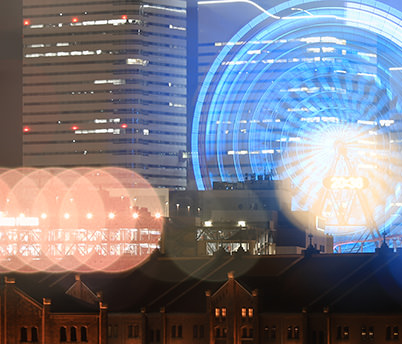
After capturing the first exposure with the camera properly in focus, turn the focus ring to the shortest focal length to defocus the light source for the next exposure. If the bokeh circles are too big, the image will appear to be too busy; if they are too small, they will appear to lack effect. Hence, a good idea is to adjust the position of the focus ring to create medium-sized bokeh circles.
Small bokeh circles

EOS 6D Mark II/ EF70-200mm f/4L IS USM/ FL: 106mm/ Aperture-priority AE (f/4, 1.3 sec, EV-0.3)/ ISO 100/ WB: Auto
Large bokeh circles

EOS 6D Mark II/ EF70-200mm f/4L IS USM/ FL: 106mm/ Aperture-priority AE (f/4, 1.6 sec, EV±0)/ ISO 100/ WB: Auto
Try this: Use multiple exposures to capture light trails from cars
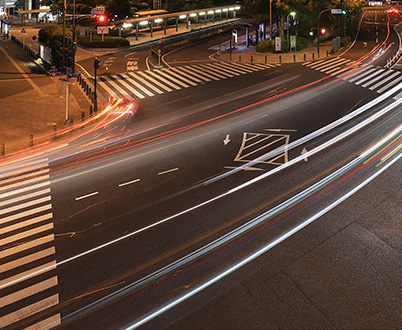
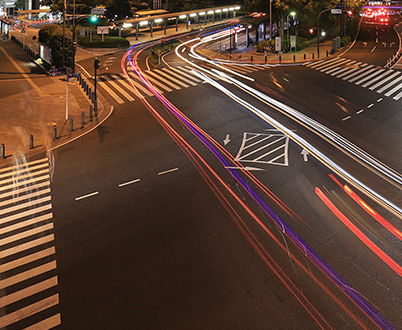
If you want to capture light trails from vehicles, I would recommend shooting from a pedestrian bridge. However, cars may not always pass at the right time. You could also enhance an image with light trails with the Multiple Exposures function. You could make your final image even more dynamic by layering many light trails and arranging them throughout your composition.

EOS 6D Mark II/ EF16-35mm f/4L IS USM/ FL: 16mm/ Aperture-priority AE (f/11, 8 sec, EV-0.7)/ ISO 100/ WB: Auto

EOS 6D Mark II/ EF16-35mm f/4L IS USM/ FL: 16mm/ Aperture-priority AE (f/11, 8 sec, EV-0.7)/ ISO 100/ WB: Auto

EOS 6D Mark II/ EF16-35mm f/4L IS USM/ FL: 16mm/ Aperture-priority AE (f/11, 8 sec, EV-0.7)/ ISO 100/ WB: Auto
In order to create a pan-focus effect and lengthen the exposure time to extend the trails, I narrowed the aperture to f/11. The image at the top was created by layering the above two exposures. For both shots, I waited until the traffic lights turned green on the street, and released the shutter as the cars set off and entered the image frame.
Technique 02: Capture beautiful nightscapes with Multi Shot Noise Reduction

EOS 6D Mark II/ EF16-35mm f/4L IS USM/ FL: 16mm/ Shutter-priority AE (f/4.5, 1/20 sec, EV-0.3)/ ISO 3200/ WB: Auto
Reduce noise with Multi Shot Noise Reduction
To take a noise-free nightscape photo with a low ISO speed, you need to use a tripod. However, it is hard to carry one around all the time. Sometimes, you might want to shoot by hand too, but when you increase the ISO speed in your attempt to capture a stable photo with minimal camera shake, you end up with image noise.
The Multi Shot Noise Reduction function is a useful feature for such situations. It captures four images consecutively with a press of the shutter button, and generates one image with low noise from them, right on the camera itself. This lets you release the shutter with confidence, even for night scenes where you might have had second thoughts shooting by hand previously.

Using Multi Shot Noise Reduction to remove unevenness of the sky
Images are more susceptible to noise at high ISO speeds when we use handheld shooting for nightscapes. Such noise becomes apparent when shooting normally. However, this effect is reduced if you turn on high ISO speed noise reduction. And if you choose the Multi Shot Noise Reduction option, noise can be reduced even more. The difference is obvious when you enlarge and compare a part of the photo.
High ISO speed NR: Off

EOS 6D Mark II/ EF16-35mm f/4L IS USM/ FL: 16mm/ Shutter-priority AE (f/4.5, 1/20 sec, EV-0.3)/ ISO 3200/ WB: Auto
High ISO speed NR: Standard

EOS 6D Mark II/ EF16-35mm f/4L IS USM/ FL: 16mm/ Shutter-priority AE (f/4.5, 1/20 sec, EV-0.3)/ ISO 3200/ WB: Auto
Multi Shot Noise Reduction

EOS 6D Mark II/ EF16-35mm f/4L IS USM/ FL: 16mm/ Shutter-priority AE (f/4.5, 1/20 sec, EV-0.3)/ ISO 3200/ WB: Auto
Composition tip: Images appear flat if there is no subject in the foreground
When you add depth to an image that is already quite vast and wide, the photo pulls you into the scene. To make an image look deeper, simply place a subject in the foreground as an accent. In the photo below, the image appears flat as there are no elements on the right side.

EOS 6D Mark II/ EF16-35mm f/4L IS USM/ FL: 16mm/ Shutter-priority AE (f/4, 1/20 sec, EV-0.3) /ISO 3200/ WB: Auto
For more tips on photographing at night, check out these articles:
One Location, Two Looks: Abstract Nightscapes – Tranquillity vs. Vibrancy
Night Photography: Adjusting Contrast for a Picturesque, Surreal-looking Image
Architectural Photography #4: Photographing Buildings at Night
In Focus: Night Photography
Receive the latest update on photography news, tips and tricks.
Be part of the SNAPSHOT Community.
Sign Up Now!
About the Author
A monthly magazine that believes that enjoyment of photography will increase the more one learns about camera functions. It delivers news on the latest cameras and features and regularly introduces various photography techniques.
Published by Impress Corporation
Born in Kanagawa Prefecture in 1988. Since 2010, he has been working as a nightscape photographer, not only shooting nightscape locations mainly in the Tokyo area but also throughout Japan. He runs the information site for nightscape spots “Nightscape FAN”


