How to Apply the Rule of Thirds in Portrait and Street Photography
Most people know that composition matters, but many beginner photographers may not know where to start. Instead of placing a subject smack in the middle of the frame, one can make a huge difference to a photo by applying the Rule of Thirds. Let’s see how this composition rule works for street and portrait photography.

EOS M5, EF-M55-200mm f/4.5-6.3 IS STM lens, f/4.5, 55mm, 1/1600sec, ISO320
Rule of Thirds: A Quick Guide
This rule breaks down a photo into a grid with nine equal parts, separated by two horizontal and vertical lines. These lines intersect four times, and along these points are where your subjects should be placed. By doing so, you draw your viewers’ eyes to one of the intersections in the most natural way.


EOS M5, EF-M55-200mm f/4.5-6.3 IS STM lens, f/5.0, 100mm, 1/1600sec, ISO320
To learn more about the Rule of Thirds, visit our guide here.
Portrait Photography
Portrait photography provides you with an excellent opportunity to practise using the Rule of Thirds, because unlike street photography, you have plenty of time to position your subject, find the composition, and get the right shot.

EOS M5, EF-M55-200mm f/4.5-6.3 IS STM lens, f/4.5, 55mm, 1/640sec, ISO320
Placing your subject at the centre of the photo is not the most appealing.
In the photo above, you will notice that the subject’s face is not in any of the four intersections, but at the dead centre of the photo. While this is naturally how we would see someone if we were looking directly at them, it doesn’t make for an appealing photo, and could be rather awkward.

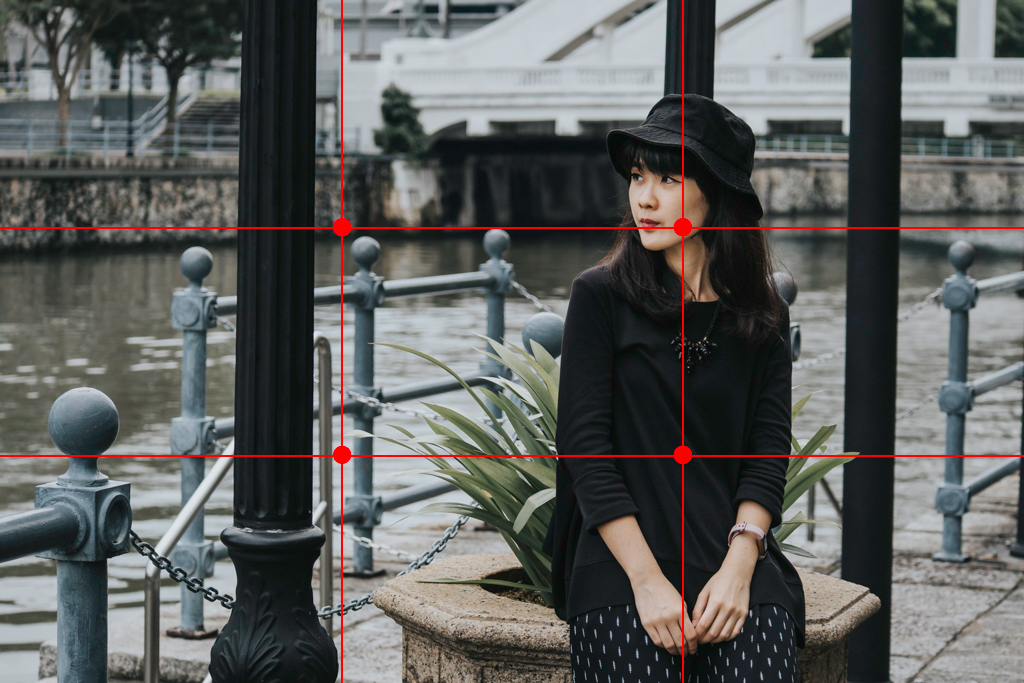
EOS M5, EF-M55-200mm f/4.5-6.3 IS STM lens, f/4.5, 55mm, 1/1250sec, ISO320
Placing your subject along a third of the frame makes for a more pleasant photo.
Align your subject in one of the intersections and in this case, resting on the vertical line on the right, the photo turns out much easier on the eyes. This creates a point of interest for your viewers and works perfectly for portrait and street photography. Additionally, when the subject is looking towards the left, he or she should be placed on the right intersection points (vice-versa) to avoid the mistake of not giving context and depth to the direction that he or she is looking at.
Since portraitures define its focal points on the subject matter, expressions and styling of the additional details like accessories needs to be immaculate. These supporting points can either complement or add contrast to the subject with its textural designs, colours or even shapes.
Learn how to use different camera modes for portraits: Photographing People: When to use Program Mode, Shutter Priority, and Aperture Priority.
Street Photography
Street photography is about the people and environment captured in its most natural state. This means that there is no posing, no directing, and no time to lose when a photograph opportunity presents itself. You will only get a few seconds to take a shot before your subject moves or is gone.
However, the principles of the Rule of Thirds still apply. You will capture engaging photographs by using the intersecting points as references for where to place your subjects.

EOS M5, EF-M55-200mm f/4.5-6.3 IS STM lens, f/6.3, 200mm, 1/1250sec, ISO320
To complement the natural human ‘scanning’ tendency to read from left to right, subject placement along the vertical line in the photo lets you have more control of the focal points. In instances where the subject is alone, the ‘scanning’ tendency allows the composition effect to be amplified when the subject is placed on the left-sided intersection line.
Want to learn which lenses to use for street photography? Here are a few tips on how to choose the right lens.
Receive the latest update on photography news, tips and tricks.
Be part of the SNAPSHOT Community.
Sign Up Now!


