


[Part 2] Image Quality and ISO Speed Basics. Zoom Lens and Built-in Flash Effect
Series Article introducing the basics of compact digital camera functions. Here in Part 2, let's learn about the angle-of-view using the zoom function, built-in flash effect, and basics on ISO speed and image quality settings. The IXUS series comes with the "Smart Auto" feature where you can capture charming photos easily. However, learning the fundamentals in photography can help improve your expressive power significantly, making your photographic experience even more enjoyable. (Reported by: Koichi Isomura)
Pages: 1 2
Utilizing the "Wide-angle" and "Telephoto" Focal Lengths
A characteristic of zoom lenses is that you can easily alter the area you wish to capture. Generally, the angle of view of a lens is expressed in terms of "focal length." Setting to the "wide-angle" side shortens the focal length, and captures a wider area, while setting to the "telephoto" side increases the focal length, allowing you to capture a larger view of distant objects.
You can capture a subject in the same size either at the wide-angle side from a close distance, or at the telephoto side from a distant position. However, note that the resulting depiction will be different due to the characteristics of the focal length, such as the perspective effect. By understanding such characteristics, you will find even greater joy in the photographic works you produce.
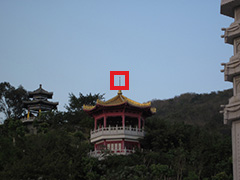
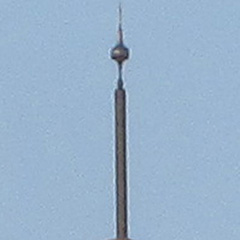
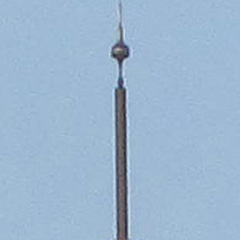
Changes in Area Captured with Focal Length
Captures a Wider Area at Wide-angle Side

Larger View of Distant Objects at Telephoto Side
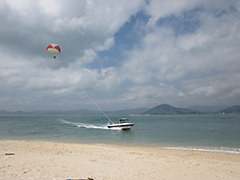
Zooming the lens to the wide-angle side captures a wider area, and stresses the perspective effect. Meanwhile, the telephoto side captures a larger view of distant objects, and creates a compressed sense of distance.
Changes in Impression and Expression of Background
Captures a Wider Background at Wide-angle Side

Simplifies the Background at Telephoto Side
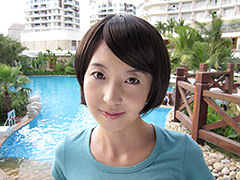
While you can capture a wide background by photographing the portrait subject from a close distance at the wide-angle side, the perspective effect is also emphasized at the same time, which may cause the face to appear distorted. Meanwhile, when the portrait subject is photographed at the telephoto side from a distant position, the area captured in the background is narrower, thus making it useful for preventing a cluttered impression. The telephoto side also comes in handy when you want to blur the background to bring out the portrait subject.
Making Effective Use of the Built-in Flash
You can make use of the built-in flash to illuminate a subject that is close to the camera while taking a shot. While the flash is generally used at dimly-lit locations, it can also be employed in a bright environment such as to brighten the face of a backlit subject that would otherwise appear dark. Light from the built-in flash reaches a range of about 2 to 4m, so it would have little effect on subjects located in the distance.
If you want to retain the atmosphere of the environment or capture a distant subject, you can choose a high ISO speed without using the built-in flash. To do so, set to the "Flash Off" mode, and take a shot with a high ISO speed.
Flash Photography at Night
Flash Off
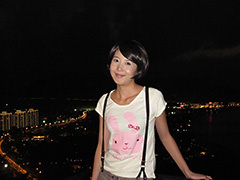
Flash On
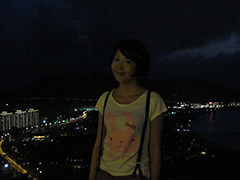
There are many cases where simply raising the ISO speed does not help to solve the problem, such as when you want to capture both the nightscape in the background and the portrait subject in front. In this case, select the "Handheld Night Scene" shooting mode so that the built-in flash is fired automatically to obtain clear results.
Flash Photography in the Day

Flash Off

Flash On
The built-in flash also comes in handy when you are shooting in the bright day. For scenes where the face of the portrait subject turns out dark due to backlight, for instance, firing the flash helps to brighten the shadowed face to produce a clear image.
Altering the ISO Speed Based on the Brightness
The ISO speed setting is used to determine the sensitivity of the image sensor inside the camera toward light. While selecting a higher ISO speed eases shooting at dimly-lit places, high ISO noise that occurs as a result may affect the image quality. If you are photographing at a sufficiently bright location, select a low ISO speed so that you can obtain a clear depiction with little noise.
The ISO speed menu comes with a convenient "Auto" option, which automatically selects an appropriate ISO speed according to the brightness of the surrounding environment so that noise can be minimized.
Examples of ISO Speed Setting
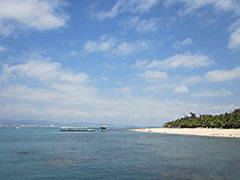
ISO 80
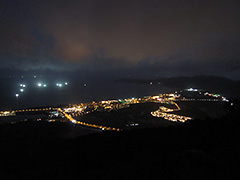
ISO 800
To capture a shot under the bright sun, as illustrated in the example shot using ISO 80, setting to a low ISO speed helps to produce a clear depiction with little noise. To obtain brighter results of a nightscape, such as the example shot using ISO 800, I selected a higher ISO speed.
Changes in Noise Level with ISO Speed
Auto (ISO 800)
The examples illustrate changes in the image quality with the ISO speed as well as the corresponding noise level in the shadow areas (IXUS 105 is used in this example). Noise is more likely to occur when a higher ISO speed is selected.
ISO 80


ISO 100


ISO 200


ISO 400


ISO 800


ISO 1600


Setting the Image Quality
In digital photography, the quality of the image data is determined by the "recording pixels" and "compression ratio" settings. The "L" recording pixels setting records an image in the largest number of pixels, allowing you to obtain sufficient resolution even when the photo is printed out in a large format. With the same pixel count, you can obtain a higher image quality with the "Super Fine" or the "Fine" setting whichever is provided, for a lower compression ratio.
In other words, combining the "L" and "Super Fine" settings gives you the best image quality. However, note that data size also increases as a result. To view an image on the computer screen or print it into a postcard size, the lower resolution of the "M3" setting suffices. If the recording media you are using has a small capacity, selecting a smaller data size allows you to record a larger number of images to the media.
Changes in Size with Recording Pixels Setting (Example)
* The number of pixels for each setting varies with the camera model.
L (Large): 4,000 × 3,000 pixels

W (Wide): 4,000 × 2,248 pixels

M1 (Middle 1): 3,264 × 2,448 pixels

M2 (Middle 2): 2,592 × 1,944 pixels

M3 (Middle 3): 1,600 × 1,200 pixels

S (Small): 640 × 480 pixels

With the "L" recording pixels setting, you can print out photos even in large formats. While shooting with a low pixel count allows you to reduce the data size, the image may not be reproduced accurately if there is insufficient resolution.
Changes in Image Quality with Compression Ratio
Even with the same number of recording pixels, the ability to reproduce details deteriorates when a higher compression ratio is selected. If there is no particular need to reduce the data size, and in order to obtain a high image quality, you are recommended to select the "Super Fine" or the "Fine " setting, whichever has the lower compression ratio.
Fine
Normal
* Example here are shot using the IXUS 105. Compression ration menu setting varies according to camera models.

